
Instructions / Assembly


INSTRUCTION SHEET
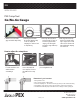
PEX Crimp Tool
Go/No-Go Gauge
PEX
1. Slide the correct slot on the
gauge around the crimped ring.
2. If the ring does not t into
the slot at all, then the crimp
is a “No-Go”. Adjust the
crimping force on the tool and
re-crimp the ring.
3. If the ring slides into the slot
and stops in the “Go” range at
least at one point, then the
crimp is good. The ring will
not t the go range all the way
around it.
4. If the ring slides all the way
into the slot, then the crimp
ring is compressed too small
and is a “No-Go”. Remove the
ring and adjust the crimping
force on the tool.
1. Open the handle, then
loosen the nut on the screw
with the numbers
surrounding it.
2. Push and rotate the screw.
Increase the number for
more crimp force. Decrease
the number for less crimp
force.
3. Push the screw back into
place and tighten the nut.
How to adjust the crimp force:
Illustration of a good connection:
1. Fitting shoulder location.
2. Pipe is cut square and stops at tting sholder.
3. Position the CrimpRing 1/8" - 1/4" from the end of the pipe, directly over two end ribs of the tting.
4. The CrimpRing is evenly compressed over the pipe and shows no evidence of uneven distortion.
5. The PEX material is uniformly compressed between the ribs, resulting in a leak-free, quality joint.
is-69PTKH_01/20/21
The Mosack Group, Inc.
Mint Hill, NC 28227
1.888.229.2874
www.apolloow.com