
Installation Guide
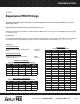

HOW TO INSTALL
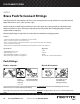
PEX connections
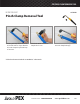
Crimp ring connection:
1. Fitting shoulder.
2. Pipe is cut squarely and stops at tting shoulder.
3. Position the ring or clamp 1/8" - 1/4" from the end of the pipe, over the
two ends ribs of the tting.
4. The ring or clamp is evenly compressed over the pipe.
5. The PEX material is uniformly compressed between the ribs, resulting
in a leak-free joint.
Customer Service: 1.888.229.2874 www.apolloow.com 13
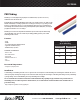
PEX CONNECTIONS
All Apollo PEX tools are pre-calibrated from the factory to perform up to 10,000 fastens.
If you feel your tool needs calibrating to perform a correct fasten, calibration instructions will be on the instruction sheet for your tool at
www.apolloow.com/literature.
Rings, clamps, and sleeves may be buried but should be wrapped with pipe insulation prior to burying.
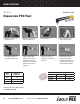
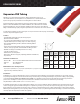
Pinch clamp connection:
1. Keep all components clean until ready for use. Dirt, water, or
other contaminants on mating contact surfaces of the clamp,
tubing, or tting can result in an inferior assembly. When in
doubt, wipe clean before assembly.
2. Cut PEX pipe squarely and remove burrs.
3. Slide ring or clamp over end of PEX pipe and pipe over tting to
the tting shoulder. Position ring 1/8"-1/4" from pipe end, over
the two ribs closest to the end of the tting.
4. Crimp accroding to tool directions.
5. Maximum root gap in nub of clamp after crimping is 0.08”. If the
gap exceeds this limit, the tool should be recalibrated. The
existing joint should be reclamped with a new clamp.
1/8"-1/4"
0.08"