CNX80 Pilot Guide 560-0984-00C Draft1.
CNX80 Pilot Guide 560-0984-00C Draft1.book Page 2 Tuesday, September 2, 2003 10:36 AM Airworthiness certification support for non-TSO functions is available from AT upon request (see the installation manual for details). This document and the information disclosed herein are proprietary information of Garmin AT. Neither this document nor the information contained herein shall be transmitted, reproduced, copied, or disclosed in any form or by any means without the written authorization of Garmin AT.
CNX80 Pilot Guide 560-0984-00C Draft1.book Page 1 Tuesday, September 2, 2003 10:36 AM Table of Contents Introduction . . . . . . . . . . . . . . . . . . . . . . . . . . . . . . . . . . . . . . . . . . . . . . . . . . . . .1 Controls . . . . . . . . . . . . . . . . . . . . . . . . . . . . . . . . . . . . . . . . . . . . . . . . . . . . . . . .2 Power/Volume . . . . . . . . . . . . . . . . . . . . . . . . . . . . . . . . . . . . . . . . . . . . . . . 2 Datacard . . . . . . . . . . . . . . . . . . . . . . . .
CNX80 Pilot Guide 560-0984-00C Draft1.book Page 2 Tuesday, September 2, 2003 10:36 AM Execute (Exec) . . . . . . . . . . . . . . . . . . . . . . . . . . . . . . . . . . . . . . . . . . . . . .27 Comment (Cmnt) . . . . . . . . . . . . . . . . . . . . . . . . . . . . . . . . . . . . . . . . . . . .27 Copy . . . . . . . . . . . . . . . . . . . . . . . . . . . . . . . . . . . . . . . . . . . . . . . . . . . . . .27 Discontinuity . . . . . . . . . . . . . . . . . . . . . . . . . . . . . . . . . . . . . . . . .
CNX80 Pilot Guide 560-0984-00C Draft1.book Page 1 Tuesday, September 2, 2003 10:36 AM Introduction This guide describes the operation of the CNX80 Color GPS/WAAS NavCom. The CNX80 provides a new, higher level of accuracy. integrity, integration, flight planning capability, and convenience for the pilot.
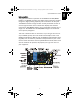
Controls CNX80 Pilot Guide 560-0984-00C Draft1.book Page 2 Tuesday, September 2, 2003 10:36 AM Apollo CNX80 Pilot’s Guide Controls Power/Volume The knob at the top left corner of the CNX80 controls power on/off and the radio volume. Push the PWR/VOL knob in to turn power on. Pull the knob out to turn power off. When the power knob is pulled out, a time-out message and counter will appear for five seconds.
CNX80 Pilot Guide 560-0984-00C Draft1.book Page 3 Tuesday, September 2, 2003 10:36 AM MENU/ENTER and Line Selection Keys When editing information, or a response is required, pressing this key accepts the value. In other cases, pressing this key will bring up a series of menu items on the right side of the display. The menu items are then selected by pressing the key to the right of it. Pressing the Menu/Enter key while the menu items are shown will make them disappear.
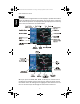
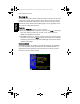
CNX80 Pilot Guide 560-0984-00C Draft1.book Page 4 Tuesday, September 2, 2003 10:36 AM Apollo CNX80 Pilot’s Guide Display Display The CNX80 uses a high-resolution color display to provide information about the different functions. Information and “smart keys” unique for each mode of operation are displayed. Sample displays with a description of common elements are shown below.
CNX80 Pilot Guide 560-0984-00C Draft1.book Page 5 Tuesday, September 2, 2003 10:36 AM Apollo CNX80 Pilot’s Guide Annunciation Description GPS Indicates when GPS is being used as the source. Appears in lower left corner of the display. VOR/ILS/LOC Indicates when VOR/ILS/LOC is being used as the source. Appears in lower left corner of the display. ENR Appears to the right of the “GPS” annunciator when in En Route mode.
CNX80 Pilot Guide 560-0984-00C Draft1.book Page 6 Tuesday, September 2, 2003 10:36 AM Apollo CNX80 Pilot’s Guide Start Up Starting Up The CNX80 performs internal checks and shows the status of the tests during start up. The startup screen, owner name (if entered), testing, position, and database information shows on the screen for several seconds and then shows the first Map page. It is not generally necessary to enter a GPS seed position. Power Up 1. Push the PWR/VOL knob in to turn on power. 2.
CNX80 Pilot Guide 560-0984-00C Draft1.book Page 7 Tuesday, September 2, 2003 10:36 AM Apollo CNX80 Pilot’s Guide Map Mode (MAP) 1. Press MAP to reach Map mode. Radio, Nav, Transponder, CDI, Annunciator, or pilot-customized information is shown on the left side of the display and the map display is shown on the right side. 2. There are four Map pages that you select by turning the Large knob. 3. Turn the Small knob to change the Map scale.
CNX80 Pilot Guide 560-0984-00C Draft1.
CNX80 Pilot Guide 560-0984-00C Draft1.book Page 9 Tuesday, September 2, 2003 10:36 AM Apollo CNX80 Pilot’s Guide Panning (PAN) The Panning feature of the Map mode allows you to check out the area near your present position. You can activate the Panning feature by pressing the PAN key or by pressing the CRSR button on the Small knob when in Map mode. Panning The cursor starts at your present position when you start the Pan function. The crosshair cursor remains in the center of the map display.
CNX80 Pilot Guide 560-0984-00C Draft1.book Page 10 Tuesday, September 2, 2003 10:36 AM Apollo CNX80 Pilot’s Guide Direct-To Direct-To Press the Direct-To key to get to the Direct-To function which allows you to quickly set up a flight from your present position directly to a selected waypoint.
CNX80 Pilot Guide 560-0984-00C Draft1.book Page 11 Tuesday, September 2, 2003 10:36 AM Apollo CNX80 Pilot’s Guide Destination (Dest) The Dest Menu selection key replaces the active flight plan with a direct course to the displayed waypoint. You can choose a waypoint from your flight plan (WPTS) or another waypoint from the database (DB). 1. When you press Direct-To, the default waypoint shown will be the highlighted waypoint in your flight plan when the WPTS smart key is highlighted.
CNX80 Pilot Guide 560-0984-00C Draft1.book Page 12 Tuesday, September 2, 2003 10:36 AM Apollo CNX80 Pilot’s Guide Direct-To Course To (CrsTo) Course To operation allows you to select an inbound to the intercept course for the selected waypoint. The default course for the operation is the course from the present position to the selected waypoint.
CNX80 Pilot Guide 560-0984-00C Draft1.book Page 13 Tuesday, September 2, 2003 10:36 AM Apollo CNX80 Pilot’s Guide When the Course From operation is executed, the CDI will indicate FROM and the flightplan will go into suspend mode (SUSP); it will not automatically sequence the flightplan waypoints. 1. Press Direct-To. Select a new waypoint, if desired, with the Large and Small knobs. 2. Press CrsFr. A map is displayed showing the selected course. 3. Change the course bearing, if desired.
CNX80 Pilot Guide 560-0984-00C Draft1.book Page 14 Tuesday, September 2, 2003 10:36 AM Direct-To Apollo CNX80 Pilot’s Guide terminate OBS mode by making another flight leg active or going Direct-To another waypoint. 1. Press Direct-To. With the WPTS smart key highlighted, select a waypoint in the flight plan with the Large knob or with the DB smart key highlighted, select a new waypoint outside of your flight plan with the Large and Small knobs. 2. Press OBS.
CNX80 Pilot Guide 560-0984-00C Draft1.book Page 15 Tuesday, September 2, 2003 10:36 AM Apollo CNX80 Pilot’s Guide Nearest Waypoints (NRST) The Nearest Waypoint Search function allows you to search for the 20 waypoints nearest to your present position in each waypoint type. There are eight waypoints types: Airport, VOR, NDB, INT, User, FSS (Flight Service Station), and Air Route Traffic Contol Center (ARTCC).
CNX80 Pilot Guide 560-0984-00C Draft1.book Page 16 Tuesday, September 2, 2003 10:36 AM Apollo CNX80 Pilot’s Guide 4. Press <-SBY to insert the highlighted frequency into the Standby position or <-A-> to insert the frequency into the Active position. Nearest Info on Nearest Waypoint 1. Press NRST. 2. Press the key for the waypoint type you want to search. 3. Turn the Large knob to select the nearest waypoint. 4. Press the INFO button. Fly Direct-To a Nearest Waypoint 1. Press NRST. 2.
CNX80 Pilot Guide 560-0984-00C Draft1.book Page 17 Tuesday, September 2, 2003 10:36 AM Apollo CNX80 Pilot’s Guide Information on Waypoints (INFO) Info mode allows you to view information about the selected waypoint. Examples of selecting a waypoint can be: active Wpt in flight plan, item selected from Nearest Waypoint list, item selected in Pan mode, etc. VOR Information • Identifier, city, state, country, bearing and distance from present position, frequency, lat/lon coordinates, and magnetic variation.
CNX80 Pilot Guide 560-0984-00C Draft1.book Page 18 Tuesday, September 2, 2003 10:36 AM Apollo CNX80 Pilot’s Guide Com Radio (COM) Press COM to activate control of the internal Com Radio. All other functions will continue to function normally, such as active flight plans. Turn the PWR/VOL knob to control the Com volume. Squelch (SQ) Press the SQ key to toggle the Com receiver squelch function.
CNX80 Pilot Guide 560-0984-00C Draft1.book Page 19 Tuesday, September 2, 2003 10:36 AM Apollo CNX80 Pilot’s Guide 4. Press the Menu/Enter key if no choice is desired. Emergency Press the Emrgncy key to insert the Emergency frequency (121.500) as the Standby frequency. Flip/Flop Press the <-> (flip/flop) key to swap the Active and Standby frequencies. Signal 1. Press Menu/Enter and then the Signal key to bring up the RF Level and Noise Level values. The Signal menu label will be highlighted.
CNX80 Pilot Guide 560-0984-00C Draft1.book Page 20 Tuesday, September 2, 2003 10:36 AM Apollo CNX80 Pilot’s Guide Com Radio Save Channel This function allows you to save and name the current Active frequency in the User frequency list. 1, Press Menu/Enter and then the Save Chnl key to bring up the Save Channel box. The Save Chnl menu label will be highlighted. 2. Press the Save Chnl key again to turn the value display off. 3. Turn the Small knob to change the value. 4.
CNX80 Pilot Guide 560-0984-00C Draft1.book Page 21 Tuesday, September 2, 2003 10:36 AM Apollo CNX80 Pilot’s Guide Nav Radio (VOR) Press VOR to activate control of the internal Nav Radio. All other functions will continue to function normally, such as active flight plans. Note that distances, such as to a Localizer, are based on calculated distances from GPS information. ID Press the ID key to toggle the Nav audio between Off, On and Voice only.
CNX80 Pilot Guide 560-0984-00C Draft1.book Page 22 Tuesday, September 2, 2003 10:36 AM Apollo CNX80 Pilot’s Guide ID/To/Fr When the Active frequency is a VOR, you can view the current course To/Fr the VOR as well as the Identifier and distance. This value appears between the Active and Standby VOR frequencies and to the right. Press Menu/Enter and then each press of the ID/To/Fr key will toggle between the display of the ID (Identifier), To bearing, or From bearing values.
CNX80 Pilot Guide 560-0984-00C Draft1.book Page 23 Tuesday, September 2, 2003 10:36 AM Apollo CNX80 Pilot’s Guide 5. Turn the Large knob to move to the Type selection. Turn the Small knob to choose between Differential, Ground, or Air. Differential means the value was referenced to another calibrated source or unit. Ground means the unit was calibrated while on the ground. Air means the unit was calibrated while in the air. 6. Turn the Large knob to move to the Location selection.
CNX80 Pilot Guide 560-0984-00C Draft1.book Page 24 Tuesday, September 2, 2003 10:36 AM Apollo CNX80 Pilot’s Guide Transponder Control (XPDR) If a remote Apollo SL70 transponder is connected and setup to operate with the CNX80, the Transponder Control Mode will allow you to control your transponder from the CNX80 front panel. Press XPDR to activate Transponder mode. Ident Press the IDNT key once to activate the Ident mode.
CNX80 Pilot Guide 560-0984-00C Draft1.book Page 25 Tuesday, September 2, 2003 10:36 AM Apollo CNX80 Pilot’s Guide VFR Press the VFR key to select the VOR 1200 squawk code. TrgrSpd The TrgrSpd key allows you to edit the aircraft speed that will switch the transponder automatically between active and standby. See the Auto mode description below. Auto When Auto mode is selected, the transponder will automatically become active after the aircraft reaches the Trigger speed.
CNX80 Pilot Guide 560-0984-00C Draft1.book Page 26 Tuesday, September 2, 2003 10:36 AM Apollo CNX80 Pilot’s Guide Flight Planning (FPL) The Flight Planning function lets you set up and store flight plans where you can name the flight plan, insert a series of waypoints, and then add comments. Flightplan View Display the active flight plan. Back Press the BACK smart key to return to the previous display. Edit Use this feature to edit an existing flight plan.
CNX80 Pilot Guide 560-0984-00C Draft1.book Page 27 Tuesday, September 2, 2003 10:36 AM Apollo CNX80 Pilot’s Guide Save Press the Save key to save the active flight plan to memory. If a flight plan exists with the same name, the CNX80 will add a suffix (such as a “2”) to the flight plan to show the difference. Press Menu/Enter for Yes or CLR for No. Edit Pressing the Edit key creates a copy of the active flight plan. Making a copy protects you from accidently changing your active flight plan.
CNX80 Pilot Guide 560-0984-00C Draft1.book Page 28 Tuesday, September 2, 2003 10:36 AM Apollo CNX80 Pilot’s Guide resolving any conflicts by turning the Large knob to highlight it and then pressing the CLR key. Deleting a discontinuity results in a fix-to-fix direct nav path between those waypoints. Pilot Nav Legs When the “Pilot Nav” message appears on a leg in your flight plan it means the CNX80 will not provide guidance on that leg.
CNX80 Pilot Guide 560-0984-00C Draft1.book Page 29 Tuesday, September 2, 2003 10:36 AM Apollo CNX80 Pilot’s Guide 6. Select by Location a. With the first character of the Identifier highlighted, press the CRSR knob in. The whole Identifier field will be highlighted. Now turn the Large knob CCW one turn to highlight the Location field. b. Turn the Small knob to display the facilities in alphabetic sequence. Steps for Setting Up a Simple Flight Plan 1. Press the FN key (if necessary) and then the FPL key.
CNX80 Pilot Guide 560-0984-00C Draft1.book Page 30 Tuesday, September 2, 2003 10:36 AM Apollo CNX80 Pilot’s Guide Steps for Setting Up an IFR Flight Plan Procedures can be inserted at the time you are creating the flight plan (as described here) or later with the Procedure (PROC) function. Note If datum for an airport is unknown, no terminal or instrument procedures will be displayed. The Jeppesen database can only show one procedure type per runway (i.e. ILS, GPS, VOR).
CNX80 Pilot Guide 560-0984-00C Draft1.book Page 31 Tuesday, September 2, 2003 10:36 AM Apollo CNX80 Pilot’s Guide B. Add Departure Procedure (DP) Departure procedures may be modified in either the Flight Plan (FPL) or Procedure (PROC) modes. The Procedure mode method is shown. 1. In Flight Plan mode, highlight the flight plan name and press EXEC. 2. Press FN and then PROC. 3. In the Origin section press the Depart key. Note Guidance is not provided for Pilot Nav legs or Vectored DPs. 4.
CNX80 Pilot Guide 560-0984-00C Draft1.book Page 32 Tuesday, September 2, 2003 10:36 AM Flightplan Apollo CNX80 Pilot’s Guide 5. Press ->Wpt to insert a waypoint or ->Arwy to insert an airway following the highlighted leg. If the airway choice is not available there are no airways available for that waypoint. Delete a waypoint or airway by pressing the CLR key. 6. Press XPND to display all of the parts of the flight plan. 7.
CNX80 Pilot Guide 560-0984-00C Draft1.book Page 33 Tuesday, September 2, 2003 10:36 AM Apollo CNX80 Pilot’s Guide 2. Select the desired leg of your flight plan with the Large knob (WPTS smart key is highlighted). 3. Press the FlyLeg key to activate the selected leg. E. Add Arrival Procedures (STARS) 1. Press the Arrival key in the Destination section. 2. Use the Large and Small knobs to select the runway, arrival, and transition. 3. Press Menu/Enter. F. Add Approach Procedures 1. Press the Appr key.
CNX80 Pilot Guide 560-0984-00C Draft1.book Page 34 Tuesday, September 2, 2003 10:36 AM Apollo CNX80 Pilot’s Guide Timer (TMR) The Timer Mode allows you to set or view several timing functions. You can set one or two timers as count up or count down timers. You can view the Trip Time, Trip Distance, Flight Time, and Flight Distance. The Trip Time and Trip Distance show the time and distance traveled since being reset.
CNX80 Pilot Guide 560-0984-00C Draft1.book Page 35 Tuesday, September 2, 2003 10:36 AM Apollo CNX80 Pilot’s Guide Trigger Speed Set the Trigger Speed for the speed where you want the Flight Time and Distance counters to start and stop. 1. Turn the Large knob to highlight Trigger Speed. 2. Press the CRSR knob in. The Trigger Speed will now be highlighted. 3. Turn the Small knob to the desired speed and then press the CRSR knob again or press the Menu/Enter key.
CNX80 Pilot Guide 560-0984-00C Draft1.book Page 36 Tuesday, September 2, 2003 10:36 AM Apollo CNX80 Pilot’s Guide Using Your Checklist 1. Press FN and then the CHK key to start the Checklist function. 2. Turn the Large knob to highlight the desired list and then press Enter/Menu. The selected list will be displayed with the first line highlighted. 3. Press the CHK key, or the Menu/Enter key, as you check each item in the list. After pressing the CHK key, the next item in the list will be highlighted. 4.
CNX80 Pilot Guide 560-0984-00C Draft1.book Page 37 Tuesday, September 2, 2003 10:36 AM Apollo CNX80 Pilot’s Guide User Waypoints (USER) The CNX80 can hold up to 500 user-defined waypoints. These waypoints can be based on either lat/lon position or range and bearing from a reference point. In the User Waypoint function, you can create new waypoint, edit existing ones, or search for a User waypoint. Creating or Editing a User Waypoint 1. Press FN and then the USER key to start the User Waypoint function.
CNX80 Pilot Guide 560-0984-00C Draft1.book Page 38 Tuesday, September 2, 2003 10:36 AM Apollo CNX80 Pilot’s Guide System Mode (SYS) The System mode provides information about GPS status (GPS), System Software Versions (VERS), and allows for configuring the system for individual installations (CNFG). GPS Status 1. Press FN and then the SYS key to reach the System functions. 2. The GPS function shows a map of the satellite locations with ID and other system information.
CNX80 Pilot Guide 560-0984-00C Draft1.book Page 39 Tuesday, September 2, 2003 10:36 AM Apollo CNX80 Pilot’s Guide Configuration The Configuration page lets you customize many of the settings and unit measurements for your installation or local needs. 1. Press FN and then the CNFG key to reach the Configuration functions. 2. Turn the Large knob to highlight the value you want to change. The green arrow on the right side of the display indicates the direction to turn the Large knob to view more choices. 3.
CNX80 Pilot Guide 560-0984-00C Draft1.book Page 40 Tuesday, September 2, 2003 10:36 AM Apollo CNX80 Pilot’s Guide Parallel Track (PTK) The Parallel Track function allows you to create a parallel course offset of 1 to 99 nm to the left or right of your current flight plan. You must have FROM and TO waypoints defined. Parallel Track cannot be activated if you set a course using Direct-To. Choose Left or Right of the current course, and the offset distance.
CNX80 Pilot Guide 560-0984-00C Draft1.book Page 41 Tuesday, September 2, 2003 10:36 AM Apollo CNX80 Pilot’s Guide 4. Press the Menu/Enter key or the CRSR knob when you are finished making selections. 5. Press the Activate or Standby key to activate or deactivate the Parallel Track values selected. Simulator Mode The CNX80 has a built-in simulator so you can practice with your unit without being in flight. You can set your present position, ground speed, and track.
CNX80 Pilot Guide 560-0984-00C Draft1.book Page 42 Tuesday, September 2, 2003 10:36 AM Apollo CNX80 Pilot’s Guide Present Position (PPOS) Press the PPOS key to bring up a display for selecting a Lat/Lon position for your ownship starting point. 1. Turn the Large knob to select the item to change. 2. Turn the Small knob to change the values. 3. Press Menu/Enter to accept the displayed values or press CLR to cancel the selection and return to the previous display.
CNX80 Pilot Guide 560-0984-00C Draft1.book Page 43 Tuesday, September 2, 2003 10:36 AM Apollo CNX80 Pilot’s Guide Text Messages Message Description Inside of x, Within x nm of x, Within x min of Special Use Area alert. Pilot awareness of upcomx ing pilot action required. For Loaded Approach Do NOT use GPS For Primary Navigation Guidance Selected approach does not meet requirements for primary guidance by GPS. PTK end in x sec Parallel track course ending. GPS Fault Code: xxxx GPS error report.
CNX80 Pilot Guide 560-0984-00C Draft1.book Page 44 Tuesday, September 2, 2003 10:36 AM Apollo CNX80 Pilot’s Guide Message Description Initiating Manual Track Using Manual Track, Simulator mode only. Speed, and Altitude Steep Turn Ahead (or others) Pilot awareness. Arrival (or) Arrival in x sec Pilot awareness. Pilot Nav (or) Pilot Nav in x sec Pilot awareness. DISCONTINUITY Ahead Modify flight plan or perform Direct-To function.
CNX80 Pilot Guide 560-0984-00C Draft1.
CNX80 Pilot Guide 560-0984-00C Draft1.book Page 2 Tuesday, September 2, 2003 10:36 AM © 2003 by Garmin AT, Inc. 2345 Turner Rd., S.E. Salem, OR 97302 U.S.A. Phone 503.581.8101 800.525.6726 In Canada 800.654.3415 FAX 503.364.2138 http://www.garminat.