
User`s manual

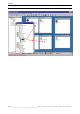
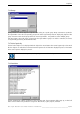
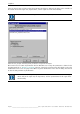
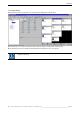
Table Of Contents
- Preliminary remarks
- Introduction
- New functions
- Installation
- Best practice
- Requirements
- Used ports
- Setup
- Upgrade from Apollo 1.3 to Apollo 1.4
- Upgrade from Apollo 1.4 to Apollo 1.4SR1
- Upgrading from Apollo 1.4 to Apollo 1.5
- Upgrading from Apollo 1.5 to Apollo 1.6
- Upgrading from Apollo 1.6 to Apollo 1.7
- Upgrading from Apollo 1.7 to Apollo 1.8
- Upgrading from Apollo 1.8 to Apollo 1.9
- Upgrading the Display Wall configuration
- Control Room Configurator
- Viewer
- Concept
- Apollo 1.9 Viewers
- Limitations
- Memory requirements (minimal RAM size)
- Communication memory
- Requirements
- Steps required to configure the FRG Viewer
- Steps required to configure the Visu Viewer
- Steps required to configure the Cottus Viewer
- Steps required to configure the VNC Viewer
- Steps required to configure the ProViewer
- Steps required to configure the Web Viewer
- Steps required to configure the MPEG Viewer
- Steps required to configure the VTplus Viewer
- Launching Viewer
- Controlling Viewers
- VNC Viewer
- Explorer
- Starting the Explorer
- Explorer User Interface
- Object Tree
- Source Tree View
- Explorer workspace
- Explorer menu bar
- Help menu
- Remote Desktop menu
- Layout Selector menu
- Explorer tool bar
- Device Manager in the Explorer
- Explorer Context Menu
- Drag&Drop functionality
- Layout Editor
- Desktop Server
- Project Backup
- Command Interface
- Device command Interface
- Desktop command Interface
- Viewer command Interface
- Apollo Explorer command interface
- Apollo Layout Editor command interface
- Apollo Layout Selector command interface
- Apollo Remote Desktop command interface
- Apollo Database Convertor command interface
- Apollo Window Detector command interface
- Control Room Bus services
- Control Room Bus
- Serial command interface
- TCPIP command interface
- Application management
- License management
- Time synchronization
- Log file
- Security Provider
- Defining accessGroups
- Configuration of restricted objects
- Permissions
- Restrictions for regions
- Restrictions for layouts
- Restrictions for shortcuts
- Restrictions for advanced menus
- Window Properties|Description
- Window Properties|Sizable
- Window Properties|Always on Top
- Window Properties|Visible
- Edit|Invisible Windows
- Edit|Keyboardinput
- Edit|CommandLine
- Edit|Permissions
- Edit|SaveLayout
- Customized configuration and uninstallation of Apollo
- Soap API Service
- Appendix
- Hotline

7. Explorer
224/402
_________________________________________________
Barco – Apollo – DOC-3197-2 – user's manual – Revision 08 – November 2006
7.9.2 Connect
Clicking on the connect menu item opens a dialog listing all Desktop Servers managed from the Control Room
Bus. Select a Desktop Server to connect with. Online indicates that the respective Desktop Server has been
launched. Starting and closing Desktop Servers result in adding or removing the online indication.
As soon as the Desktop Server has been launched, the connection is established and the layouts which can be
loaded into this region are displayed with their respective icons.
When loading a layout, its name will be shown in the stack area.
7.9.3 Unload all layouts
Select Unload All Layouts to remove all loaded layouts. The unloaded layouts are removed from the layout stack,
too.
7.9.4 Reload layouts
If a layout that has been manipulated on the Display Wall is to be reset to its original state select Reload. This
command re-arranges the windows as defined in the layout.
In this mode of operation the buttons of the loaded layouts appear released. Pressing the respective button then
reloads the layout.
Reloading layout does not require to unload the layout. Windows are re-arranged according the
definitions in the layout database without having to close applications first.
Changes made in the Layout Editor on a database of a Display Wall which is connected with the Layout Selector
are immediately applied. However, new layouts or deleted layouts are only visible when re-starting the Layout
Selector.