
User`s manual
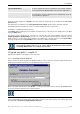

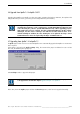


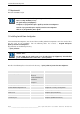
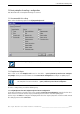
Table Of Contents
- Preliminary remarks
- Introduction
- New functions
- Installation
- Best practice
- Requirements
- Used ports
- Setup
- Upgrade from Apollo 1.3 to Apollo 1.4
- Upgrade from Apollo 1.4 to Apollo 1.4SR1
- Upgrading from Apollo 1.4 to Apollo 1.5
- Upgrading from Apollo 1.5 to Apollo 1.6
- Upgrading from Apollo 1.6 to Apollo 1.7
- Upgrading from Apollo 1.7 to Apollo 1.8
- Upgrading from Apollo 1.8 to Apollo 1.9
- Upgrading the Display Wall configuration
- Control Room Configurator
- Viewer
- Concept
- Apollo 1.9 Viewers
- Limitations
- Memory requirements (minimal RAM size)
- Communication memory
- Requirements
- Steps required to configure the FRG Viewer
- Steps required to configure the Visu Viewer
- Steps required to configure the Cottus Viewer
- Steps required to configure the VNC Viewer
- Steps required to configure the ProViewer
- Steps required to configure the Web Viewer
- Steps required to configure the MPEG Viewer
- Steps required to configure the VTplus Viewer
- Launching Viewer
- Controlling Viewers
- VNC Viewer
- Explorer
- Starting the Explorer
- Explorer User Interface
- Object Tree
- Source Tree View
- Explorer workspace
- Explorer menu bar
- Help menu
- Remote Desktop menu
- Layout Selector menu
- Explorer tool bar
- Device Manager in the Explorer
- Explorer Context Menu
- Drag&Drop functionality
- Layout Editor
- Desktop Server
- Project Backup
- Command Interface
- Device command Interface
- Desktop command Interface
- Viewer command Interface
- Apollo Explorer command interface
- Apollo Layout Editor command interface
- Apollo Layout Selector command interface
- Apollo Remote Desktop command interface
- Apollo Database Convertor command interface
- Apollo Window Detector command interface
- Control Room Bus services
- Control Room Bus
- Serial command interface
- TCPIP command interface
- Application management
- License management
- Time synchronization
- Log file
- Security Provider
- Defining accessGroups
- Configuration of restricted objects
- Permissions
- Restrictions for regions
- Restrictions for layouts
- Restrictions for shortcuts
- Restrictions for advanced menus
- Window Properties|Description
- Window Properties|Sizable
- Window Properties|Always on Top
- Window Properties|Visible
- Edit|Invisible Windows
- Edit|Keyboardinput
- Edit|CommandLine
- Edit|Permissions
- Edit|SaveLayout
- Customized configuration and uninstallation of Apollo
- Soap API Service
- Appendix
- Hotline

4. Installation
Barco – Apollo – DOC-3197-2 – user's manual – Revision 08 – November 2006
__________________________________________________
31/402
Operator Workstation The client components have to be installed on any network computer
used to manipulate the Display Wall via the interactive applications.
ProServer This component has to be installed on every workstation which
screen should be scraped or which has to be controlled by means of
the RemotePointer application.
Select the desired component. If Custom is selected, define the components to be installed in the Select Com-
ponents dialog
The required files are installed to the C:\Program Files\Barco Apollo directory unless otherwise indicated.
The Control Room Bus is installed as a service as well and Apollo shortcuts are generated.
Installation is a completely automatic process.
The Settings dialog is displayed once installation has finished. Enter a directory for your Apollo project. Use OK to
end the Settings dialog.
The system can be reconfigured for any project at any time after the initial installation using the shortcut
Start|Programs|Barco Apollo|Settings, see also Settings. The project directory including the subdirectory for the
Apollo database is created during the installation. This subdirectory is directly accessed by the Layout Editor.
Share this sub directory if the Layout Editor is to be started on a different workstation.
In case of Apollo has been installed on an WinXP platform, make sure that the Apollo
project directory allows write access for a user. Change the permission of this directory
accordingly. Without write access, Apollo cannot be run.
4.5 Upgrade from Apollo 1.3 to Apollo 1.4
Upgrading from Apollo 1.3 to Apollo 1.4 takes two steps:
4.5.1 1. Converting the Apollo Database
Call the database converter program. Use Windows Explorer to find and click on the file C:\Program Files\Barco
Apollo\Program\Databaseconvertor.exe. The following dialog is displayed:
Click on the button with the three dots (Browse …) and select the Apollo database. Click on the Convert button
to start the conversion process for the required database.
Only a database generated with Apollo Release 1.1, 1.2 or 1.3 can be converted.
If the Apollo database includes regions, and you want to preserve them, the option Use Regions has to be
checked. If this option is not checked, the regions will be hidden. If later required, they can be shown again using
the Layout Editor (Properties | Display Wall | Use Regions)