
User`s manual
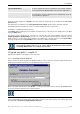


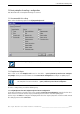
Table Of Contents
- Preliminary remarks
- Introduction
- New functions
- Installation
- Best practice
- Requirements
- Used ports
- Setup
- Upgrade from Apollo 1.3 to Apollo 1.4
- Upgrade from Apollo 1.4 to Apollo 1.4SR1
- Upgrading from Apollo 1.4 to Apollo 1.5
- Upgrading from Apollo 1.5 to Apollo 1.6
- Upgrading from Apollo 1.6 to Apollo 1.7
- Upgrading from Apollo 1.7 to Apollo 1.8
- Upgrading from Apollo 1.8 to Apollo 1.9
- Upgrading the Display Wall configuration
- Control Room Configurator
- Viewer
- Concept
- Apollo 1.9 Viewers
- Limitations
- Memory requirements (minimal RAM size)
- Communication memory
- Requirements
- Steps required to configure the FRG Viewer
- Steps required to configure the Visu Viewer
- Steps required to configure the Cottus Viewer
- Steps required to configure the VNC Viewer
- Steps required to configure the ProViewer
- Steps required to configure the Web Viewer
- Steps required to configure the MPEG Viewer
- Steps required to configure the VTplus Viewer
- Launching Viewer
- Controlling Viewers
- VNC Viewer
- Explorer
- Starting the Explorer
- Explorer User Interface
- Object Tree
- Source Tree View
- Explorer workspace
- Explorer menu bar
- Help menu
- Remote Desktop menu
- Layout Selector menu
- Explorer tool bar
- Device Manager in the Explorer
- Explorer Context Menu
- Drag&Drop functionality
- Layout Editor
- Desktop Server
- Project Backup
- Command Interface
- Device command Interface
- Desktop command Interface
- Viewer command Interface
- Apollo Explorer command interface
- Apollo Layout Editor command interface
- Apollo Layout Selector command interface
- Apollo Remote Desktop command interface
- Apollo Database Convertor command interface
- Apollo Window Detector command interface
- Control Room Bus services
- Control Room Bus
- Serial command interface
- TCPIP command interface
- Application management
- License management
- Time synchronization
- Log file
- Security Provider
- Defining accessGroups
- Configuration of restricted objects
- Permissions
- Restrictions for regions
- Restrictions for layouts
- Restrictions for shortcuts
- Restrictions for advanced menus
- Window Properties|Description
- Window Properties|Sizable
- Window Properties|Always on Top
- Window Properties|Visible
- Edit|Invisible Windows
- Edit|Keyboardinput
- Edit|CommandLine
- Edit|Permissions
- Edit|SaveLayout
- Customized configuration and uninstallation of Apollo
- Soap API Service
- Appendix
- Hotline

5. Control Room Configurator
38/402
__________________________________________________
Barco – Apollo – DOC-3197-2 – user's manual – Revision 08 – November 2006
5.1 Requirements
Microsoft Visio2000 or higher
In case of Visio 2003, the follwing settings must be made:
Macro Security: medium (or low)
File path settings (Tools|Options)
Templates: C:\Program Files\Barco Apollo\Control Room Configurator
Stencils: C:\Program Files\Barco Apollo\Control Room Configurator
Add-ons: C:\Program Files\Barco Apollo
5.2 Installing Control Room Configurator
If the Control Room Configurator was selected when installing individual components and if the standard direc-
tory was used for the installation, then the following folder was created: ... Program Files\Barco
Apollo\Control Room Configurator.
Copy this folder to the following directory:
… \Visio\Solutions
This refers to Visio 2000 only. For higher versions of Visio, the above mentioned settings
must be done!
For Visio 2000, also the paths can be set as described above (Tools|Options). This will allow
you to work with directories other than …\Visio\Solutions.
Now all of the following files are located in the directory …\Visio\Solutions\Control Room Configurator:
Notes
Resources (Folder) Apollo.lic
Clkserv.cn
Excluded Windows.ini
Pmxtext.inc
Startup.ini
Examples (Folder) Examples.vsd Configuration examples:
Control Room Configuration.vst Template for creating a configuration
Connectors.vss Templates (Connections)
Devices.vss Templates (Barco Hardware)
Software.vss Templates (Apollo Software)
Third Party.vss Templates (Additional Products)