Apple Video System User’s Manual
K Apple Computer, Inc. © 1996 Apple Computer, Inc. All rights reserved. Under the copyright laws, this manual may not be copied, in whole or in part, without the written consent of Apple. Your rights to the software are governed by the accompanying software license agreement. The Apple logo is a trademark of Apple Computer, Inc., registered in the U.S. and other countries.
C O N T E N T S Communications regulation information iv Preface vii 1 Installing the Card and Software and Connecting Video Equipment 1 What you should have 2 Installing the video input card 2 Installing the software 41 Connecting video equipment 43 2 Learning About the Software 51 Opening the Apple Video Player 52 Getting help 53 Choosing the correct video source 54 Adjusting the sound 56 Adjusting the picture 58 Changing the video window size 59 Changing the window color 60 Setting the video in
Communications regulation information FCC statement This equipment has been tested and found to comply with the limits for a Class B digital device in accordance with the specifications in Part 15 of FCC rules. See instructions if interference to radio or television reception is suspected. Radio and television interference The equipment described in this manual generates, uses, and can radiate radiofrequency energy.
This product was tested for FCC compliance under conditions that included the use of Apple peripheral devices and Apple shielded cables and connectors between system components. It is important that you use Apple peripheral devices and shielded cables and connectors between system components to reduce the possibility of causing interference to radios, television sets, and other electronic devices.
P R E F A C E This manual tells you how to install and use the video input card and software, and connect video equipment, so that you can m view video from a variety of sources in a window that you can move or resize m adjust the color and sound m capture a single image or a series of images on disk vii
C H A P T E R 1 Installing the Card and Software and Connecting Video Equipment This chapter covers installing the video input card and software. It also shows how to connect video equipment to the card. If you purchased your computer with the video input card already installed, go to the section “Connecting Video Equipment,” later in this chapter.
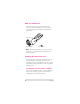
What you should have Check your package to make sure you have both the video input card and an attachment screw. Your package also contains floppy disks from which you will install the software later. Video input card Grounding clip Attachment screw The grounding clip may be a separate piece in your package. If so, you will attach it by following instructions later in the manual.
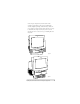
Your compact computer may look like either of the computers pictured below; the steps for installing the card vary slightly depending on which model you have. If your computer looks like Style A, follow the first set of steps to install the video input card. If your system looks like Style B, skip to the second set of steps, “Installing the Card in Style B.
Installing the card in Style A 1 Make sure you save any open documents and quit any open applications. Then turn off the computer. m Choose Shut Down from the Special menu, or press the Power key on the keyboard. m Then press the power switch at the back of the computer. Press the side of the switch marked with the j symbol. 2 Unplug all the cables except the power cord from your computer. Leaving the power cord plugged in helps protect the computer from electrostatic discharge damage.
3 Use a screwdriver to remove the screws from the back panel. Your computer may have only two screws (on either side of the back panel) to remove. Even if the back of your computer looks different, all the ports should be in the same location as pictured here. Note: Remove these screws. (Your computer may have only two screws.
4 With your fingertips, locate the two latches on the underside of the computer’s case. With your fingertips, locate the two latches on the underside of the computer’s case.
5 Pulling gently, swing the panel up and slip it out. Pulling gently, swing the panel up and slip it out. Remember: Don’t walk around the room until you have finished installing the card and closed the computer. Move the logic board as little as possible while it’s outside the computer.
6 There is a wire handle on the back of the logic board. Swing it down and use it to pull the logic board toward you. Wire handle The logic board is plugged into a slot inside the computer. You may have to brace the computer with your other hand and pull firmly at first. Slide the entire logic board all the way out of the computer.
7 Locate the video-in access cover on one side of the vertical plate attached to the logic board. Remove the cover from this opening by squeezing together the plastic tabs that hold it in place. Your logic board may not look exactly like the one pictured here, but the video-in slot and plastic access cover are in the same position regardless of the logic board you have. Note: The plastic access cover is on the other side of the vertical plate.
8 Remove the video input card from its static-proof bag. Handle the card by its edges in order to avoid touching the connectors. 9 Attach the grounding clip to the S-video port of the video input card, if it isn’t attached already. Without the grounding clip attached, the S-video port may send insufficient power to equipment you connect to it.
10 Making sure the grounding clip is on the card (as shown in step 9), plug the video input card firmly into the video-in slot on the logic board. Fit the three ports on the card into the port access hole. Make sure the card is firmly seated in the slot. Check to make sure the grounding clip is attached to the card before installing the card in the video-in slot.
11 Screw the card to the vertical plate on the logic board. (Use the provided attachment screw.
12 Swing the wire handle on the logic board back up into its storage position, securing it under its catch. Then fit the logic board into the guide rails on both sides of the computer’s interior. Make sure the logic board slides into the guides that are on both sides of the computer’s interior. Swing the handle up, into its storage position.
13 Press the reset button on the logic board. Then gently but firmly push the board back into place within the computer. You will need to push a little harder at the end to make sure the connectors at the back of the board are seated in their slot. If you can’t find the reset button, it may be in a different location on your logic board. Check the manual that came with your computer, in the section in the appendix about installing expansion cards.
14 Slip the three tabs at the top of the back panel into the matching grooves in the computer case. Slip the three tabs on the back panel into the grooves in the computer case. 15 Snap the bottom of the panel into place, making sure it is flush with the back of the computer. Snap the plastic back panel into place.
16 Reinsert the screws in the back panel. As described earlier, your computer may have only two screws to reinsert, one on either side of the back panel. Note: Reinsert these screws. (Your computer may have only two screws.) 17 Reconnect any cables you disconnected at the start of this process. Because you pressed the reset button on the logic board earlier, some of your computer’s software settings may have changed. (For example, the date and time on your computer will need to be reset.
18 Skip the steps that follow (“Installing the Card in Style B”), and the next section, “Installing the Card in a Modular Computer,” and go on to the section titled “Installing the Software.” Installing the card in Style B 1 Make sure you save any open documents and quit any open applications. Then turn off the computer. m Choose Shut Down from the Special menu, or press the Power key on the keyboard. m Then press the power switch at the back of the computer.
3 If there are screws securing the back panel, remove them with a screwdriver. Then press down with your thumbs to loosen the clips on either side of the back panel.
4 Pulling gently, swing the panel down and slip it out.
5 Remove both retainer screws from the vertical plate behind the back panel. Remove both retainer screws from the vertical plate. Remember: Don’t walk around the room until you have finished installing the card and closed the computer. Move the logic board as little as possible while it’s outside the computer.
6 There is a wire handle on the back of the logic board. Swing it down and use it to pull the logic board toward you. Swing down the wire handle, and slide the logic board out of the computer. The logic board is plugged into a slot inside the computer. You may have to brace the computer with your other hand and pull firmly at first. Slide the entire logic board all the way out of the computer.
7 Locate the video-in access cover on one side of the vertical plate attached to the logic board. Remove the cover from this opening by squeezing together the plastic tabs that hold it in place. Your logic board may not look exactly like the one pictured here, but the video-in slot and access cover are in the same position regardless of the logic board you have. Note: The plastic access cover is on the other side of the vertical plate.
8 Remove the video input card from its static-proof bag. Handle the card by its edges in order to avoid touching the connectors. 9 Attach the grounding clip to the S-video port of the video input card, if it isn’t attached already. Without the grounding clip attached, the S-video port may send insufficient power to equipment you connect to it.
10 Making sure the grounding clip is on the card (as shown in step 9), plug the video input card firmly into the video-in slot on the logic board. Fit the three ports on the card into the port access hole. Make sure the card is firmly seated in the slot. Check to make sure the grounding clip is attached to the card before installing the card in the video-in slot.
11 Screw the card to the vertical plate on the logic board. (Use the provided attachment screw.
12 Swing the wire handle on the logic board back up into its storage position, securing it under its catch. Then fit the logic board into the guide rails on both sides of the computer’s interior. Make sure the logic board slides into the guides that are on both sides of the computer’s interior. Swing the handle up, into its storage position.
13 Press the reset button on the logic board. Then gently but firmly push the board back into place within the computer. You will need to push a little harder at the end to make sure the connectors at the back of the board are seated in their slot. 1 Press the reset button. 2 Gently but firmly push on the vertical plate until the logic board is solidly back in place.
14 Reinsert the retainer screws into the vertical plate on the logic board. Reinsert both retainer screws into the vertical plate.
15 Slip the tabs at the bottom of the back panel into the matching grooves in the computer case. Then press down on the clips and snap the top of the panel into place, making sure it is flush with the back of the computer.
16 If you removed security screws from the back panel in step 3, reinsert them. 17 Reconnect any cables you disconnected at the start of this process. Because you pressed the reset button on the logic board earlier, some of your computer’s software settings may have changed. (For example, the date and time on your computer will need to be reset.) You may want to open the control panels for the date and time, keyboard, and mouse to make sure that they are set the way you want them.
Installing the card in a modular computer If your system has a separate monitor, like this one, continue with the steps below. If the monitor is built into your system, go back to the previous section, “Installing the Card in a Compact Computer.” To install the video input card in a computer with a separate monitor, follow these steps: 1 Press the Power key on the keyboard to shut down your computer. You can also choose Shut Down from the Special menu.
3 Place your thumbs on the two tabs at the top of the plastic panel, and press down. 4 Pulling gently, swing the panel down and slip it out. Remove the back panel.
5 If there are security screws on the vertical plate on the back of the computer, remove them with a screwdriver. If there are security screws, remove both screws from the vertical plate. 6 Unplug the power cord from your computer. Remember: Don’t walk around the room until you have finished installing the card and closed the computer. Move the logic board as little as possible while it’s outside the computer.
8 Squeeze the plastic tabs on the video input port’s access cover and pull the metal retainer so the access cover can come off. Your logic board may not look exactly like the one pictured here, but the video-in slot and plastic access cover are in the same position regardless of the logic board you have. Note: The plastic access cover is on the other side of the vertical plate.
9 Remove the video input card from its static-proof bag. Hold the card by its edges to avoid touching any connectors. 10 Attach the grounding clip to the S-video port of the video input card, if it isn’t attached already. Without the grounding clip attached, the S-video port may send insufficient power to equipment you connect to it.
11 Locate the video-in slot on the logic board. 12 Making sure the grounding clip is on the card (as shown in step 10), plug the video input card firmly into the video-in slot on the logic board. Fit the three ports on the card into the port access hole. Make sure the card is firmly seated in the slot. Check to make sure the grounding clip is attached to the card before installing the card in the video-in slot.
13 Screw the card to the vertical plate on the logic board. (Use the provided attachment screw.
14 Slip the base of the logic board into the guide rails inside the computer case and swing the handle back into its storage position. Make sure the logic board slides into the guides that are on both sides of the computer’s interior. Swing the handle up, into its storage position.
15 Press the reset button on the logic board. Then gently but firmly push the board back into place within the computer. You will need to push a little harder at the end to make sure the connectors at the back of the board are seated in their slot. If you can’t find the reset button, it may be in a different location on your logic board. Check the manual that came with your computer, in the section in the appendix about installing expansion cards.
16 If you removed security screws, reinsert and tighten them now. Insert security screws here. 17 Slip the three hooks at the base of the plastic back panel into the grooves in the computer case. Slip the three hooks on the back panel into the grooves in the computer case. 18 Swing the plastic back panel up and snap it into place. Snap the plastic back panel into place.
19 Reconnect the power cord and any cables you disconnected at the start of this process. Because you pressed the reset button on the logic board earlier, some of your computer’s software settings may have changed. (For example, the date and time on your computer will need to be reset.) You may want to open the control panels for the date and time, keyboard, and mouse to make sure that they are set the way you want them.
6 Follow the instructions on the screen. 7 When the installation is complete, click Restart. You can now find the Apple Video Player icon in the Apple Video Player folder, in the Apple Extras folder on your hard disk.
Connecting video equipment If you want to see video on your computer from a VCR, laserdisc player, video camera, or other video equipment, you need to connect the equipment to the ports on the video input card. You can connect one piece of equipment to the S-video port or one piece to the composite video port on the video input card.
Determining which video connector you need Check the Video Out port or ports on your video equipment. A Video Out port should look like one of the ports pictured below. (You may have both ports.) S-video port Composite video port (RCA-type) To connect to a composite Video Out port, use a composite (RCA plug) connector. See “Connecting Video Equipment If You Use a Composite (RCA Plug) Connector.” Composite connector (RCA plug) To connect to an S-video Video Out port, use an S-video connector.
Connecting video equipment if you use a composite (RCA plug) connector To connect your video equipment you need one video cable and two audio cables, all with RCA plugs at both ends. The cables can be separate or joined. You can purchase cables at electronics supply stores. RCA video RCA RCA audio RCA RCA audio RCA video RCA or RCA RCA 2 audio RCA or video RCA 2 audio RCA If you have only one Audio Out port on your video equipment, you can use a Y-adapter audio cable.
1 Make sure that both the Macintosh and the video equipment are turned off. 2 Attach one end of the video cable to the Video Out port on the video equipment. 3 Plug the other end of the video cable into the yellow composite video input port on the video input card. 4 Insert the RCA plugs on one end of the audio cables into the left and right Audio Out ports on the video equipment. If you’re using a Y-adapter audio cable: Plug the single end of the cable into the Audio Out port on your video equipment.
The video input card ports are exactly the same on a computer with a built-in monitor, and the card itself is in about the same position on the back of the unit as in the illustration below of a computer without a built-in monitor. Video input port (yellow) Left sound input port (white) Right sound input port (red) Cables with RCA plugs Video Out port Left Audio Out port Right Audio Out port The ports on your video equipment may be arranged and labeled differently from those shown here.
Connecting video equipment if you use an S-video connector To connect your video equipment you need one video cable with S-video connectors on both ends and two audio cables with RCA plugs at both ends. The RCA cables can be separate or joined. You can purchase cables at electronics supply stores. S-video video S-video RCA audio RCA RCA audio RCA video S-video or S-video RCA 2 audio RCA If you have only one Audio Out port on your video equipment, you can use a Y-adapter audio cable.
1 Make sure that both the Macintosh and the video equipment are turned off. 2 Attach one end of the video cable to the Video Out port on the video equipment. 3 Plug the other end of the video cable into the S-video input port on the video input card. About the S-video port: The S-video port accepts 4-pin and 7-pin connectors. If the connector doesn’t slide easily into the port, realign it and try again. Avoid using force, which could damage the card or the connector.
5 Insert the RCA plugs on the other end of the audio cables into the left (white) and right (red) sound input ports on the video input card. If you’re using a Y-adapter audio cable: Plug the double end of the cable (where it forms a Y) into the right and left sound input ports on the video input card.
C H A P T E R 2 Learning About the Software This chapter contains the information you need to set up and use the Apple Video Player application program.
Opening the Apple Video Player To use the Apple Video Player application program, open it by double-clicking its icon in the Apple Video Player folder, in the Apple Extras folder on your hard disk. When the Apple Video Player application opens, a video window appears. If you don’t get an image in the window right away, see Chapter 4, “Troubleshooting.” You can also open (and quit) the Apple Video Player application by using a keyboard shortcut.
If you’re viewing video on a secondary monitor: If you have two monitors attached to your computer (one attached to an expansion card in your computer), you can drag the video window to the secondary monitor, but the image’s resolution will decrease. Getting help All the step-by-step instructions contained in the rest of this manual are also available in the Guide menu at the upperright corner of the screen, marked with the h icon.
To be reminded of keyboard shortcuts you can use with Apple Video Player, choose Apple Video Player Shortcuts from the Guide h menu in the upper-right corner of the screen. Choosing the correct video source If you connected your video equipment to the S-video port on the video input card, you must select S-video in the Apple Video Player application. If you connected your equipment to the composite (RCA) port on the card, you must select Video in the Apple Video Player application.
The screen controls appear. 3 Click the video source you want to use. Choose Video if your device is attached to the composite video input port on the video input card, or S-Video if your device is attached to the S-video input port on the video input card. You can also choose TV to view TV in the video window, if you have a TV tuner card in your computer. To learn about viewing TV on your computer, see the manual that comes with the TV tuner card.
Adjusting the sound When you are watching video in the video window, you can adjust the sound’s volume, balance, and tone. Changing the sound volume There are three ways to change sound volume: m Use the volume buttons on the front of the computer. m Drag the slider next to the speaker icon on the video window. m Press the Up Arrow key or Down Arrow key on the keyboard. (Make sure Apple Video Player is the active application, or these keys won’t have any effect.
Adjusting speaker balance and tone To adjust the speaker balance, bass, or treble: 1 Choose Show Controls Window from the Windows menu. 2 Click the sound icon. 3 Drag the appropriate slider to adjust the sound. You can also click anywhere in a slider’s track to move the slider to that position. The sound adjustments take effect as you make them, so you can monitor your changes.
Adjusting the picture To adjust the brightness, sharpness, contrast, and color of the picture: 1 Choose Show Controls Window from the Windows menu. The Controls window appears. 2 Click the video screen icon. The screen controls appear. 3 Drag the appropriate slider to adjust the picture to your liking. You can also click anywhere in a slider’s track to move the slider to that position. The picture adjustments take effect as you make them, so you can monitor your changes.
Changing the video window size There are several ways to change the size of the video window. You can make a choice from the Windows menu, use a keyboard shortcut for one of the three most common sizes, drag the size box, or click the zoom box. Choosing menu commands You can choose different video window sizes from the Windows menu: m Smallest Size uses about 1/16 of the screen. m Normal Size uses about 1/4 of the screen. m Largest Size uses as much of the screen as it can.
Using keyboard shortcuts There are three keyboard shortcuts for changing the video window size: m x-1 sets the smallest size. m x-2 sets normal size. m x-3 sets the largest size. You can also switch to the largest size by clicking the zoom box. Dragging the size box If you drag the size box, the horizontal and vertical dimensions of the screen change proportionally. If you drag the size box while holding down the Shift key, the image becomes distorted.
Setting the video input standard The video input standard determines how the Apple Video Player application interprets video (S-video or composite) signals. This standard is preset to your region in the Apple Video Player software. In most cases, you won’t need to change it. NTSC is the standard video signal for most of the Americas and Japan. PAL is common in Western Europe, Australia, most of Asia, and parts of South America and Africa.
Setting and using a “hot key” You can also open Apple Video Player by pressing a preset key or combination of keys. When you press this “hot” key, you switch to the Apple Video Player application no matter what other application you are currently in. If Apple Video Player is already the active application, the Apple Video Player application quits when you press the hot key. To set a hot key: 1 With the Apple Video Player application active, choose Hot Key from the Setup menu.
C H A P T E R 3 Capturing Video Images This chapter gives instructions for using the Apple Video Player application program to capture m individual (still) images m sequences of moving images (as QuickTime movies) The images in the video window can come from any video equipment connected to your video card. You’ll need to open the Apple Video Player application before following the instructions in this chapter. (See “Opening the Apple Video Player” in Chapter 2.
Capturing individual images You have two ways to capture a single image—by using the capture controls in the Controls window or by using the Copy Video Display command in the Edit menu. To learn how to record a sequence from a movie, see the section “Capturing Movies” later in this chapter. Capture controls When you use the capture controls in the Controls window, you can freeze the screen image before you save it. Additionally, the capture controls let you save the image directly on a disk.
The capture controls appear. 3 Wait until you see the image you want to capture. The Controls window can remain open without affecting what happens in the video window. m To freeze the video image at the current frame, click Freeze. The video freezes, and you can decide if you want to save the current frame. To unfreeze the video, click Freeze again. m To save the current video frame on a disk, click Save.
Copy Video Display command To capture the current screen image by copying, choose Copy Video Display from the Edit menu or press x-C. When you use Copy Video Display or press xC, the current screen image is copied to the Clipboard. The image is not saved on a disk. (To save an image that’s on the Clipboard, you must paste it into a document or the Scrapbook.
2 Click one of the buttons under Movie Compression. None means that no compression takes place. Normal, the preset choice, uses anywhere from 12% to 50% of the disk space that None uses; the less movement in each frame of the movie, the greater the savings. Most uses slightly less disk space than does Normal. To save the most space you can, choose the smallest size video window and the most compression. Compression affects picture quality: the more compression you use, the grainier the picture.
2 Adjust the volume to your liking. Movies are captured at the current volume setting. For example, if the sound is muted, your recorded movie will not have any sound. 3 Choose Show Controls Window from the Windows menu. The Controls window appears. 4 Click the video camera icon. The capture controls appear. 5 Wait until the sequence that you want to capture begins. The Controls window can remain open without affecting what happens in the video window.
6 Click Record. Recording begins and the Record button changes to a Stop button. 7 Click Stop when you’ve recorded as much as you want. If you don’t click the Stop button, recording continues until the hard disk is full. Important A dialog box appears, in which you can specify a name and location for your movie. You can also preview the QuickTime movie before you save it.
C H A P T E R 4 Troubleshooting This chapter suggests what to do if problems occur when you’re using the video input card hardware and software. If you have a problem with your Apple equipment and nothing presented in this chapter, or in the manual that came with your computer, solves it, consult the service and support information that came with your Apple equipment for instructions on how to contact an Appleauthorized service provider or Apple for assistance.
You see a blank screen when you change to video mode or when you first open Apple Video Player. m Be sure your video equipment is securely connected to the appropriate video port and your equipment is turned on. m You may have the wrong video source selected. Go to the screen controls in the Controls window and click the appropriate Video Source button. For further instructions on selecting the video source, see the section, “Choosing the Correct Video Source,” in Chapter 2.
You don’t hear any sound. m Adjust the volume slider in the video window, or the volume controls on the front of your computer if you have them. m Check the sound-related control panel on your computer to see if the volume has been turned off. For instructions on using the control panel to turn on sound, choose Macintosh Guide from the Guide (h) menu. (Make sure that you’re in the Finder first.
You have a dark or “rolling” picture. m Adjust the video screen controls. (Choose Show Controls Window from the Windows menu and click the video screen icon.) m If you have a VCR connected to your video input card, make sure you’re not having a problem with the videotape or the VCR itself. (Connect the VCR back to your TV and play the tape to see if the image is still bad.
m Adjust the sound controls in the Controls window. (Choose Show Controls Window from the Windows menu and click the sound icon.) m Turn up the volume controls on your video equipment. You’re playing a video tape with closed captions, but the closed captions do not appear. m To view a videotape with closed captions, you must connect your VCR to a TV tuner port, not the video input card. If you do not have a TV tuner card in your computer, you can purchase one from an Apple-authorized dealer.
76 Chapter 4
C H A P T E R 5 Technical Information Your video input card is suitable for use with home-quality video equipment. This chapter lists the specific technical characteristics of the video card.
Internal connections The video input card can be used with the Apple MPEG Media System card or Apple’s TV tuner card, or both. Video input characteristics m Maximum input level: 2 volts peak-to-peak (Vpp) m Minimum input level: 0.
I N A adjusting sound volume 56 speaker balance and tone 57 video image 58 Africa, standard video signal for 61 Americas, standard video signal for 61 Apple-authorized dealer 71 Apple Extras folder 42, 52 Apple Video Player application 52–62 adjusting sound volume with 56 adjusting speaker balance and tone with 57 adjusting video image with 58 changing video window size with 59–60 changing window color with 60 choosing the correct video source with 54–55 getting help in 53–54 installing 41–42 keyboard sh
B back panel of a compact computer removing 6–7, 18–19 removing screws from 5, 18 replacing 15, 29, 40 replacing screws on 16, 28 back panel of a modular computer removing 32 replacing 40 balance of speakers, adjusting 57 C cables audio cable 45, 46, 48, 49, 50 S-video cable 50 video cable 45, 48, 49 Y-adapter audio cable 46, 48, 49, 50 Canada, standard video signal for 61 capture controls (Controls window) 64–65 capturing video individual video images 64–66 movies 66–69 Central America, standard video si
composite video input port on video input card 43, 46 composite Video Out port on video equipment 44 compression rate for movies 66–67 computers.
grounding clip appearance of 2 attaching to S-video port 10, 23, 35 checking before installing card 11, 24, 36 purpose of 10 Guide menu 53, 54 Guide menu icon 53 Installer icon 41 installing video input card in a compact computer 2–30 in a modular computer 31–41 Apple Video Player application 41–42 internal connections 78 H K G handling logic board 4, 7, 20 video input card 10, 23, 35 headphones 57 help in Apple Video Player application 53–54 Hi-Z input 74 Hot Key command (Setup menu) 62 hot keys setti
M N Memory control panel 67 menus Edit menu 66 Guide menu 53, 54 Setup menu 61, 62 Windows menu 54, 57, 60, 64, 68, 73 modular computer with external monitor installing video input card into 31–41 removing back panel from 32 replacing back panel on 40 monitors external. See modular computer with external monitor internal. See compact computer with built-in monitor secondary troubleshooting 74 viewing video on 53 movies.
S-video port on video input card 10, 23, 35, 43–44, 49–50, 54–55 TV tuner port 75 video input port on video input card 47 Video Out port on video equipment 44, 46, 47, 49 power, turning off 4 Preferences command (Setup menu) 61, 66 printing applications, turn off before recording video 67 problems. See troubleshooting programs.
S saving video images as PICT files 65 on disk 64–65 screen controls 55, 73 screws removing from back of a modular computer 33 from back panel of a compact computer 5, 18 replacing on back panel of a compact computer 16, 28 on back of a modular computer 40 SECAM video input standard 61 selecting video source 54–55 service and support 71 Setup menu Hot Key command 62 Preferences command 61, 66 sharpness, adjusting 58 shortcuts in Apple Video Player application 54 Show Balloons command (Guide menu) 53 Show C
connecting video equipment to 43, 49–50 connectors accepted by 49 selecting as video source 54–55 T technical information 77–78 television.
capturing individual images 64–66 keyboard shortcut for 66 movies 66–69 copying 66 freezing and unfreezing 64–65 recording as movies 67–69 saving as PICT files 65 saving on disk 64–65 troubleshooting too small or filled with odd colors 72 too white or too dark 73 viewing on a secondary monitor 53 video-in access cover, removing from a compact computer 9, 22 from a modular computer 34 video input card.
viewing TV in video window 55 video on a secondary monitor 53 virtual memory, turn off before recording video 67 voltage output of video equipment 73–74 volume adjusting 57, 74, 68 of movies 68 troubleshooting 73 volume controls 72, 74 Y, Z Y-adapter audio cable connecting to audio port of video equipment 46, 49 to sound input ports on video input card 50 description of 45, 48 W, X warranty 71 Western Europe, standard video signal for 61 Window Color command (Windows menu) 60 Windows menu choosing video
Apple Computer, Inc. 1 Infinite Loop Cupertino, California 95014-2084 408.996.1010 030-8681-A Printed in U.S.A.