
User's Manual


20 Chapter 2
Setting Up Your Time Capsule
Use the AirPort Utility setup assistant to enter your ISP settings and configure how your
Time Capsule shares the settings with other computers.
1
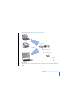
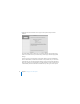
Open AirPort Utility, located in /Applications/Utilities/ on a computer using Mac OS X,
or in Start > All Programs > AirPort on a computer using Windows XP.
2
Select your Time Capsule and click Continue.
If you’re making changes to a Time Capsule that has already been set up, you might
have to connect to the network it’s created before making changes to the Time
Capsule.
To choose the wireless network you want to change on a Macintosh use the AirPort
status menu in the menu bar. On a computer using Windows XP, hold the pointer over
the wireless connection icon until you see the network name (SSID), and then choose it
from the list if there are multiple networks available.
3
Follow the onscreen instructions to configure and share Internet access on your Time
Capsule.
AirPort Utility provides a quick and easy way to set up your Time Capsule and network.
If you want to set additional options for your network, such as restricting access to your
network, or setting advanced DHCP options, choose Manual Setup from the Base
Station menu of AirPort Utility.
Setting Advanced Options
Use AirPort Utility to set up your Time Capsule manually if you want to set advanced
Time Capsule options such as advanced security options, closed networks, DHCP lease
time, access control, power controls, user accounts, and more.