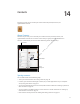
4 Contacts iPad lets you easily access and edit your contact lists from personal, business, and organizational accounts. About Contacts en tia l Contacts lets you easily access and edit your contact lists from personal, business, and organizational accounts. You can search across all of your groups, and the information in Contacts is automatically accessed to make addressing emails quick and easy.
Searching contacts You can search titles and first, last, and company names in your contacts on iPad. If you have a Microsoft Exchange account, an LDAP account, or a CardDAV account you can also search those contacts. Search contacts: In Contacts, tap the search field and enter your search. Search a GAL Tap Groups, tap Directories at the bottom of the list, then enter your search. Search an LDAP server Tap Groups, tap the LDAP server name, then enter your search.
Contacts accounts and settings You can add additional Contacts accounts and adjust the way contact names are sorted and displayed. Add a Contact account: Go to Settings > Mail, Contacts, Calendars, then tap Add Account. To change Contact settings, go to Settings > Mail, Contacts, Calendars for these options: Tap Sort Order and choose to sort by first or last name. Set how contacts are displayed Tap Display Order and choose to display by first or last name.
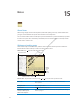
15 Notes About Notes With its large display and onscreen keyboard, iPad makes jotting notes easy. iCloud makes notes you type on iPad available on all your other iOS devices and computers. fid en tia l You can read and write notes in landscape or portrait orientation. In portrait orientation, tap Notes to view a list of your notes. In landscape orientation, the list of notes appears on the left, and the current note is circled in red.
Searching notes You can search the text of notes to find a particular note. Search for notes: Enter text in the search field that appears at the top of the notes list. In portrait orientation, tap Notes to display the notes list. Search results appear as you type. Tap the keyboard button to dismiss the keyboard and see more results. To view a note, tap it in the search results list.
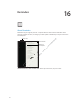
16 Reminders About Reminders l Reminders lets you organize your life—complete with due dates and lists. Reminders works with your calendar accounts, so changes you make update automatically on all your iOS devices and computers. en tia &KDQJH YLHZV Pr Ap eli pl min e Pr ary op D rie ra ta ft ry an d on C 0DUN LWHPV DV FRPSOHWHG fid $GG D UHPLQGHU Switch between list view and date view: At the top of the screen, tap List or Date.
Setting a reminder Add a reminder: In Reminders, tap , then enter a description and tap Done. After you add a reminder, you can fine-tune its settings: Tap the reminder, then tap Remind Me. Turn on “On a Day” then set the date and time you want to be reminded. Reminders that are due are displayed in Notification Center. Add notes to a reminder Tap the reminder, then tap Show More. Tap Notes. Move a reminder to another list Tap the reminder, then tap Show More. Tap List and choose a new list.
Managing completed reminders Reminders keeps track of the items you mark as completed. You can see them in list or date view, and also in the Completed list. View completed items: Tap the List button at the top of the screen, then tap Completed. Mark a completed item as uncompleted Tap to remove the checkmark. The item automatically moves back to its original list. Sync previous reminders Go to Settings > Mail, Contacts, Calendars. Then under Reminders, tap Sync.
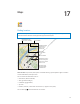
17 Maps Finding locations en (QWHU D VHDUFK Pr Ap eli pl min e Pr ary op D rie ra ta ft ry an d C on 'LVSOD\ WKH ORFDWLRQ RI D EXVLQHVV RU SHUVRQ LQ \RXU FRQWDFWV OLVW fid *HW GLUHFWLRQV E\ FDU SXEOLF WUDQVLW RU ZDONLQJ tia l WARNING: For important information about driving and navigating safely, see the Important Product Information Guide at www.apple.com/support/manuals/ipad. 6KRZ \RXU FXUUHQW ORFDWLRQ 0RUH LQIRUPDWLRQ 'RXEOH WDE WR ]RRP LQ WDS ZLWK WZR ILQJHUV WR ]RRP RXW
See the name or description of a location Tap the pin. See a list of the businesses found in a search Tap . Tap a business to see its location. Find your current location Tap . Your current location is shown by a blue marker. If your location can’t be determined precisely, a circle appears around the marker. The smaller the circle, the greater the precision. Use the digital compass Tap again. The icon changes to onscreen. Mark a location Touch and hold the map until the drop pin appears.
Getting and sharing info about a location 0DNH D )DFH7LPH FDOO ZKHQ DYDLODEOH 9LVLW WKH ZHEVLWH tia . en Get or share info about a location: Tap the pin, then tap l *RRJOH 0DS GDWD *RRJOH Tap “Add to Contacts.” Tweet, text, or email your location Tap Share Location. To post a Tweet, you must be logged in to your Twitter account. Go to Settings > Twitter.
Map views tia l *RRJOH 0DS GDWD *RRJOH en See a standard, satellite, hybrid, or terrain view: Tap or drag the bottom-right corner of the screen, then select the view you want. Pr Ap eli pl min e Pr ary op D rie ra ta ft ry an d C on fid See the Google Street View of a location: Tap . Flick left or right to pan through the 360° panoramic view (the inset shows your current view). Tap an arrow to move down the street. To return to map view, tap the map inset.
18 Music Adding music and audio To get music and other audio content onto iPad: Purchase and download content from the iTunes Store on iPad. In Music, tap Store when browsing. See Chapter 19, “iTunes Store,” on page 88. en iOS devices and computers. See “Using iCloud” on page 18. tia l Use Automatic Download to automatically download new music purchased on your other fid Sync with iTunes on your computer. You can sync all of your media, or selected songs and other on items.
Playing songs and other audio WARNING: For important information about avoiding hearing loss, see the Important Product Information Guide at www.apple.com/support/manuals/ipad. You can listen to audio from the built-in speaker, headphones attached to the headphones port, or wireless Bluetooth stereo headphones paired with iPad. When headphones are attached or paired, no sound comes out of the speaker. 3OD\ 3DXVH 9LHZ WKH WUDFN OLVW 5HSHDW 6KXIIOH $GMXVW WKH YROXPH 0DNH D *HQLXV SOD\OLVW %DFN Pr Ap
Display a song’s lyrics Display the album cover by tapping the thumbnail at the top of the screen. Lyrics appear if you’ve added them to the song using the song’s Info window in iTunes. Use Ping See “Following artists and friends” on page 90. Play music on AirPlay speakers or Apple TV Tap Set options for Music Go to Settings > Music. . See “Using AirPlay” on page 35.
iTunes Match iTunes Match stores your music library in iCloud—even songs imported from CDs—and lets you enjoy your collection on iPad and other iOS devices and computers. iTunes Match is available as a paid subscription. Note: iTune Match is available starting in the U.S. Subscribe to iTunes Match: In iTunes on your computer, choose Store > Turn On iTunes Match, then click the Subscribe button. Once you subscribe, iTunes adds your music and playlists to your iCloud library.
Playlists You can create and edit your own playlists on iPad, or edit playlists synced from iTunes on your computer. Create a playlist: View Playlists, then tap New near the top of the screen. Enter and save a title, select songs and videos to include, then tap Done. When you make a playlist and then sync iPad to your computer, the playlist is synced to your iTunes library. Edit a playlist: View Playlists and select the playlist. Tap Edit, then: To add more songs: Tap Add Songs. To delete a song: Tap .
19 iTunes Store About the iTunes Store tia l Use the iTunes Store to add content to iPad. You can browse and purchase music, TV shows, audiobooks, and alert tones. You can also buy and rent movies, or download and play podcasts or iTunes U collections. You need an Apple ID in order to purchase content. See “Store settings” on page 94. fid en Note: The iTunes Store may not be available in all regions, and iTunes Store content may vary across regions. Features are subject to change.
Purchasing music, audiobooks, and tones When you find a song, album, tone, or audiobook you like in the iTunes Store, you can purchase and download it. You can preview an item before you purchase it, to make sure it’s what you want. Preview a song, tone, or audiobook: Tap the item and follow the onscreen instructions. Tap Music, then tap Redeem at the bottom of the screen and follow the onscreen instructions.
Following artists and friends Use Ping to connect with the world’s most passionate music fans. Follow favorite artists to learn about new releases and upcoming concerts and tours, get an insider’s perspective through their photos and videos, and learn about their musical influences. Read friends’ comments about the music they’re listening to, and see what they’re buying and which concerts they plan to attend. Also, express your musical likes and post comments for your own followers.
Checking download status You can check the Downloads screen to see the status of in-progress and scheduled downloads, including purchases you pre-order. See the status of items being downloaded: Tap Downloads. Pre-ordered items don’t download automatically when they’re released. Return to the Downloads screen to begin the download. Download a pre-ordered item Tap the item, then tap . If a download is interrupted, the download resumes when there’s an Internet connection.
20 App Store About the App Store You can search for, browse, review, purchase, and download apps from the App Store directly to iPad. en tia l Note: The App Store may not be available in all countries or regions, and App Store content may vary by country or region. Features are subject to change. Pr Ap eli pl min e Pr ary op D rie ra ta ft ry an d C on fid To browse the App Store, iPad must be connected to the Internet. See “Wi-Fi” on page 118. To purchase apps, you need an Apple ID.
Finding and downloading apps Browse the featured selections to see new, notable, or recommended apps, or browse Top 25 to see the most popular apps. If you’re looking for a specific app, use Search. Browse the App Store: Tap Featured, Categories, or Top Charts. Tap Genius to see a list of recommended apps based on what’s already in your app collection. To turn Genius on, follow the onscreen instructions. Genius is a free service, but you need an Apple ID.
Store settings Use Store settings to sign in using an Apple ID, create a new Apple ID, or edit an existing one. If you have more than one Apple ID, you can use Store settings to sign out and sign in using another Apple ID. For iTunes Store terms and conditions, go to www.apple.com/legal/itunes/ww/. Sign in using an Apple ID: Choose Store, tap Sign In, then tap Use Existing Apple ID and enter your Apple ID and password.
21 Newsstand About Newsstand C on fid en tia l Newsstand organizes your magazine and newspaper app subscriptions with a shelf that lets you access your publications quickly and easily. Newsstand apps appear on the shelf, and as new issues become available, a badge lets you know they’re ready for reading. They’re delivered to iPad automatically.
Reading the latest issues When a newspaper or magazine has a new issue, Newsstand automatically downloads it when connected to Wi-Fi and notifies you by displaying a badge on the app icon. To start reading, open Newsstand and look for apps with a “New” banner. Each app has its own method of managing issues. For information about how to delete, find, or work with individual issues, see the app’s help information or App Store listing.
22 iBooks About iBooks l iBooks is a great way to read and buy books. Download the free iBooks app from the App Store, and then get everything from classics to best sellers from the built-in iBookstore. Once you download a book, it’s displayed on your bookshelf. fid en tia To download the iBooks app and use the iBookstore, you need an Internet connection and an Apple ID. If you don’t have an Apple ID, or if you want to make purchases using another Apple ID, go to Settings > Store.
Sync an ePub book or PDF to iPad: In iTunes on your computer, choose File > Add to Library and select the file. Select the book or PDF in the Books pane in iTunes, and then sync. To add a PDF to iBooks without syncing, email the PDF to yourself from your computer. Open the email message on iPad, then tap the PDF attachement and choose “Open in iBooks” from the menu that appears. Reading books Reading a book is easy. Go to the bookshelf and tap the book you want to read.
Add, remove, or edit a note Touch and hold any word until it’s selected. Drag the grab points to adjust the selection, then tap Note. Type some text, then tap Done. To view a note, tap the indicator in the margin near the highlighted text. To remove a note, tap the highlighted text, then tap Delete Note. To change the color of a note, tap the highlighted text, then tap Colors and select a color from the menu. See all your bookmarks, highlights, and notes Tap Enlarge an image Double-tap the image.
Searching books and PDFs You can search for the title or author of a book to quickly locate it on the bookshelf. You can also search the contents of a book to find all the references to a word or phrase. You can also send a search to Wikipedia or Google to find related resources. Search in a book: Tap near the center of the page to show the controls, then tap the magnifying glass. Search for a book Go to the bookshelf. Tap the status bar to scroll to the top of the screen, then tap the magnifying glass.
Organizing the bookshelf Use the bookshelf to browse your books and PDFs. You can also organize items in collections. l 7RXFK DQG KROG D ERRN WR UHDUUDQJH tia (]HPSHISL VU [OL P)VVRZ[VYL ;P[SL H]HPSHIPSP[` PZ Z\IQLJ[ [V JOHUNL fid en Move a book or PDF to a collection: Go to the bookshelf and tap Edit. Select the items you want to move, then tap Move and select a collection.
23 Game Center About Game Center tia l Discover new games and share your game experiences with friends around the world in Game Center. Invite your friends to play, or use auto-match to find other equally-matched opponents. Earn bonus points by achieving specific accomplishments in a game, see what your friends have achieved, and check leaderboards to see who the best players are. en Note: Game Center may not be available in all areas, and game availability may vary.
Signing in to Game Center Sign in: Open Game Center. If you see your nickname and photo at the top of the Me screen, you’re already signed in. If not, enter your Apple ID and password, then tap Sign In. Or, tap Create New Account to create a new Apple ID. Add your photo Tap the photo next to your name. Declare your status Tap Me, tap the status bar, then enter your status. View your account settings Tap Me, tap the account banner, then choose View Account.
Playing with friends Game Center puts you in contact with players around the world. You add friends to Game Center by making a request, or by accepting a request from another player. Invite friends to a multiplayer game: Tap Friends, choose a friend, choose a game, and tap Play. If the game allows or requires additional players, choose additional players to invite, then tap Next. Send your invitation, then wait for the others to accept. When everyone is ready, start the game.
24 Accessibility Universal Access features iPad incorporates numerous accessibility features, including: VoiceOver screen reader Zoom magnification Large Text White on Black Speak Selection l Speak Auto-text tia Mono Audio and balance en AssistiveTouch fid Support for braille displays C on Playback of closed-captioned content Pr Ap eli pl min e Pr ary op D rie ra ta ft ry an d Zoom, White on Black, and Mono Audio work with all apps. Large Text works with Mail and Notes.
When you go to a new screen, VoiceOver plays a sound and automatically selects and speaks the first element of the screen (typically, the item in the upper-left corner). VoiceOver also lets you know when the display changes to landscape or portrait orientation, and when the screen is locked or unlocked. Note: VoiceOver speaks in the language specified in International settings, which may be influenced by the Region Locale setting. VoiceOver is available in many languages, but not all.
Using VoiceOver Select items on the screen: Drag your finger over the screen. VoiceOver identifies each element as you touch it. You can move systematically from one element to the next by flicking left or right with a single finger. Elements are selected from left to right, top to bottom. Flick right to go to the next element, or flick left to go to the previous element.
“Tap” the selected item when VoiceOver is on: Double-tap anywhere on the screen. Triple-tap anywhere on the screen. Adjust a slider With a single finger, flick up to increase the setting or down to decrease the setting. Scroll a list or area of the screen Flick up or down with three fingers. Flick down to page down through the list or screen, or flick up to page up. When paging through a list, VoiceOver speaks the range of items displayed (for example, “showing rows 5 through 10”).
Practice gestures: Go to Settings > General > Accessibility > VoiceOver, then tap VoiceOver Practice. When you finish practicing, tap Done. If you don’t see the VoiceOver Practice button, make sure VoiceOver is turned on. Here’s a summary of key VoiceOver gestures: Navigate and Read Tap: Speak item. Flick right or left: Select the next or previous item. Flick up or down: Depends on the Rotor Control setting. See “Using the VoiceOver rotor control” on page 110.
Using the VoiceOver rotor control The rotor control is a virtual dial that you can use to change the results of up and down flick gestures when VoiceOver is turned on. Operate the rotor: Rotate two fingers on the iPad screen around a point between them. Change the options included in the rotor: Go to Settings > General > Accessibility > VoiceOver > Rotor and select the options you want to be available using the rotor. The e∂ect of the rotor depends on what you’re doing.
Entering text Move insertion point and hear text by: Character, word, or line Select edit function Select language Using a control Select and hear values by: Character, word, or line Adjust the value of the control object Entering and editing text with VoiceOver When you select a text field with VoiceOver, you can use the onscreen keyboard or an external keyboard connected to iPad to enter text. You can use the editing features of iPad to cut, copy, or paste in the text field.
With VoiceOver turned on and a key selected on the keyboard, use the rotor to select Typing Mode, then flick up or down. Delete a character , then double-tap or split-tap. You must do this even when Select the touch typing. To delete multiple characters, touch and hold the Delete key, then tap the screen with another finger once for each character your want to delete. VoiceOver speaks the character as it’s deleted. If Use Pitch Change is turned on, VoiceOver speaks deleted characters in a lower pitch.
VoiceOver Keyboard Commands VO = Control-Option VO–A Read from the top VO–B Move to the status bar VO–M Press the Home button VO–H Select the next or previous item VO–Right Arrow or VO–Left Arrow Tap an item VO–Space bar Double-tap with two fingers VO–”-” Choose the next or previous rotor item VO–Up Arrow or VO–Down Arrow Choose the next or previous speech rotor item VO–Command–Left Arrow or VO–Command–Right Arrow Adjust speech rotor item VO–Command–Up Arrow or VO–Command–Down Arrow Mute o
C Form control I Image T Table S Static text W ARIA landmark X List M Element of the same type 1 Level 1 heading 2 Level 2 heading 3 Level 3 heading 4 Level 4 heading 5 Level 5 heading 6 Level 6 heading tia l Using a braille display with VoiceOver C on fid en Setting up a braille display You can use a refreshable Bluetooth braille display to read VoiceOver output in braille.
The current line contains additional text to the left The current line contains additional text to the right Set the leftmost or rightmost cell to display status information: Go to Settings > General > Accessibility > VoiceOver > Braille > Status Cell, then tap Left or Right. See an expanded description of the status cell: On your braille display, press the status cell’s router button.
White on Black Use White on Black to invert the colors on the iPad display, which may make it easier to read the screen. When White on Black is turned on, the screen looks like a photographic negative. Invert the screen’s colors: Go to Settings > General > Accessibility > White on Black. Speak Selection Even with VoiceOver turned o∂, you can have iPad read aloud any text you can select. Turn on Speak Selection and adjust speaking rate: Go to Settings > General > Accessibility > Speak Selection.
Perform a pinch gesture Tap the menu button, tap Favorites, and then tap Pinch. When the pinch circles appear, touch anywhere on the screen to move the pinch circles, then drag the pinch circles in or out to perform a pinch gesture. When you finish, tap the menu button. Create your own gesture Tap the menu button, tap Favorites, and then tap an empty gesture placeholder. You can also go to Settings > General > Accessibility > AssistiveTouch > “Create custom gesture.
25 Settings Airplane Mode Airplane mode disables the wireless features in order to reduce potential interference with aircraft operation and other electrical equipment. l Turn on airplane mode: Tap Settings and turn airplane mode on. fid en tia When airplane mode is on, appears in the status bar at the top of the screen. No Wi-Fi, cellular (for iPad Wi-Fi + 3G) or Bluetooth signals are emitted from iPad, disabling any feature that uses the Internet.
Set iPad to ask if you want to join a new network Go to Settings > Wi-Fi and turn “Ask to Join Networks” on or o∂. If “Ask to Join Networks” is turned o∂, you must manually join a network to connect to the Internet when a previously used network isn’t available. Forget a network, so iPad doesn’t join it Go to Settings > Wi-Fi and tap Then tap “Forget this Network.
Display numbered badges on apps with notifications Tap Notifications, then choose an item from the In Notification Center list. Turn o∂ Badge App Icon. Prevent alerts when iPad is locked Tap Notifications, then choose an app from the In Notification Center list. Turn o∂ “View in Lock Screen” to hide alerts from the app when iPad is locked. Some apps have additional options.
VPN VPNs used within organizations lets you communicate private information securely over a nonprivate network. You may need to configure VPN, for example, in order to access your work email. This setting appears when you have VPN configured on iPad, and lets you turn VPN on or o∂. See “Network” on page 122. Brightness & Wallpaper Use Brightness settings to adjust the screen to a comfortable level. Adjust the screen brightness: Go to Settings > Brightness & Wallpaper and drag the slider.
Usage You can view available storage space, display battery power remaining, and, on iPad Wi-Fi + 3G, cellular usage. View available storage: Go to Settings > General > Usage. Manage iCloud storage Go to Settings > General > Usage > Manage Storage. View app storage Go to Settings > General > Usage. Each installed app’s total storage space is shown. For more details, tap the app’s name. See your cellular usage Go to Settings > General > Usage > Cellular Usage. Available on iPad Wi-Fi + 3G.
iTunes Wi-Fi Sync You can sync iPad with iTunes on a computer that’s connected to the same Wi-Fi network. Enable iTunes Wi-Fi Sync: Connect iPad to your computer using the Dock Connector to USB Cable. In iTunes, turn on “Sync over Wi-Fi connection” in the device’s Summary pane. See “Syncing with iTunes” on page 19. After you configure Wi-Fi Sync, iPad syncs with iTunes automatically, once a day, when it is connected to a power source and: iPad and your computer are both connected to the same Wi-Fi network.
iPad Cover Lock / Unlock You can automatically lock or unlock iPad 2 when you use it with the iPad Smart Cover (available separately). When this is turned on, iPad automatically locks and goes to sleep when you close the cover, and then wakes and when you open it. Restrictions You can set restrictions for the use of some apps and for purchased content. For example, parents can restrict explicit music from being seen on playlists, or turn o∂ YouTube access.
Side Switch You can use the Side Switch to lock screen orientation or to silence notifications and sound e∂ects. Lock the screen in portrait or landscape orientation: Go to Settings > General > “Use the Side Switch to…,” then tap Lock Rotation. Mute notifications and other sound e∂ects: Go to Settings > General > “Use the Side Switch to…,” then tap Mute. The Side Switch doesn’t mute audio or video playback.
Profiles This setting appears if you install one or more profiles on iPad. Tap Profiles to see information about the profiles you install. For more information about profiles see Appendix A, “iPad in Business,” on page 127. Reset You can reset the word dictionary, network settings, home screen layout, and location warnings. You can also erase all of your content and settings. Erase all content and settings: Go to Settings > General > Reset, then tap Erase All Content and Settings.
Appendix A iPad in Business iPad in the enterprise With support for secure access to corporate networks, directories, and Microsoft Exchange, iPad is ready to go to work. For detailed information about using iPad in business, go to www.apple.com/ipad/business. Using configuration profiles fid en tia l If you’re in an enterprise environment, you may be able to set up accounts and other items on iPad by installing a configuration profile.
VPN access VPN (virtual private network) provides secure access over the Internet to private networks, such as the network at your company or school. Use Network settings on iPad to configure and turn on VPN. Ask your administrator what settings you should use. VPN can also be set up automatically by a configuration profile. When VPN is set up by a configuration profile, iPad may turn VPN on automatically whenever it’s needed. For more information, contact your administrator.
Appendix B International Keyboards International keyboards let you type text in many di∂erent languages, including Asian languages and languages written from right to left. Adding and removing keyboards To type text in di∂erent languages on iPad, you use di∂erent keyboards. By default, only the keyboard for the language you’ve set is available. To make keyboards for other languages available, use Keyboard settings. For a list of keyboards supported by iPad, go to www.apple.com/ipad/specs.
Typing using Cangjie Build Chinese characters from the component Cangjie keys. As you type, suggested characters appear. Tap a character to choose it, or continue typing up to five components to see more options. Typing using Stroke (Wubihua) Use the keypad to build Chinese characters using up to five strokes, in the correct writing sequence: horizontal, vertical, left falling, right falling, and hook. For example, the Chinese character (circle) should begin with the vertical stroke 䖹.
Japanese You can type Japanese using the Kana or Romaji keyboards. You can also type facemarks. Typing Japanese Kana Use the Kana keypad to select syllables. For more syllable options, tap the arrow key and select another syllable or word from the window. Typing Japanese Romaji Use the Romaji keyboard to type syllables. Alternative choices appear along the top of the keyboard, tap one to type it. For more syllable options, tap the arrow key and select another syllable or word from the window.
Vietnamese Touch and hold a character to see the available diacritical marks, then slide to choose the one you want.
Appendix C Support and Other Information iPad Support site Comprehensive support information is available online at www.apple.com/support/ipad. You can also use Express Lane for personalized support (not available in all areas). See expresslane.apple.com. Low-battery image or “Not Charging” message appears en tia l iPad is low on power and needs to charge for up to ten minutes before you can use it. For information about charging iPad, see “Charging the battery” on page 21.
Restarting and resetting iPad If something isn’t working right, try restarting iPad, forcing an app to close, or resetting iPad. Restart iPad: Hold down the Sleep/Wake button until the red slider appears. Slide your finger across the slider to turn o∂ iPad. To turn iPad back on, hold down the Sleep/Wake until the Apple logo appears. Force an app to close: Hold down the Sleep/Wake button on top of iPad for a few seconds until a red slider appears, then hold down the Home button until the app closes.
Backing up with iCloud iCloud automatically backs up iPad daily over Wi-Fi when it’s connected to a power source and iPad is locked. The date and time of the last backup is listed at the bottom of the Storage & Backup screen. iCloud backs up your: Purchased music, TV shows, apps, and books Photos in your Camera Roll album iPad settings and app data Home screen and app organization Messages Note: Purchased music isn’t backed up in all areas and TV shows aren’t available in all areas.
Removing an iTunes backup You can remove an iPad backup from the list of backups in iTunes. You may want to do this, for example, if a backup was created on someone else’s computer. Remove a backup: 1 In iTunes, open iTunes Preferences. Mac: Choose iTunes > Preferences. Windows: Choose Edit > Preferences 2 Click Devices (iPad doesn’t need to be connected). 3 Select the backup you want to remove, then click Delete Backup. 4 Click Delete, to confirm you wish to remove the selected backup, then click OK.
Safari, Mail, and Contacts If iPad can’t send or receive email, try these steps. Can’t send email In Settings, choose Mail, Contacts, Calendars, then select the account you’re trying to use. Tap Account Info, then tap SMTP under Outgoing Mail Server. You can set up additional SMTP servers, or select one from another mail account on iPad. Contact your Internet service provider for configuration information. Set up your mail account directly on iPad, instead of syncing it from iTunes.
If you’re using the line out port on the optional iPad Dock, make sure that you turn on the external speakers or stereo, and that they’re plugged in correctly and working properly. Use the volume controls on the the external speakers or stereo, not on iPad. If you’re using an app that works with AirPlay, check to see if the AirPlay device you’re sending the sound to is turned on and the volume is turned up. If you want to hear sound through iPad’s speaker, tap and select it from the list.
iTunes Store and App Store To use the iTunes Store or the App Store, iPad must have an Internet connection. See “Network” on page 122. iTunes or App Store isn’t available To purchase content from the iTunes Store or the App Store, you need an Apple ID. You can set up an Apple ID on iPad. Go to Settings > Store > Create New Apple ID. You can also set up an Apple ID on your computer by opening iTunes and choosing Store > Create Account.
Disposal and recycling information Your iPad must be disposed of properly according to local laws and regulations. Because it contains a battery, iPad must be disposed of separately from household waste. When your iPad reaches its end of life, contact Apple or your local authorities to learn about recycling options. For information about Apple’s recycling program, go to www.apple.com/recycling.
% Apple Inc. © 2011 Apple Inc. All rights reserved. Apple, the Apple logo, AirPlay, AirPort, AirPort Express, AirPort Extreme, Aperture, Apple TV, FaceTime, Finder, iBooks, iCal, iLife, iPad, iPhone, iPhoto, iPod, iPod touch, iTunes, iTunes Extras, Keynote, Mac, Mac OS, Numbers, Pages, Photo Booth, Safari, Spotlight, and Time Capsule are trademarks of Apple Inc., registered in the U.S. and other countries. IOS is a trademark or registered trademark of Cisco in the U.S.