iPad User Guide Everything you need to know about iPad
Your iPad iPad models compatible with iPadOS 14.5 This guide helps you get started using iPad and discover all the amazing things it can do with iPadOS 14.5, which is compatible with the following models: iPad Pro 12.9-inch (5th generation) iPad Pro 12.9-inch (4th generation) iPad Pro 12.9-inch (3rd generation) iPad Pro 11-inch (3rd generation) iPad Pro 11-inch (2nd generation) iPad Pro 11-inch (1st generation) iPad Air (4th generation) iPad Pro 12.9-inch (1st and 2nd generation) iPad Pro 10.
Note: Apps and services that send or receive data over a cellular network may incur additional fees. Contact your carrier for information about your service plan and fees. iPad Pro 12.
Unwind with iPad Whatʼs new in iPadOS 14 iPad Pro 12.
Personalize your iPad Unwind with iPad Whatʼs new in iPadOS 14 iPad Pro 12.
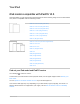
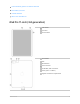
Learn advanced gestures to interact with iPad Personalize your iPad Unwind with iPad Whatʼs new in iPadOS 14 iPad Pro 11-inch (3rd generation) Front camera Top button Volume buttons Rear cameras Flash LiDAR Scanner Smart Connector Thunderbolt / USB 4 connector SIM tray (Wi-Fi + Cellular) Magnetic connector for Apple Pencil iPad User Guide 6
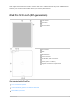
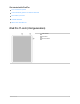
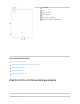
Get started with iPad Pro Turn on and set up iPad Learn advanced gestures to interact with iPad Personalize your iPad Unwind with iPad Whatʼs new in iPadOS 14 iPad Pro 11-inch (2nd generation) Front camera Top button Volume buttons iPad User Guide 7
Rear cameras Flash LiDAR Scanner Smart Connector USB-C connector SIM tray (Wi-Fi + Cellular) Magnetic connector for Apple Pencil Get started with iPad Pro Turn on and set up iPad Learn advanced gestures to interact with iPad Personalize your iPad Unwind with iPad Whatʼs new in iPadOS 14 iPad Pro 11-inch (1st generation) iPad User Guide 8
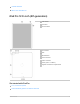
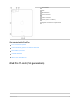
Front camera Top button Volume buttons iPad User Guide 9
Rear camera Flash Smart Connector USB-C connector SIM tray (Wi-Fi + Cellular) Magnetic connector for Apple Pencil Get started with iPad Pro Turn on and set up iPad Learn advanced gestures to interact with iPad Personalize your iPad Unwind with iPad Whatʼs new in iPadOS 14 iPad Pro 12.
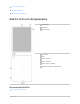
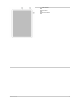
Front camera Top button Volume buttons Home button/Touch ID Rear camera Flash Headphone jack Smart Connector Lightning connector SIM tray (Wi-Fi + Cellular) Note: Flash isnʼt available on iPad Pro 12.9-inch (1st generation).
Get started with iPad Pro Turn on and set up iPad Learn basic gestures to interact with iPad Personalize your iPad Unwind with iPad Whatʼs new in iPadOS 14 iPad Pro 10.
Rear camera Flash Headphone jack Smart Connector Lightning connector SIM tray (Wi-Fi + Cellular) Get started with iPad Pro Turn on and set up iPad Learn basic gestures to interact with iPad Personalize your iPad Unwind with iPad Whatʼs new in iPadOS 14 iPad Pro 9.
Front camera Top button Volume buttons Home button/Touch ID iPad User Guide 14
Rear camera Flash Headphone jack Smart Connector Lightning connector SIM tray (Wi-Fi + Cellular) Get started with iPad Pro Turn on and set up iPad Learn basic gestures to interact with iPad Personalize your iPad Unwind with iPad Whatʼs new in iPadOS 14 iPad Air (4th generation) iPad User Guide 15
Front camera Top button/Touch ID Volume buttons iPad User Guide 16
Rear camera Microphone Smart Connector USB-C connector Magnetic connector for Apple Pencil Get started with iPad Air Turn on and set up iPad Learn basic gestures to interact with iPad Personalize your iPad Unwind with iPad Whatʼs new in iPadOS 14 iPad Air (3rd generation) iPad User Guide 17
Front camera Top button Volume buttons Home button/Touch ID iPad User Guide 18
Rear camera Headphone jack Smart Connector Lightning connector SIM tray (Wi-Fi + Cellular) Get started with iPad Air Turn on and set up iPad Learn basic gestures to interact with iPad Personalize your iPad Unwind with iPad Whatʼs new in iPadOS 14 iPad Air 2 iPad User Guide 19
Front camera Top button Volume buttons Home button/Touch ID iPad User Guide 20
Rear camera Headphone jack Lightning connector SIM tray (Wi-Fi + Cellular) Get started with iPad Air Turn on and set up iPad Learn basic gestures to interact with iPad Personalize your iPad Unwind with iPad Whatʼs new in iPadOS 14 iPad (8th generation) iPad User Guide 21
Front camera Top button Volume buttons Home button/Touch ID iPad User Guide 22
Rear camera Headphone jack Smart Connector Lightning connector SIM tray (Wi-Fi + Cellular) Get started with iPad Turn on and set up iPad Learn basic gestures to interact with iPad Personalize your iPad Unwind with iPad Whatʼs new in iPadOS 14 iPad (7th generation) iPad User Guide 23
Front camera Top button Volume buttons Home button/Touch ID iPad User Guide 24
Rear camera Headphone jack Smart Connector Lightning connector SIM tray (Wi-Fi + Cellular) Get started with iPad Turn on and set up iPad Learn basic gestures to interact with iPad Personalize your iPad Unwind with iPad Whatʼs new in iPadOS 14 iPad (6th generation) iPad User Guide 25
Front camera Top button Volume buttons Home button/Touch ID iPad User Guide 26
Rear camera Headphone jack Lightning connector SIM tray (Wi-Fi + Cellular) Get started with iPad Turn on and set up iPad Learn basic gestures to interact with iPad Personalize your iPad Unwind with iPad Whatʼs new in iPadOS 14 iPad (5th generation) iPad User Guide 27
Front camera Top button Volume buttons Home button/Touch ID iPad User Guide 28
Rear camera Headphone jack Lightning connector SIM tray (Wi-Fi + Cellular) Get started with iPad Turn on and set up iPad Learn basic gestures to interact with iPad Personalize your iPad Unwind with iPad Whatʼs new in iPadOS 14 iPad mini (5th generation) iPad User Guide 29
Front camera Top button Volume buttons Home button/Touch ID Rear camera Headphone jack Lightning connector SIM tray (Wi-Fi + Cellular) iPad User Guide 30
Get started with iPad mini Turn on and set up iPad Learn basic gestures to interact with iPad Personalize your iPad Unwind with iPad Whatʼs new in iPadOS 14 iPad mini 4 Front camera Top button Volume buttons Home button/Touch ID Rear camera Headphone jack Lightning connector SIM tray (Wi-Fi + Cellular) iPad User Guide 31
Get started with iPad mini Turn on and set up iPad Learn basic gestures to interact with iPad Personalize your iPad Unwind with iPad Whatʼs new in iPadOS 14 iPad User Guide 32
Whatʼs new in iPadOS 14 Redesigned widgets Today View widgets have been redesigned to show you more information right from the Home Screen. You can choose among different sizes or add a Smart Stack that displays widgets based on factors like your location, an activity, or the time. See Add widgets on iPad. App design New enhancements like sidebars and pull-down menus let you quickly access more app functions from a single location, without switching views.
App Clips An App Clip is a small part of an app that focuses on a specific task, like renting a bike, paying for parking, or ordering food. You can discover App Clips in Safari, Maps, and Messages, or in the real world through App Clip Codes (iPadOS 14.3) and QR codes. See Use App Clips. Find My (iPadOS 14.3) Keep track of everyday items in the new Items tab. See Locate an item in Find My. Search Search is now a single destination where you can start all your searches.
Messages Pin your most important conversations to the top of your conversation list so you can easily get to them. Mention someone in a conversation to direct a message right to them, and use inline replies to reply directly to a specific message in a group conversation. See Pin a conversation, Mention people in conversations, and Reply to a specific message in a conversation.
People Detection (iPadOS 14.2) On iPad Pro 11-inch (2nd generation and later) and iPad Pro 12.9inch (4th generation and later), you can use Magnifier to detect people and help you maintain a physical or social distance from others. See Detect people around you using Magnifier. Headphone sound level You can check the precise audio level while sound plays through your headphones and set maximum volume limits. See Check headphone and environmental sound levels and Limit the headphone volume.
Safari Safari is more secure and helpful than ever. You can view the Privacy Report to understand how websites treat your privacy, and Safari may warn you if a password youʼre using isnʼt secure. If you come across a website in a different language, Safari now provides translations for seven different languages (beta). See View the Privacy Report and Translate a webpage. Siri Siri has a new compact design that lets you quickly get information while still focusing on what youʼre doing.
Reminders Reminders automatically suggests dates, times, and locations for a reminder based on similar reminders youʼve created in the past. Members of a shared list can assign reminders to each other so splitting up tasks is easier than ever. In iPadOS 14.5, you can also sort and print your lists. See Share and assign reminders, Sort or reorder reminders, and Print reminders. FaceTime FaceTime can now detect when a participant is using sign language and make the person prominent in a Group FaceTime call.
Privacy A new setting allows you to share only your approximate location with an app, and an indicator appears at the top of your iPad screen whenever an app is using your microphone or camera. All apps are required to ask your permission before tracking you across apps and websites owned by other companies (iOS 14.5). See Control the location information you share, Review or change access to the camera, microphone, and other hardware features, and Control app tracking permissions. App Store (iPadOS 14.
Set up and get started Turn on and set up iPad Turn on and set up your new iPad over an internet connection. You can also set up iPad by connecting it to your computer. If you have another iPhone, iPad, iPod touch, or an Android device, you can transfer your data to your new iPad. Note: If your iPad is deployed or managed by a company, school, or other organization, see an administrator or teacher for setup instructions. For general information, see the Apple at Work website or Education website.
2. Do one of the following: Tap Set Up Manually, then follow the onscreen setup instructions. If you have another iPhone, iPad, or iPod touch with iOS 11, iPadOS 13, or later, you can use Quick Start to automatically set up your new device. Bring the two devices close together, then follow the onscreen instructions to securely copy many of your settings, preferences, and iCloud Keychain. You can then restore the rest of your data and content to your new device from your iCloud backup.
Set up cellular service on iPad (Wi-Fi + Cellular models) If you have a Wi-Fi + Cellular model, you can sign up for a cellular data plan. This helps you stay connected to the internet when youʼre away from a Wi-Fi network. Contact your carrier to set up a cellular data plan. iPad Pro 12.9-inch (5th generation) and iPad Pro 11-inch (3rd generation) can connect to 5G networks. See the Apple Support article Use 5G with your iPad. The cellular connection requires a SIM from your carrier.
1. Go to Settings > Cellular Data. 2. Tap Add a New Plan, then follow the onscreen instructions. You can choose a carrier and a plan, or you can add your iPad to an existing plan. See the Apple Support article Set up cellular data service on your Wi-Fi + Cellular model iPad, or contact your carrier. Install a nano-SIM You can install an Apple SIM card or a nano-SIM provided by a carrier. 1.
Manage your cellular data service 1. Go to Settings > Cellular Data. 2. Do any of the following: Restrict all data to Wi-Fi: Turn off Cellular Data. Turn on or off LTE and roaming: Tap Cellular Data Options. Turn on Personal Hotspot: Tap Set Up Personal Hotspot (available from certain carriers), then follow the onscreen instructions. Manage your cellular account: Tap Manage [account name] or Carrier Services.
Join a Personal Hotspot If an iPhone or an iPad (Wi-Fi + cellular) is sharing a Personal Hotspot, you can use its cellular internet connection. Go to Settings > Wi-Fi, then choose the name of the device sharing the Personal Hotspot. If asked for a password on your iPad, enter the password shown in Settings Hotspot on the device sharing the Personal Hotspot.
iCloud provides you with a free email account and 5 GB of storage for your mail, documents, photos and videos, and backups. Your purchased music, apps, TV shows, and books donʼt count against your available storage space. You can upgrade your iCloud storage right from iPad. Note: Some iCloud features have minimum system requirements. The availability of iCloud and its features varies by country or region. Sign in with your Apple ID If you didnʼt sign in during setup, do the following: 1. Go to Settings .
1. Go to Settings > [your name] > iCloud. 2. Do any of the following: See your iCloud storage status. Upgrade your iCloud storage—tap Manage Storage > Change Storage Plan. Turn on the features you want to use, such as Photos, Mail, Contacts, and Messages.
Passwords and credit cards; see Make your passwords available on all your devices with iPad and iCloud Keychain You can also do the following: View your iCloud data on iPhone, iPad, iPod touch, Apple Watch, Mac, and iCloud.com (using a Mac or a Windows PC). Share your photos and videos with the people you choose. See Share iPad photos with Shared Albums in iCloud. Share your iCloud storage on plans with 200 GB or more with up to five other family members.
2. Tap Search, then enter “iPad User Guide.” 3. Tap Get, then wait for the book to download. See Read books in the Books app on iPad.
Basics Wake and unlock iPad iPad turns off the display to save power, locks for security, and goes to sleep when youʼre not using it. You can quickly wake and unlock iPad when you want to use it again. Wake iPad To wake iPad, do one of the following: Press the top button. Tap the screen. Or, on supported models, you can tap the screen with Apple Pencil to wake iPad and open Notes. Unlock iPad with Face ID If you didnʼt set up Face ID when you set up iPad, see Set up Face ID on iPad. 1.
To lock iPad again, press the top button. iPad locks automatically if you donʼt touch the screen for a minute or so. However, if Attention Aware Features is turned on in Settings > Face ID & Passcode, iPad wonʼt dim or lock as long as it detects attention. Unlock iPad with Touch ID If you didnʼt set up Touch ID when you set up iPad, see Set up Touch ID on iPad. On an iPad with a Home button, press the Home button using the finger you registered with Touch ID.
2. Enter the passcode (if you set up iPad to require a passcode). To lock iPad again, press the top button. iPad locks automatically if you donʼt touch the screen for a minute or so. Learn gestures for iPad Learn basic gestures to interact with iPad Control iPad and its apps using a few simple gestures—tap, touch and hold, swipe, scroll, and zoom. Symbol Gesture Tap. Touch one finger lightly on the screen. Touch and hold. Touch and hold items in an app to preview contents and perform quick actions.
Gesture Description Go Home. Swipe up from the bottom edge of the screen to return to the Home Screen at any time. See Open apps on iPad. Quickly access controls. Swipe down from the top-right corner to open Control Center; touch and hold a control to reveal more options. To add or remove controls, go to Settings customize Control Center on iPad. > Control Center. See Use and Open the App Switcher. Swipe up from the bottom edge, pause in the center of the screen, then lift your finger.
Gesture Description Use Accessibility Shortcut. Triple-click the top button. (On an iPad with a Home button, triple-click the Home button.) See Use accessibility shortcuts on iPad. Take a screenshot. Simultaneously press and quickly release the top button and volume up button. (On an iPad with a Home button, simultaneously press and quickly release the top button and the Home button.) See Take a screenshot or screen recording on iPad. Turn off.
Ask Siri. Say something like: “Turn up the volume” or “Turn down the volume.” Learn how to ask Siri. You can use Control Center to silence audio alerts and notifications. WARNING: For important information about avoiding hearing loss, see Important safety information for iPad. Do Not Disturb doesnʼt mute the audio from music, podcasts, movies, and TV shows. Lock the ringer and alert volumes Go to Settings > Sounds, then turn off Change with Buttons.
Mute the sound Press and hold the Volume Down button. Temporarily silence calls, alerts, and notifications Open Control Center, then tap . (See Set Do Not Disturb on iPad.) Change or turn off iPad sounds In Settings , change or turn off the sounds iPad plays when you get a call, text message, email, reminder, or other type of notification. To temporarily silence incoming calls, alerts, and sound effects, turn on Do Not Disturb.
Change common iPad settings Find settings on iPad In the Settings app , you can search for iPad settings you want to change, such as your passcode, notification sounds, and more. 1. Tap Settings on the Home Screen.
2. Swipe down from the top of the screen to reveal the search field, enter a term—“iCloud,” for example—then tap a setting on the left side of the screen. Adjust the screen brightness and color on iPad On iPad, dim the screen to extend battery life, set Dark Mode, and use Night Shift. On supported models, use True Tone to automatically adapt the color and intensity of the display to match the light in your environment.
Schedule Dark Mode to turn on and off automatically 1. Go to Settings > Display & Brightness. 2. Turn on Automatic, then tap Options. 3. Select either Sunset to Sunrise or Custom Schedule. If you choose Custom Schedule, tap the options to schedule the times you want Dark Mode to turn on and off. If you select Sunset to Sunrise, iPad uses the data from your clock and geolocation to determine when itʼs nighttime for you.
Turn True Tone on or off On supported models, turn on True Tone to automatically adapt the color and intensity of the display to match the light in your environment. Do any of the following: Open Control Center, touch and hold Go to Settings , then tap to turn True Tone on or off. > Display & Brightness, then turn True Tone on or off. Turn Night Shift on or off You can turn on Night Shift manually, which is helpful when youʼre in a darkened room during the day.
Change the name of your iPad You can change the name of your iPad, which is used by iCloud, AirDrop, your Personal Hotspot, and your computer. 1. Go to Settings 2. Tap > General > About > Name. , enter a new name, then tap Done. Set the date and time on iPad By default, the date and time, visible on the Lock Screen, are set automatically based on your location. If theyʼre incorrect, you can adjust them. 1. Go to Settings > General > Date & Time. 2.
3. To add a keyboard for another language, go to Settings > General > Keyboard > Keyboards, then tap Add New Keyboard. See Add or change keyboards on iPad. Set up mail, contacts, and calendar accounts on iPad In addition to the apps that come with iPad and that you use with iCloud, iPad works with Microsoft Exchange and many of the most popular internet-based mail, contacts, and calendar services. You can set up accounts for these services. Set up a mail account 1.
Access features from the iPad Lock Screen The Lock Screen, which shows the current time and date and your most recent notifications, appears when you turn on or wake iPad. From the Lock Screen, you can see notifications, open Camera and Control Center, get information from your favorite apps at a glance, and more. Access features and information from the Lock Screen You can quickly access the features and information you need most from the Lock Screen, even while iPad is locked. Open Camera: Swipe left.
To choose what you can access from the Lock Screen, see Control access to information on the iPad Lock Screen. Show notification previews on the Lock Screen 1. Go to Settings > Notifications. 2. Tap Show Previews, then tap Always. Notification previews include text from Messages, lines from Mail messages, and details about Calendar invitations. See View and respond to notifications on iPad. Open apps on iPad You can quickly open apps from your Home Screen pages. 1.
2. Swipe left or right to browse apps on other Home Screen pages. 3. To open an app, tap its icon on the Home Screen. 4. To return to the first Home Screen page, swipe up from the bottom edge of the screen. Take a screenshot or screen recording on iPad You can take a picture of the screen just as it appears, or a recording of actions on the screen, to share with others or use in documents. Take a screenshot 1.
Take a full-page screenshot You can take a full-page, scrolling screenshot of a webpage, document, or email that exceeds the length of your iPad screen. The screenshot is saved as a PDF. 1. Do one of the following: On an iPad with a Home button: Simultaneously press and then release the top button and the Home button. On other iPad models: Simultaneously press and then release the top button and the volume up button. 2. Tap the screenshot in the lower-left corner, then tap Full Page. 3.
Lock or unlock the screen orientation You can lock the screen orientation so that it doesnʼt change when you rotate iPad. Open Control Center, then tap . When the screen orientation is locked, appears in the status bar. Change the wallpaper on iPad On iPad, choose an image or photo as wallpaper for the Lock Screen or Home Screen. You can choose from dynamic and still images.
1. Go to Settings > Wallpaper > Choose a New Wallpaper. 2. Do any of the following: Choose a preset image from a group at the top of the screen (Dynamic, Stills, and so on). Wallpaper marked with changes appearance when Dark Mode is turned on. Select one of your own photos (tap an album, then tap the photo). To reposition your selected image, pinch open to zoom in on it, then drag the image to move it. Pinch closed to zoom back out.
Zoom an app to fill the screen on iPad Most apps for iPhone and iPod touch can be used with iPad, but they might not take advantage of the large screen. In this case, tap to zoom in on the app. Tap to return to the original size. Check the App Store to see if thereʼs a version of the app thatʼs optimized for iPad, or a universal version thatʼs optimized for iPhone, iPod touch, and iPad.
1. To see all your open apps in the App Switcher, do one of the following: On all iPad models: Swipe up from the bottom of the screen, then pause in the center of the screen. On an iPad with a Home button: Double-click the Home button. 2. To browse the open apps, swipe right, then tap the app or Split View workspace you want to use. Switch between open apps Swipe left or right with four or five fingers. Swipe left or right with one finger along the bottom edge of the screen.
2. Drag an app to one of the following locations: Another location on the same page The Dock at the bottom of the screen Another Home Screen page Drag the app to the right edge of the screen. You might need to wait a second for the new page to appear. The dots above the Dock show how many pages you have and which one youʼre viewing. 3. When youʼre finished, tap Done at the top right.
To delete a folder, tap the folder to open it, then drag all the apps out of it. The folder is automatically deleted. Move an app from a folder to the Home Screen You can move an app from a folder to a Home Screen page to make it easier to find and open. 1. Go to the Home Screen page with the folder that contains the app, then tap the folder to open it. 2. Touch and hold the app until the apps begin to jiggle. 3. Drag the app from the folder to the Home Screen.
If you change your mind, you can redownload apps youʼve deleted. In addition to deleting third-party apps, you can delete the following built-in Apple apps that came with your iPad: Books Calendar Contacts (Contact information remains available through Messages, Mail, FaceTime, and other apps. To remove a contact, you must restore Contacts.
Use multiple apps simultaneously Open two items in Split View on iPad Open two different apps, or two windows from the same app, by splitting the screen into resizable views. For example, open Messages and Maps at the same time in Split View. Or open two Messages windows in Split View and manage two conversations at the same time. Open a second item in Split View 1. While using an app, swipe up from the bottom edge and pause to reveal the Dock. 2.
Turn Split View into Slide Over Swipe down from the top of the smaller view. See Open an app in Slide Over. On supported models, you can use Split View and Slide Over simultaneously. Open an app in Slide Over on iPad You can use an app that slides in front of another app or in front of itself. For example, open Messages in Slide Over to carry on a conversation while using Maps. iPad keeps track of the apps you open in Slide Over so that you can switch between them easily. Open another app in Slide Over 1.
Switch between apps in Slide Over Swipe right along the bottom of the Slide Over window, or do the following: 1. Swipe up from the bottom of the Slide Over window. 2. Tap the app you want to view, if itʼs visible. If you donʼt see it, swipe right through the apps.
Move the Slide Over window to the other side of the screen: Drag from the top of the Slide Over window. Remove the Slide Over window: Drag the top of the window off the right edge of the screen. Move the Slide Over window back onto the screen: From any open app, swipe left from the right edge of the screen. Turn Slide Over into Split View Drag the top of the Slide Over window to the lower right or lower left of the screen. On supported models, you can use Slide Over and Split View simultaneously.