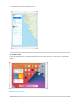
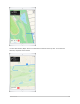
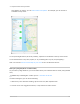
2. Tap Directions on the information card. Use the Maps widget To quickly get directions to a likely destination from the Home Screen or Today View, use the Maps widget. See Add widgets on iPad.
To get directions, iPad must be connected to the internet. (On Wi-Fi + Cellular models, cellular data rates may apply. See View or change cellular data settings on iPad (Wi-Fi + Cellular models).) To get directions involving your current location, Location Services must be on. (See Control the location information you share on iPad.) Choose your preferred type of travel in Maps on iPad You can choose the default mode of transportation for getting directions in the Maps app 1. Go to Settings . > Maps. 2.
On other iPad models, Maps shows turn directions in a banner at the top left. To see the next direction, swipe left on the banner.
To end directions at any time, tap End, or say something to Siri like “Stop navigating.” Note: You can also see an overview map of your route or the entire list of driving directions. See See an overview of your route or its directions in a list in Maps on iPad. Share your driving ETA (Wi-Fi + Cellular models) As you follow turn-by-turn driving directions, you can let others know your estimated time of arrival (ETA). Ask Siri. Say something like: “Share my ETA.” Learn how to ask Siri.
Ask Siri. On Wi-Fi + Cellular models, say something like: “Report an accident” “Thereʼs something on the road” “Thereʼs a speed check here.” Learn how to ask Siri Or with turn-by-turn driving directions showing (Wi-Fi + Cellular models), you can tap the route card at the bottom of the screen, tap Report, then tap Accident, Hazard, or Speed Check. To report an incident when you arenʼt following turn-by-turn directions (all models), you can do the following: 1.
4. Tap Submit. Apple evaluates incoming incident reports. When thereʼs a high level of confidence in the reports, incident markers for Accident, Hazard, and in China, Road Work are displayed in Maps for other users too. Note: Speed checks are not displayed with incident markers. Instead, notifications for speed checks appear when you follow turn-by-turn directions (U.S. only). Report on the status of a hazard or accident A map may display hazard their status (U.S. only). and accident markers.
Apple evaluates incoming incident reports. When thereʼs a high level of confidence in the reports, the incident markers are removed from Maps. Note: Apple is committed to keeping personal information safe and private. To learn more, go to Settings > Maps, then tap About Apple Maps and Privacy. Get cycling directions from your current location in Maps on iPad In the Maps app , you can get detailed cycling directions. Maps offers routes on bike paths, bike lanes, and bike-friendly roads (when available).
2. Tap Go for the route you want. Note: Before you tap Go, you can select other route options. For example, you can choose to avoid hills or busy roads. To see upcoming directions (Wi-Fi only models), swipe left on the banner at the top of the screen. To end the directions at any time, tap End, or say something like “Hey Siri, stop navigating.” Note: You can also see an overview map of your route or all of its directions in a list.
3. You can do the following during your trip: Stop sending ETA information: Tap Sharing ETA at the bottom of the screen, then choose a contact. Replace the Sharing ETA card with the route card: Tap on the Sharing ETA card. People using devices with iOS 13.1, iPadOS 13.1, or later receive a Maps notification with your ETA, and they can track your progress in Maps. People using devices with earlier versions receive the notification through iMessage. People using other mobile devices receive an SMS message.
Get walking directions from your current location in Maps on iPad In the Maps app , you can get detailed walking directions to your destination. To hear turn-by-turn directions (Wi-Fi + Cellular models), wear headphones connected to your iPad, or turn on the guidance voice. Get directions for walking 1. Do one of the following: Say something like “Hey Siri, give me walking directions home.” Learn how to ask Siri. Tap your destination (such as a landmark on a map), tap Directions, then tap .
Note: You can also see an overview map of your route or a list of all of its directions. Share your walking ETA (Wi-Fi + Cellular models) As you follow walking directions, you can let others know your estimated time of arrival (ETA) (iPadOS 14.5). Ask Siri. Say something like: “Share my ETA.” Learn how to ask Siri. Or without asking Siri, you can do the following: 1. With turn-by-turn directions showing, tap the route card, then tap Share ETA. 2.
To disable Share ETA, go to Settings > Maps > Navigation & Guidance, then turn off Share ETA. Get transit directions from your current location in Maps on iPad In the Maps app , you can get detailed transit directions to your destination. 1. Do one of the following: Say something like “Hey Siri, give me transit directions to the Ferry Building.” Learn how to ask Siri (Siri transit directions not available in all countries or regions).
Do any of the following during your trip: See upcoming directions: Swipe left on the banner at the top of the screen. View and share the directions in a list: Tap the route card at the bottom of the screen, then tap Details. To share the list of directions, scroll to the bottom of the route card, then tap Share. See the route overview: Tap the route card at the bottom of the screen, then tap Overview. To see more detail, tap the route card, then tap Zoom In.
See an overview of your walking or transit route (Wi-Fi + Cellular models) With walking or transit directions showing, tap the route card at the bottom of the screen, then tap Overview. To return to turn-by-turn directions, tap the route card, then tap “Turn-by-turn” (for a walking route) or Zoom In (for a transit route).
Change audio settings for turn-by-turn directions in Maps on iPad (Wi-Fi + Cellular models) For driving, walking, and cycling routes, you can turn off the voice for spoken directions or change its volume in the Maps app (Wi-Fi + Cellular models). You can also change the audio output device that plays spoken directions, and whether to automatically pause spoken audio, like podcasts and audio books, when directions are spoken.
Devices, such as a Bluetooth car device or AirPods, appear as options when theyʼre connected to iPad. Change whether to pause spoken audio for voice directions Do one of the following: With turn-by-turn directions showing, tap the route card at the bottom of the screen, tap Audio, then turn Pause Spoken Audio on or off. Before you start your next route, go to Settings Pause Spoken Audio on or off.
Avoid hills or busy roads: With a cycling route showing, swipe the route card up, scroll to the bottom of the list, then turn on an option. Reverse the starting point and destination: Tap My Location (near the top of the route card), then tap . Choose a different starting point or destination: Tap My Location, tap either the From or To field, then enter a different location.
4. To choose a different starting point or destination, tap My Location, tap either the From or To field, enter a different location, then tap Route. 5. Tap Go for the route you want. 6. Do any of the following: See upcoming directions: Swipe left on the banner at the top of the screen. View and share the directions in a list: Tap the route card at the bottom of the screen, then tap Details. To share the list of directions, scroll to the bottom of the route card, then tap Share.
Report a misnamed road, business, or other place 1. Tap in the upper-right corner of the map, then tap Report an Issue. 2. Tap Map Labels. 3. Tap the map, then tap the road or place to show its name. 4. Tap Done. 5. Do any of the following: Correct the name: Tap the name, tap speak a correction. , then use the keyboard to correct the name or tap to Remove the name: Tap Remove Label.
1. Tap in the upper-right corner of the map, then tap Report an Issue. 2. Tap Transit. 3. Choose an issue type, then provide updated information. To update station information or line information, tap the station or line on the map to show itʼs name, then tap Next. To enter information, you can use the keyboard or tap to speak the information. 4. Optionally, tap Add Photo to include a photo with your report. 5. Tap Submit. Report a navigation issue 1.
2. Tap Other Issue. 3. Optionally, tap Add Photo to include a photo with your feedback. 4. Use the keyboard to enter your feedback or tap to speak your feedback. 5. Tap Submit. Measure Measure dimensions with iPad On supported models, use the Measure app and your iPad camera to measure nearby objects and surfaces—you can manually set the start and end points of a measurement, have iPad automatically detect the dimensions of rectangular objects, and more.
1. Open Measure , then use the iPad camera to slowly scan nearby objects. 2. Position iPad so that the object you want to measure appears on the screen. Note: For your privacy, when you use Measure to take measurements, a green dot appears at the top of the screen to indicate your camera is in use. Take an automatic rectangle measurement 1. When iPad detects the edges of a rectangular object, a box frames the object; tap the box to see the dimensions. 2. To take a photo of your measurement, tap .
1. After measuring the distance between two points, move iPad closer to the measurement line until it transforms into a ruler, showing incremental inches and feet. 2. To take a photo of your measurement, tap . View and save measurements on iPad In the Measure app on iPad Pro 12.
1. Position iPad so that the person you want to measure appears on the screen from head to toe. A line appears at the top of the personʼs head (or hair, or hat), with the height measurement showing just below the line. 2. To take a photo of the measurement, tap . 3. To save the photo, tap the screenshot in the lower-left corner, tap Done, then choose Save to Photos or Save to Files. You can easily access and share the height measurement image from Photos or Files on iPad whenever you want.
iMessage texts can include photos, videos, and other info. You can see when other people are typing, and send read receipts to let them know when youʼve read their messages. For security, messages sent using iMessage are encrypted before theyʼre sent. iMessage texts appear in blue bubbles, and SMS/MMS texts appear in green bubbles. See the Apple Support article About iMessage and SMS/MMS. Sign in to iMessage 1. Go to Settings > Messages. 2. Turn on iMessage.
Note: Messages in iCloud uses iCloud storage. See Manage Apple ID and iCloud settings on iPad for information about iCloud storage. Send and receive text messages on iPad Use the Messages app to send and receive texts, photos, videos, and audio messages. You can also personalize your messages with animated effects, Memoji stickers, iMessage apps, and more. Send a message You can send a text message to one or more people. 1. Tap at the top of the screen to start a new message, or tap an existing message.
Tip: To see what time a message was sent or received, drag the message bubble to the left. To view conversation details, tap the name or phone number at the top of the screen, then tap . You can tap the contact to edit the contact card, share your location, view attachments, leave a group conversation, and more. Reply to a message Ask Siri.
Unpin a conversation You can unpin specific conversations at the top of the Messages list. Do any of the following: Touch and hold a conversation, then drag the message to the bottom of the list. Touch and hold a conversation, then tap . Share your name and photo In Messages, you can share your name and photo when you start or respond to a new message. Your photo can be a Memoji or custom image. When you open Messages for the first time, follow the instructions on your iPad to choose your name and photo.
Reply to a specific message in a conversation You can respond to a specific message inline to improve clarity and help keep conversations organized. 1. In a conversation, double-tap (or touch and hold) a message, then tap 2. Write your response, then tap . . Mention people in conversations You can mention other people in a conversation to call their attention to a specific message. Depending on their settings, this can notify them even if they have muted the conversation. 1.
Note: Business Chat messages you send appear in dark gray, to distinguish them from messages sent using iMessage (in blue) and SMS/MMS messages (in green). Send photos, videos, and audio messages on iPad In the Messages app , you can send messages with photos, videos, and audio using the iMessage or SMS/MMS service (WiFi + Cellular models). You can also share, save, or print attachments. Your carrier may set size limits for attachments; iPad may compress photo and video attachments when necessary.
2. Tap the photo in the message bubble, then do any of the following: Tap Markup, use the markup tools to draw on the photo, then tap Save. Tap Edit, use the photo editing tools to edit the photo, then tap Done. 3. Tap Done, add a message, then tap message bubble. to send the photo, or tap to remove the photo from the Add camera effects to a photo or video On supported models, when you take a photo or video in a conversation, you can add camera effects to it—such as filters, stickers, labels, and shapes.
Copy an attachment: Touch and hold the attachment, then tap Copy. Share items from another app: In the other app, tap Share or , then tap Messages. Forward a message or attachment: Touch and hold a message or attachment, tap More, select additional items if desired, then tap . Delete a message or attachment: Touch and hold a message or attachment, tap More, select additional items if desired, then tap .
4. Tap to send your message or to cancel. After you create and send a handwritten message, the message is saved. To see your saved messages, tap . Tap the message to use it again. To delete the saved message, touch and hold it until the messages jiggle, then tap . Use a bubble effect Use bubble effects to animate the message bubble. 1. In a new or existing conversation, type a message or insert a photo or Memoji. 2. Touch and hold , then tap the gray dots to preview different bubble effects.
3. Tap to send the message or to cancel. Tip: Want to send a personal message? When you use invisible ink, the message remains blurred until the recipient swipes to reveal it. Use a full-screen effect Use full-screen effects to animate the message screen. 1. In a new or existing conversation, type a message or insert a photo or Memoji. 2. Touch and hold , then tap Screen. 3. Swipe left to preview different screen effects.
4. Tap to send the message or to cancel. Messages automatically uses the following screen effects for specific text strings: Balloons for “Happy birthday” Confetti for “Congratulations” Fireworks for “Happy New Year” Use iMessage apps in Messages on iPad In the Messages app , you can decorate a conversation with stickers, play a game, share songs, and more—all through iMessage apps—without leaving Messages. You can expand your message options by downloading more iMessage apps from the App Store.
Browse and download iMessage apps 1. In a Messages conversation, tap to open the iMessages App Store. 2. Tap an app to see more details and reviews, then tap the price to purchase an app or tap Get to download a free app. All purchases are made with the payment method associated with your Apple ID. Use an iMessage app 1. In a conversation, tap an iMessage app in the app drawer. 2. Tap an item in the iMessage app to add it to a message bubble. 3.
2. Touch and hold a sticker, then drag it on top of a message in the conversation. Before you release it, you can do any of the following: Adjust the angle: Rotate a second finger around the finger dragging the sticker. Adjust the size: Move a second finger closer to or away from the finger dragging the sticker. You can also place the sticker on top of another sticker, or on a photo. To see text thatʼs covered by a sticker, double-tap the sticker.
2. Tap each feature and choose the options you want. As you add features to your Memoji, your character comes to life. 3. Tap Done to add the Memoji to your collection. To edit, duplicate, or delete a Memoji, tap , tap the Memoji, then tap . Send Memoji and Memoji stickers Messages automatically generates sticker packs based on your Memoji and Memoji characters. You can use stickers to express a range of emotions in new ways. 1. In a conversation, tap . 2.
Send animated Memoji or Memoji recordings On models with a TrueDepth camera you can send Memoji messages that use your voice and mirror your facial expressions. 1. In a conversation, tap 2. Tap , then choose a Memoji. to record your facial expressions and voice. Tap Replay to review your message. 3. Tap to send your message or to cancel. You can also take a picture or video of yourself as a Memoji, decorate it with stickers, then send it; see Add camera effects to a photo or video.
1. Tap in the app drawer. 2. Tap the color dot to choose a color, then draw with one finger. You can change the color, then start drawing again. 3. Tap to send your sketch, or tap to delete it. Express your feelings 1. Tap in the app drawer. 2. Send one of the following animations using gestures on the canvas. Your feelings are sent automatically when you finish the gesture: Tap: Tap with one finger to create a burst of color. You can change the color, then tap again.
3. Tap to take a photo or to record a video. 4. Add a Digital Touch effect, such as a sketch or kiss. 5. Tap to send your message, or tap to delete it. Send and receive money with Apple Pay on iPad (U.S. only) In the Messages app , you can use Apple Pay to send and receive money quickly and easily. Thereʼs no app to download, and you can use the cards you already have with Apple Pay. When you receive money in Messages, itʼs added to your Apple Cash card. See Set up and use Apple Cash on iPad (U.S.
Note: Before you send or receive payments with Apple Pay, you need to agree to the terms and conditions of this service. Send a payment in Messages Ask Siri. Say something like: “Apple Pay 75 dollars to Phillip for the zipline tour” or “Send 15 dollars to Kim for lunch with Apple Pay.” Learn how to ask Siri. You can also do the following: 1. In an iMessage conversation, tap , then enter the amount. Tip: If thereʼs an underlined monetary amount in a message, tap it to preset the payment. 2.
2. Enter the amount, then tap Request. Apple Cash and sending and receiving payments through Apple Pay are services provided by Green Dot Bank, member FDIC. Change message notifications on iPad In Settings senders. , you can set up and manage notifications for the Messages app and filter unknown Manage notifications for messages 1. Go to Settings > Notifications > Messages. 2. Choose options, including the following: Turn Allow Notifications on or off.
Mute notifications for a conversation 1. In the Messages list, swipe left on the conversation. 2. Tap Hide Alerts. Block, filter, and report messages on iPad In the Messages app , you can block unwanted messages, filter messages from unknown senders, and report spam or junk messages. Block messages from a specific person or number 1. In a Messages conversation, tap the name or number at the top of the conversation, then tap the top right. at 2. Tap info. 3. Scroll down, then tap Block this Caller.
Note: Reporting junk or spam doesnʼt prevent the sender from sending messages, but you can block the number to stop receiving them. To report spam or junk messages you receive with SMS or MMS, contact your carrier. Delete messages on iPad In the Messages app , you can delete messages and entire conversations. You canʼt recover a deleted conversation. With Messages in iCloud, anything you delete from iPad is also deleted from your other Apple devices where Messages in iCloud is turned on.
Become an Apple Music subscriber: With a subscription and a Wi-Fi or cellular connection, stream as much music as you like from the Apple Music catalog and your music library. You can download songs, albums, and playlists, and share music with your friends. See Subscribe to Apple Music on iPad. Note: Services and features arenʼt available in all countries or regions, and features may vary by region. Additional charges may apply when using a cellular connection.
1. Under the Library heading in the sidebar, tap a category, such as Albums or Songs; tap Downloaded to view only music stored on iPad. 2. Type in the search field to filter your results and find what youʼre looking for. 3. Tap an item, then tap Play, or tap Shuffle to shuffle an album or playlist. You can also touch and hold the album art, then tap Play. To change the list of categories, tap Edit in the sidebar, then select categories youʼd like to add, such as Genres and Compilations.
Control Description Play the current song. Pause playback. Skip to the next song. Touch and hold to fast-forward through the current song. Return to the songʼs beginning. Tap again to play the previous song in an album or playlist. Touch and hold to rewind through the current song. Tap to repeat an album or playlist. Double-tap to repeat a single song. Tap to play your songs in random order. Tap again to turn off shuffle. Hide the Now Playing Screen button. Tap for more options.
Adjust volume: Drag the volume slider. You can also use the volume buttons on the side of iPad. Navigate to the artist, album, or playlist: Tap the artist name below the song title, then choose to go to the artist, album, or playlist. Scrub to any point in a song: Drag the playhead. See time-synced lyrics Time-synced lyrics appear for many songs in Apple Music. Tap the player to open Now Playing, then tap To hide lyrics, tap . Lyrics scroll in time with the music. .
2. Tap , then tap Share Lyrics. You can also touch and hold a lyrics line to open the sharing screen. 3. Tap the first and last lyrics you want to share, then choose a sharing option. Note: You need an Apple Music subscription to share lyrics. Report a concern To report a concern about time-synced lyrics, touch and hold a lyrics line, then tap Report a Concern at the bottom of the screen. Get audio controls from the Lock Screen or when using another app Open Control Center, then tap the audio card.
By default, if youʼre an Apple Music subscriber, Autoplay adds music similar to what you last played to the end of the queue. To turn off Autoplay, tap . Note: When you turn off Autoplay on a device that uses your Apple ID—your iPad, for example— Autoplay is turned off on all other devices that use the same Apple ID. Add music and videos to the queue When browsing or playing music, touch and hold a song, album, playlist, or video, then choose an option.
Apple Music Subscribe to Apple Music on iPad Apple Music is an ad-free streaming music service that lets you listen to millions of songs and your music library. As a subscriber, you can listen any time—online or off—and create your own playlists, get personalized recommendations, see music your friends are listening to, watch exclusive video content, and more. Note: Apple Music features may vary by country or region. Learn whatʼs available in your country or region.
Edit your subscription You can change your subscription plan or cancel your subscription. 1. Tap Listen Now in the sidebar, then tap or your profile picture. 2. Tap Manage Subscription. If youʼre not a subscriber, you can use Music to listen to music synced to iPad from a Mac or a Windows PC, play and download previous iTunes Store purchases, and listen to Apple Music 1 for free.
Add music to iPad and listen offline In the Music app , Apple Music subscribers can add and download songs and videos from Apple Music. You can stream music you add to iPad when you have an internet connection. To play music when youʼre not connected to the internet, you must first download it. Add music from Apple Music to your library Do any of the following: Touch and hold a song, album, playlist, or video, then tap Add to Library.
Download music from Apple Music to your iPad Download a song, album, or playlist: Touch and hold music youʼve added to your library, then tap Download. After youʼve added a playlist or album, you can also tap at the top of the screen. Note: You must turn on Sync Library to download music from Apple Music to your library (go to Settings > Music, then turn on Sync Library). Always download music: Go to Settings > Music, then turn on Automatic Downloads. Songs you add are automatically downloaded to iPad.