Mac Pro Essentials for Mac Pro (Rack) Look around your new Mac Pro See the ports, connectors, and other features.
Configure your Mac Pro Your Mac Pro has user-accessible memory, graphics modules, and expansion cards that are user-upgradeable. Configure your Mac Pro Secure storage and secure boot Built-in security features ensure your data is safe and your computer starts up only with legitimate macOS software.
Stay in sync Access your documents, photos, music, apps, contacts, and calendars across all your devices with iCloud.
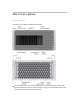
Mac Pro at a glance NAV TITLE: Take a tour Your Mac Pro is packed with advanced technologies. 3.5 mm headphone jack: Plug in stereo headphones or speakers to experience high-quality sound while listening to music or watching movies. Or plug in an analog headset with a built-in mono microphone to make audio and video calls.
USB 3 (USB-A) ports: Connect an iPad, iPhone, iPod, digital camera, external storage device, or printer. The Mac Pro USB 3 ports support USB 3 and USB 2 devices at up to 5 Gbit/s. Thunderbolt 3 (USB-C) ports: Mac Pro has two Thunderbolt 3 (USB-C) ports on the front and two ports on the back. If an Apple MPX Module is installed, it may have additional ports. Use these ports to transfer data, and connect docking stations and RAID arrays. The ports support displays if an Apple MPX Module is installed.
NAV TITLE: Work wirelessly Work wirelessly Using Bluetooth® technology, your Mac Pro can wirelessly connect (that is, pair) with devices such as the included Magic Keyboard with Numeric Keypad, and with devices like the Magic Mouse 2 and Magic Trackpad 2, AirPods, peripheral devices, wearable sports accessories, and others. To connect your Mac Pro with a device that’s not already paired, choose Apple menu > System Preferences, then click Bluetooth.
To customize how your keyboard works, use the Keyboard pane of System Preferences. Choose Apple menu > System Preferences, click Keyboard, then click the buttons at the top to see the options available for keyboard, text, shortcuts, and input sources. To learn what the function keys on the keyboard do, see Keyboard.
Mission Control key (F3): Press spaces and open windows. Launchpad key (F4): Press open it. Media keys (F7, F8, F9): Press movie, or slideshow. Mute key (F10): Press jack. to view what’s running on your Mac Pro, including all your to instantly see all the apps on your Mac Pro. Click an app to to rewind, to play or pause, or to fast-forward a song, to mute the sound from the built-in speakers or 3.
Secondary click (that is, right-click): Press the left or right side of the mouse to perform a “secondary click.” (Enable right- and left-click in System Preferences > Mouse > Secondary click.) 360º scroll: Brush one finger along the surface to scroll or pan in any direction. Screen zoom: Hold down the Control key and scroll with one finger to enlarge items on the screen. (Enable this feature in System Preferences Accessibility > Zoom > Use scroll gesture with modifier keys to zoom.
Secondary click (that is, right-click): Click with two fingers to open shortcut menus. If “Tap to click” is enabled, tap with two fingers. Two-finger scroll: Slide two fingers up or down to scroll. Pinch to zoom: Pinch your thumb and finger open or closed to zoom in or out of photos and webpages. Swipe to navigate: Swipe left or right with two fingers to flip through webpages, documents, and more—like turning a page in a book. Open Launchpad: Quickly open apps in Launchpad.
If you don’t see the Bluetooth icon in the menu bar, choose Apple menu > System Preferences (or click the System Preferences icon in the Dock), click Bluetooth, then select “Show Bluetooth in menu bar.” See Disposal and recycling information or visit Apple Lithium-ion Batteries. NAV TITLE: Adapters The following Apple adapters are available to connect external devices, displays, and more, to the Thunderbolt 3 (USB-C) ports on your Mac Pro. (table aria-label=Adapters that can be purchased separately.
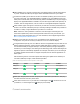
The Thunderbolt 3 (USB-C) ports support video output when an Apple MPX Module graphics card is installed. (A third-party GPU doesn’t enable video on Thunderbolt 3 (USB-C) ports .) The HDMI 2.0 port on your Mac Pro also supports video. You can use an external display, a projector, or an HDTV with your Mac Pro. Note: Mac Pro has at least one HDMI 2.0 port and four Thunderbolt 3 (USB-C) ports.
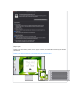
Install Mac Pro into a rack Important: Before installing Mac Pro into a rack, read the safety notes found in Important safety information for your Mac. Mac Pro and the rail assemblies can be installed into any of the three industry standard rack types. The rails come assembled to fit into square holes, but if you remove the outer nut, the rails fit into round hole racks. To install into a threaded rack, remove the screws from the rails, then replace the screws to secure the rails to the rack.
To install Mac Pro into a rack, you need to attach the rail assemblies to Mac Pro and the rack. The minimum depth of the rack must be at least 24 inches; the maximum depth should be no more than 42 inches. Note: Mac Pro requires five rack units (5U). The top two units should be left vacant, the rail assemblies should be installed in the next two units, and one unit below the rail assemblies should be left vacant. Air to cool Mac Pro flows from front to back.
1. Extend one of the unmounted rails assemblies (either left or right). 2. Insert the assembly’s rear rail pins into the back of the rack, then pull the assembly to lock it into place. 3. Insert the assembly’s front rail pins into the front of the rack, then push the assembly to lock it into place. The assembly should snap into place.
4. Slide out the inner rail until it locks. 5. Slide the release latch to detach the inner rail from the assembly. 6. Repeat steps 1 to 4 for the other rail assembly. 7. Attach the inner rails to the sides of Mac Pro, making sure that the release latches are towards the front of the computer and the rail eyelets are well placed onto the Mac Pro rail posts.
8. Slide the rail section forward until the spring lock engages the forward post. 9. With one person on each side, lift Mac Pro.
10. Align the rails attached to Mac Pro with the middle rails in the rack, then slide the computer into the rack. Ensure the locking latches are fully engaged. Remove Mac Pro from a rack Follow these steps to remove Mac Pro from a rack. 1. Move both locking latches down to the unlocked position. 2. Slide out the computer until it stops. 3. With one person on each side, safely hold Mac Pro.
4. Pull the orange release latches on both rails, then remove Mac Pro from the rack. Note: You can detach the rails from the side of Mac Pro by pulling the spring latch forward, then sliding the rail back.
Remove Mac Pro rails from a rack Follow these steps to remove Mac Pro rails from a rack. 1. If the inner rail is extended, pull the orange release latch, then slide the rail in. 2. Push in the rear orange latch at the back of the rail, then push the assembly back to unhook the rear pins. 3. Open the latch at the front of the assembly to release the front pins, then lift the assembly out of the rack.
NAV TITLE: Connect Pro Display XDR Connect Apple Pro Display XDR Retina 6K Resolution. Pro Display XDR is a 32-inch LCD display with Retina 6K resolution. Extreme Dynamic Range. Extreme Dynamic Range (XDR) takes brightness and contrast to the extreme, surpassing what is considered standard dynamic range (SDR) and high dynamic range (HDR). 1000 nits of brightness. Pro Display XDR can sustain 1000 nits of brightness across the full screen.
Tone on Pro Display XDR uses a breakthrough dual ambient light sensor design—a sensor on the front and another on the back—to better gauge your overall lighting environment. This allows more exact adjustments to the color and intensity of your display, so you can have accurate viewing in all lighting conditions. For more information, see Change Display preferences on Mac.
NAV TITLE: Plug in Pro Display XDR Plug in Pro Display XDR Pro Display XDR automatically turns on when you plug it into power and connect your Mac using the included Thunderbolt 3 Pro Cable. Route the cables through the opening in Pro Stand, ensuring that the Thunderbolt 3 Pro Cable is plugged into the Thunderbolt 3 port .
Follow these steps to detach Apple Pro Display XDR from Pro Stand. Important: Detach the display from the stand whenever you move or transport the display. 1. Before detaching the display from the stand, move the display to the highest position. 2. Unlock the slider on the magnetic connector. Important: The slider won’t unlock unless the display is in the highest position. 3. Tilt the display back and lift it from the magnetic connector.
NAV TITLE: Rotate Pro Display XDR Rotate Pro Display XDR on Pro Stand Follow these steps to rotate Apple Pro Display XDR on Pro stand. 1. Before rotating, move the display to the highest position. 2. Unlock the slider on the magnetic connector. Important: The slider won’t unlock unless the display is in the highest position.
3. Rotate the display counterclockwise. When it reaches portrait orientation, the display automatically locks. 4. To rotate to landscape orientation, repeat step 2, then rotate the display clockwise. NAV TITLE: Attach Pro Display XDR to VESA Mount Adapter Attach Pro Display XDR to VESA Mount Adapter Follow these steps to attach Apple Pro Display XDR to a VESA Mount Adapter.
Important: Make sure the VESA mounting solution and installation method (type of bolt or bracket) are sufficient to handle the weight of the Pro Display XDR (up to 16.5 lbs/7.5 kg). Important: Select a mounting location where Pro Display XDR will be free from accidental impact; don’t mount Pro Display XDR so that it faces downward (for example, on the ceiling). 1. Place the display face down on a soft cloth to avoid scratching the glass. 2.
NAV TITLE: Detach Pro Display XDR from VESA Mount Adapter Detach Pro Display XDR from VESA Mount Adapter Follow these steps to detach Apple Pro Display XDR from a VESA Mount Adapter. 1. Use the key provided to turn the lock counterclockwise. 2. Remove the adapter from Pro Display XDR. NAV TITLE: Clean Pro Display XDR Clean Pro Display XDR If your Apple Pro Display XDR has nano-texture glass, clean it only using the included polishing cloth. For additional cloths, contact AppleCare or visit support.
If your Pro Display XDR has standard glass, clean it using the included polishing cloth or a microfiber cloth and water. Get started NAV TITLE: Set up your Mac Set up your Mac The first time you turn on your Mac Pro, Setup Assistant walks you through the simple steps needed to start using your new Mac Pro. If you want to transfer your data from another computer, see Transfer your dataTransfer your data to your new for details.
Be sure to connect your Mac Pro to Ethernet or Wi-Fi, turn on Bluetooth® wireless technology, get an Apple ID, then sign in to your device. Sign in with your Apple ID. Your Apple ID is the account you use for everything you do with Apple—including using the App Store, the iTunes Store, iCloud, Messages, and more. Your Apple ID consists of an email address and a password. You need only one Apple ID to use any Apple service, on any device—whether it’s your computer, iOS device, iPadOS device, or Apple Watch.
Tip: If you don’t see the Wi-Fi status icon or Bluetooth icon in the menu bar, you can add them. For Wi-Fi, choose Apple menu > System Preferences, then click Network. Click Wi-Fi in the list on the left, then select “Show Wi-Fi status in menu bar.” For Bluetooth, choose Apple menu > System Preferences, click Bluetooth, then select “Show Bluetooth in menu bar.” Set up iCloud on your Mac Pro.
menu items change, depending on which app you’re using. Apple menu . The Apple menu in the upper-left corner of the screen contains frequently used items. To open it, click the Apple icon . Help menu. Help for your Mac Pro and apps is always available from the Finder. To get help, click the Help menu and choose macOS Help to open the macOS User Guide. Or type in the search field and choose a suggestion. To learn more, see macOS User Guide. Use a Dynamic Desktop.
Dark Mode is finely tuned for professionals who edit photos and images—colors and fine details pop against the dark app backgrounds. But it’s also great for anyone who just wants to focus on their content. Keep reading to learn about The Finder on your MacThe Finder and other features of the desktop. NAV TITLE: The Finder Use the Finder to organize and locate your files. To open a Finder window, click the Finder icon in the Dock at the bottom of the screen.
Sync devices. When you connect a device like an iPhone or iPad, you can see it in the Finder sidebar. From there you can back up, update, and restore your device. Gallery View. With Gallery View, you can see a large preview of your selected file, so you can visually identify your images, video clips, and other documents. The Preview pane shows information to help you identify the file you want. Use the scrubber bar at the bottom to quickly locate what you’re looking for.
Quick Actions. At the bottom right of the Preview pane are shortcuts that let you manage and edit files directly in the Finder. You can rotate an image, annotate or crop an image in Markup, combine images and PDFs into a single file, trim audio and video files, or create custom actions through Automator workflows (for example, watermarking a file). To learn more, see Perform quick actions in the Finder on Mac in the macOS User Guide.
Open an app or file. Click its icon in the Dock. Recently opened apps appear in the center section of the Dock. Add an item to the Dock. Drag the item and drop it where you want it. Place apps in the left section of the Dock, and files or folders in the right section. Remove an item from the Dock. Drag it out of the Dock. The item isn’t removed from your Mac Pro—just from the Dock.
Get more apps. Click the App Store icon in the Dock and search for apps you want. Apps you download from the App Store appear automatically in Launchpad. To quickly get updates for apps, click Updates in the App Store. Learn more. See the Apple Support article Use Launchpad on your Mac.
Customize your Mac Pro. Choose Apple menu > System Preferences, or click the System Preferences icon in the Dock. Then click the preference you want to set. To learn more, see Customize your Mac with System Preferences in the macOS User Guide. Update macOS. Click the System Preferences icon in the Dock, then click Software Update to see if your Mac is running the latest version of macOS software. You can specify options for automatic software updates.
Get flight info. Enter the airline and flight number in Spotlight to see your flight status and a map, without having to open Safari. Preview your results. Click a search result and view it in the preview on the right. Sometimes that’s all you need to do—click items or links directly in the preview. You can also double-click a result to open it. Open an app. Type the app name in Spotlight, then press Return. Turn off Spotlight Suggestions.
you can turn off Spotlight Suggestions in Spotlight preferences. Click the System Preferences icon in the Dock, click Spotlight, then click to deselect “Allow Spotlight Suggestions in Look up.” You can also make other changes to the list of categories Spotlight searches. Learn more. See the Apple Support article Use Spotlight on your Mac. NAV TITLE: Siri You can talk to Siri on your Mac Pro and use your voice for many tasks.
Play some music. Just say, “Play some music,” and Siri does the rest. You can even tell Siri, “Play the top song from March 1991.” Find and open files. Ask Siri to find files and open them right from the Siri window. You can ask by filename or by description. For example, “Show me files Ursula sent,” or “Open the spreadsheet I created last night.” Drag and drop. Drag and drop images and locations from the Siri window into an email, text message, or document. You can also copy and paste text. Pin a result.
NAV TITLE: New macOS features New macOS features macOS Catalina organizes your media from iTunes into three new apps: Music: Listen to your favorite songs in the new Apple Music app. Your library contains all your music, and For You offers personalized playlists and suggestions. See Music. TV: Watch movies and TV shows in the Apple TV app. See personalized recommendations in Watch Now, or pick up watching where you left off on another device. See TV.
Security: Your Mac asks for permission before letting an app access your data or capture what’s happening on screen. All new apps are checked for security issues before you run them. Security improvements also make it harder for problems in one area to impact the rest of your Mac.
Use Migration Assistant. Open a Finder window, go to Applications > Utilities, then double-click Migration Assistant. Follow the onscreen instructions. See the Apple Support article How to move your content to a new Mac. Tip: For fastest migration, connect your old computer to your Mac Pro with a cable, such as a Thunderbolt 3 (USB-C) cable. If you migrate wirelessly, you’ll get best results if you keep both computers near each other throughout the migration process. Copy files from a storage device.
Save space on your Mac Pro With Optimize Storage, you can automatically free up space on your Mac Pro by making files available on demand. Your oldest files will be stored in iCloud and on your email IMAP or Exchange server, so you can download them at any time. There are also tools to identify and delete big files. Optimize storage. To see storage recommendations, go to Apple menu > About This Mac, click Storage, then click Manage. You’ll see different recommendations based on how you configured your Mac.
Optimize Storage: Save space on your Mac by optimizing the storage of movies and TV shows in the Apple TV app. You can choose to automatically remove movies or TV shows from your Mac Pro after you watch them. You can download them again at any time. Empty Trash Automatically: Automatically erase items that have been in the Trash for more than 30 days. Reduce Clutter: Easily identify large files, and delete the files you no longer need.
Time Machine: Automatically backs up your entire Mac Pro, including system files, apps, accounts, preferences, music, photos, movies, and documents. Remembers how your computer looked on any given day, so you can revisit your Mac Pro as it appeared in the past or retrieve an older version of a document. Lets you restore your entire system from a Time Machine backup. So if anything happens to your Mac Pro, your files and settings are safe and sound.
All in one place. Manage everything related to your Apple ID in the same place. Choose Apple menu > System Preferences on your Mac Pro—your Apple ID and Family Sharing settings are at the top. Update account, security, and payment information. In System Preferences, click Apple ID, then select an item in the sidebar to review and update the information associated with your account.
Media & Purchases: Manage the accounts linked to Apple Music, Apple Podcasts, Apple TV, and Apple Books; select purchasing settings; and manage your subscriptions. See all your devices. At the bottom of the Apple ID sidebar, see all the devices linked to your Apple ID. You can verify that Find My [device] is turned on for each one (see Find My), see the status of iCloud Backup for an iOS or iPadOS device, or remove a device from your account if you no longer own it. Family Sharing.
NAV TITLE: Access your iCloud content iCloud is the easiest way to make sure all your important content is everywhere you are. iCloud stores your documents, photos, music, apps, contacts, and calendars, so you can access them anytime you’re connected to the web. You can use your Apple ID to set up a free iCloud account, which comes with 5 GB of free storage space. Purchases you make from the iTunes Store, App Store, Apple TV app, or Book Store don’t count toward your available space.
your Mac Pro, on your iPhone or iPad in the Files app, on the web at iCloud.com, or on a Windows PC in the iCloud app. When you make changes to a file on a device or on iCloud Drive, you’ll see your edits wherever you view the file. To get started, click the System Preferences icon in the Dock, click Apple ID > iCloud, select iCloud Drive, click Options, then select “Desktop & Documents Folders.” To learn more, see the Apple Support article Add your Desktop and Documents files to iCloud Drive.
Apple ID, purchases you’ve made on the iTunes Store, App Store, Apple TV app, and Book Store are available at any time, no matter which computer or device you used to purchase them. So all your music, movies, books, and more are available wherever you go. Locate your Mac Pro with Find My Mac. If your Mac Pro is missing, you can use Find My to locate it on a map, lock its screen, and even erase its data remotely if you have Find My Mac turned on.
Learn more. See What is Screen Time on Mac? in the macOS User Guide. NAV TITLE: Handoff With Handoff, you can continue on one device where you left off on another. Work on a presentation on your Mac Pro, then continue on your iPad. Or start an email message on your iPhone, then finish it on your Mac Pro. View a message on your Apple Watch, and respond to it on your Mac Pro. You don’t have to worry about transferring files.
Use across apps. You can copy and paste images, text, photos, and video between any apps that support copy and paste on your Mac, iPhone, iPad, and iPod touch. Copy and paste files. You can quickly move files from one Mac to another using Universal Clipboard. Copy a file on your Mac Pro and paste it to a Finder window, Mail message, or any app that supports copy and paste on a nearby Mac. You must be signed in with the same Apple ID on both Macs. Learn more.
Mirror your desktop. To show the same thing on both screens, open the AirPlay menu and select Mirror Built-In Retina Display. To extend your desktop again, open the AirPlay menu and choose Use as Separate Display. Use Apple Pencil. Precisely draw and create in your favorite pro apps. Just drag the window from your Mac to your iPad and start using Apple Pencil. Or use Apple Pencil to mark up PDFs, screenshots, and images.
the controls appear at the bottom of the iPad display, whether or not your Mac has a Touch Bar. Learn more. See Use your iPad as a second display for your Mac in the macOS User Guide. NAV TITLE: Continuity Camera Use your iPhone, iPad, or iPod touch to scan documents or take a picture of something nearby, and it appears instantly on your Mac. Continuity Camera is supported in many apps, including Finder, Mail, Messages, and more.
The photo or scan appears where you want it in your document. Learn more. See Insert photos and scans with Continuity Camera on Mac in the macOS User Guide. NAV TITLE: Continuity Sketch and Continuity Markup With Continuity Sketch, you can use your nearby iPhone or iPad to draw a sketch and instantly insert it into a document on your Mac—for example, in an email, a message, a document, or a note.
iPod touch to mark up PDFs, screenshots, and images, and see the results on your Mac. Press and hold the Space bar to view the document in Quick Look, then click the iPad Markup icon . Start writing, drawing, or adding shapes with your finger or Apple Pencil (on an iPad that supports it). See the updates live on your Mac as you make them on your iPhone, iPod touch, or iPad. Learn more.
Send a file from the Finder. Click the Finder icon in the Dock, then click AirDrop in the sidebar on the left. When the person you want to send a file to appears in the window, drag the file to him or her. Send a file from an app. While using an app like Pages or Preview, click the Share button choose AirDrop. and Share passwords stored in iCloud Keychain. In Safari, you can use AirDrop to share an account password with one of your contacts, or with another Mac, iPhone, iPad, or iPod touch.
Note: Internet and Wi-Fi connections are required in order to make or receive phone calls on your Mac Pro. Take or make a call. When someone calls your iPhone, click the notification that appears on your Mac Pro screen and your Mac Pro becomes a speakerphone. If you want to make a call, click a phone number in a Spotlight search or in an app such as FaceTime, Contacts, Safari, or Calendar. You need a nearby device (iPhone or iPad) with a cellular connection in order to make phone calls.
Connect to your device’s Personal Hotspot. Click the Wi-Fi status icon in the menu bar, then choose your iPhone or iPad from the list of devices that appears. The Wi-Fi icon changes to . (You don’t need to do anything on your device—Mac Pro connects automatically.) Tip: If you’re asked for a password, make sure your devices are set up correctly. See the Apple Support article Use Instant Hotspot to connect to your Personal Hotspot without entering a password. Check the status of your connection.
Set up two-factor authentication for your Apple ID. To turn on two-factor authentication, go to Apple menu > System Preferences > Apple ID > Password & Security, then select Set Up TwoFactor Authentication. See the Apple Support article Two-factor authentication for Apple ID. Make sure “Disable automatic login” is also selected. (You won’t see this option if you’re using FileVault, but you can still use the Auto Unlock and Approve with Apple Watch features.) Set up Auto Unlock.
Note: Apple Pay and Apple Card aren’t available in all countries or regions. For information about Apple Pay, go to Cashless made effortless. For information about current card issuers, see the Apple Support article Apple Pay participating banks. For information about Apple Card, see Apple Card Support. Set up Apple Pay. Apple Pay uses the Apple Card or other credit or debit cards you’ve already set up on your iPhone or Apple Watch, so no extra setup is required.
Show whatever’s on your Mac Pro on the big screen using AirPlay Mirroring. To mirror the Mac Pro screen on your TV screen or to use the HDTV as a second display, connect your HDTV to Apple TV and make sure the Apple TV is on the same Wi-Fi network as your Mac Pro. You can also play some web videos directly on your HDTV without showing what’s on your desktop— handy when you want to play a movie but keep your work private. Mirror your desktop using AirPlay Mirroring.
Print to an AirPrint printer. When you print from an app, click the Printer pop-up menu in the Print dialog, then choose a printer in the Nearby Printers list. Can’t find the printer you’re looking for? Make sure it’s connected to the same Wi-Fi network as your Mac Pro. If it’s connected and you still don’t see it, try adding it: Click the System Preferences icon in the Dock, click Printers & Scanners, then click . (You may have to temporarily connect the printer to your Mac Pro using a USB cable.
PCI Express expansion cards 8 expansion slots WARNING: To avoid damaging internal components or the components you want to install, always turn off and then unplug your Mac Pro. Don’t attempt to open the computer or install items while it’s plugged in. * Subject to availability. NAV TITLE: Install memory Install Memory in Mac Pro Follow these steps to install memory in your Mac Pro.
6. Push in the top of the latches, then pull the latches to remove the access door. 7. Slide the DIMM cover switch.
8. Remove the DIMM covers. 9. Remove the new DIMM from its static-proof bag and hold it by its corners. Don’t touch the gold connectors or the components on the DIMM. 10. Push the DIMM into the slot. The DIMM is installed when the ejectors click closed. Note: Hold the side of the computer to stabilize it while you’re installing the DIMM.
11. Reinstall the DIMM covers; the DIMM cover switch automatically locks. Note: It’s important to reinstall the DIMM covers in order to maintain the performance of your Mac Pro.
12. Reinstall the side door. 13. Reinstall Mac Pro back into the rack. 14. Reconnect all cables and the power cord to your Mac Pro. NAV TITLE: Install MPX Modules Install MPX Modules in Mac Pro Follow these steps to install MPX Modules in your Mac Pro. MPX Modules must be installed in PCIe expansion slots 1 and 3. Important: Each PCIe slot is rated a maximum of 75 W; Each 6-pin auxiliary (AUX) connector is rated 75 W, and each 8-pin AUX connector is rated 150 W.