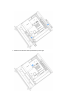
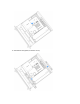
3. Touch the metal on the outside of your Mac Pro to discharge any static electricity. Note: Always discharge static before you touch parts or install components inside your Mac Pro. To avoid generating static, don’t walk around the room until you finish installing the MPX Modules. 4. Slide Mac Pro out of the rack. Note: You can install MPX Modules while Mac Pro remains installed in the rack. 5. Push in the latches on either side of the cover, then lift up the cover and slide it off the computer. 6.
7. Slide the PCI retention latch (numbered 2) to the right.
8. Use the release lever (numbered 4) to remove the existing module. 9. Remove the existing module.
10. Remove the slot covers, if necessary.
11. Push the ejection arm on the new module, then push the module into place. 12. Slide the PCI retention latch (numbered 2) to the left.
13. Reinstall the clamp plates (numbered 1 and 3).
14. Install a bridge board if you have two Radeon Pro Vega II modules. 15. Reinstall the cover, making sure the latches lock. WARNING: Do not try to operate Mac Pro with the cover removed as interlock circuitry will prevent the computer from starting up. Do not defeat the purpose of the interlock circuitry—it protects you from the fan blades and hazardous energy on the motherboard.
16. Reconnect all cables and the power cord to your Mac Pro. NAV TITLE: Install Expansion Cards Install Expansion Cards in Mac Pro You can configure your Mac Pro by installing additional cards in the PCI Express expansion slots. Slots 1 and 3 are x16 slots that directly connect to the CPU; they provide the highest performance and should be used first. After that, it’s preferable to connect a card to a slot that has as at least as many lanes as the card.
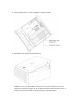
WARNING: For optimum ventilation, space cards out as you install them. If you remove a card and don’t install a replacement, place a port access cover over the empty slot to keep foreign objects out of the enclosure. An uncovered slot affects the airflow that cools the internal components, and may cause damage. Important: Connect cards to the appropriate power source, as illustrated below. Only use the original cables that came with your Mac Pro or cables sold online at apple.com or at an Apple Store.
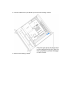
Follow these steps to install expansion cards in your Mac Pro. 1. Turn off your Mac Pro by choosing Apple menu > Shut Down. Let it cool down for 5 to 10 minutes before you touch the internal components, which may be hot. 2. Disconnect all cables and the power cord from your Mac Pro. 3. Touch the metal on the outside of your Mac Pro to discharge any static electricity. Note: Always discharge static before you touch parts or install components inside your Mac Pro.
5. Push in the latches on either side of the cover, then lift up the cover and slide it off the computer. 6. Remove the side bracket. 7. Slide the lock to the right.
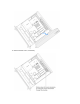
8. Remove the slot covers.
9. Remove the new card from its static-proof bag and hold it by its corners. Don’t touch the gold connector or the components on the card. Note: Use only PCIe modules that are safety certified (CSA, UL, or equivalent) and specifically state that they are compliant with the industry standard PCIe specification. Noncertified, noncompliant modules may not keep different input power sources separated, resulting in a possible burn hazard. 10. Slide the card into place. 11. Slide the lock to the left.
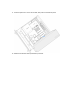
12. Reinstall the side bracket.
13. Reinstall the cover, making sure the latches lock. 14. Reinstall Mac Pro back into the rack. 15. Reconnect all cables and the power cord to your Mac Pro. Apps NAV TITLE: Included apps Apps included with your Mac Your Mac Pro comes with a collection of great apps for things you do every day, like surfing the web, sending mail and messages, and arranging your calendar.
Find even more apps. Click the App Store icon want to do. To learn more, see App Store. in the Dock to find apps for everything you Get help for any app. Click the Help menu (in the menu bar at the top of the screen) when you’re using an app. NAV TITLE: App Store App Store Search the App Store to find and download apps, and get the latest updates for your apps. Find the perfect app. Know exactly what you’re looking for? Type the name in the search field, then press Return.
Note: Apple Arcade is not available in all countries or regions. All you need is an Apple ID. To download apps, sign in with your Apple ID—choose Store > Sign In, or click Sign In at the bottom of the sidebar. If you don’t have an Apple ID yet, click Sign In, then click Create Apple ID. If you have an Apple ID but don’t remember your password, click Forgot to recover it. Get the latest updates. If you see a badge on the App Store icon in the Dock, there are updates available.
Use Apple Books to read and organize your library of books and audio books, and to purchase new books on your Mac. Note: Apple Books is not available in all countries or regions. A bookshelf on your Mac. Browse or search all the items in your library—or click Book Store to find new books and other publications. To buy an item, just sign in with your Apple ID (choose Store > Sign in). Never lose your place or your markups.
Learn more. See the Apple Books User Guide. NAV TITLE: Calendar Calendar Never miss an appointment with Calendar. Keep track of your busy schedule by creating multiple calendars, and manage them all in one place. Create events. Click to add a new event, or double-click anywhere in a day. To invite someone, double-click the event, click the Add Invitees section, then type an email address. Calendar lets you know when your invitees reply.
See all your calendars—or just a few. Click the Calendars button to see a list of all your calendars; click the ones you want to see in the window. A calendar for every part of your life. Create separate calendars—for example, for home, work, and school—each with its own color. Choose File > New Calendar to create a calendar, then secondary click (that is, right-click) each calendar to choose a new color. Share across your devices and with others.
Learn more. See the Calendar User Guide. NAV TITLE: FaceTime FaceTime Make video and audio calls from your Mac with FaceTime. (Requires an external camera and microphone. Accessories are sold separately at apple.com, your local Apple Store, or other resellers.) Video or audio only? Connect a camera and microphone to your Mac Pro to make FaceTime video calls. If it’s not convenient to make a video call, click the Audio button to make an audioonly call.
Make a phone call. If you have an iPhone with iOS 8 or later, make phone calls right from your Mac using FaceTime. Just make sure your Mac and iPhone are signed in with the same Apple ID account and have the feature turned on. (On your Mac, open FaceTime, choose FaceTime > Preferences, then select “Calls from iPhone.”) Note: Your Mac Pro and iPhone must be connected to the internet and the same Wi-Fi network in order to make or receive calls on your Mac.
specific location. Set notifications when your friends leave and arrive, too. If your friends create notifications about your location, you can view them all in one place—click Me in the People list, then scroll to Notifications About You. Secure a lost device. Use Find My to locate and protect a missing Mac, iPhone, iPad, iPod touch, Apple Watch, or AirPods. Click a device in the Devices list to locate it on the map.
Bring in the beat. You can quickly add drums to your project using Drummer Loops. Click the Loop Browser , then drag a Drummer Loop into an empty part of the Tracks area. You can customize Drummer Loops to fit your song, using a simple set of controls. Record your voice. Connect a microphone, choose Track > New Track, then select the microphone under Audio. Click the triangle next to Details to set options for input, output, and monitoring, then click Create.
Learn more. See GarageBand Support. NAV TITLE: Home Home With the Home app, you can easily and securely control all of your HomeKit accessories from your Mac. Accessory control. Accessories show up in the Home app as tiles with icons. Click an accessory tile to control it—turn lights on/off, lock/unlock the door, view live cameras, and more. You can also adjust the brightness of a light, or the target temperature of a thermostat.
Shared Access. You can share your home with family members or guests, so they can control accessories using the Home app on their own Apple devices. Create a scene. Create a scene that lets your accessories work together with a single command. For example, make a Good Night scene that turns off all the lights, closes the shades, and locks the door when you turn in for the night. Learn more. See the Home User Guide.
Create Hollywood-style trailers. Make clever trailers, complete with animated graphics and soaring soundtracks. Just add photos and video clips and customize the credits. To get started, click the New button , click Trailer, choose a template from the Trailer window, then click Create. Add the cast and credits in the Outline tab, and add your own photos and videos in the Storyboard tab.
NAV TITLE: Keynote Keynote Create professional, cutting-edge presentations with Keynote. Start with one of the more than 30 predesigned themes and make it your own by adding text, new objects, and changing the color scheme. Organize visually. Use the slide navigator on the left to quickly add, rearrange, or delete slides. Click a slide to see it in the main window, drag a slide to change its order, or select a slide and press Delete to remove it. Practice makes perfect.
Share your presentation. If your manager wants to review your presentation or you want to share it with others on a conference call, choose Share > Send a Copy to send a copy by Mail, Messages, AirDrop, or even social media. Follow the bouncing ball. Get their attention by animating an object on a slide. Select the object, click Animate in the toolbar, click Action in the sidebar, then click Add an Effect. Tip: You can include a video in your presentation.
Focus on what’s important. See only the messages you want to see in your inbox. You can block messages from specific senders by moving their messages directly to the Trash, mute overly active email threads, and unsubscribe from mailing lists directly in Mail. Add events and contacts right from Mail. When you receive a message that includes a new email address or event, just click Add to add it to Contacts or Calendar. Personalize any message. Add emoji or photos with just a click.
Never miss an email. Check the Mail icon in the Dock to see the number of unread messages. When you get a new email, a notification also appears at the top-right of the screen so you can quickly preview incoming messages. (Don’t want notifications? To turn them off, click the System Preferences icon in the Dock, then click Notifications.) Learn more. See the Mail User Guide. NAV TITLE: Maps Maps Get directions and view locations using a map or a satellite image. Or use Flyover to view select cities in 3D.
Let iPhone show you the way. Click Directions to find the best route to your destination, then click the Share button to send the directions to your iPhone for turn-by-turn voice navigation. Get there on public transit. Maps provides public transit information for select cities. Click Transit, then click a destination to get suggested travel routes and estimated travel time. More than just maps.
NAV TITLE: Messages Messages It’s easy to stay in touch, with Messages. Connect with people through text, audio, or video. If you want to share files, you can do that too. (Requires an external microphone. Accessories are sold separately at apple.com, your local Apple Store, or other resellers.) Sign in and send. Sign in with your Apple ID to exchange unlimited messages—including text, photos, Live Photos, video, and more—with anyone with a Mac, iPhone, iPad, iPod touch, or Apple Watch.
Share your screen. You can share your screen with a friend—and vice versa—and even open folders, create documents, and copy files by dragging them to the desktop on the shared screen. Click Details, then click the Screen Share button . Learn more. See the Messages User Guide.
Sing along. Click to display a panel with lyrics for the current song (if available). Tune in. Click Radio to tune in to Beats 1 live or listen to any episode from the Beats 1 family of shows. Explore the variety of stations created for almost every genre of music. Ask Siri. Say something like: “Play Beats 1.” Sync with ease. Sync your music content directly in the Apple Music app. When you connect a device, you see it in the sidebar of the Finder. Just drag the content you want onto your device.
Note: Apple News+ lets you read hundreds of magazines, popular newspapers, and premium digital publishers for a single monthly price. Apple News and Apple News+ are available in the U.S., Canada, the UK, and Australia. Customize your feed. Follow your favorite channels and topics to see them in the Today feed and sidebar. Enter a news outlet or topic in the search field, then click to follow it. Navigate easily with the sidebar. Use the sidebar to quickly choose a channel or topic.
Share an entire folder with your family or team, giving everyone access so they can create or edit notes, add attachments, and even create subfolders. Click the Add People button and select a method for sending the link. Tip: When you’re signed in with your Apple ID and iCloud is turned on for Notes, your notes are kept up to date on all your devices—so you can create a to-do list on your Mac, then check off items on your iPhone while you’re on the go. Check off your list.
NAV TITLE: Numbers Numbers Use Numbers to create attractive and powerful spreadsheets on your Mac. More than 30 Appledesigned templates give you a head start creating budgets, invoices, team rosters, and more. Numbers can also open and export Microsoft Excel spreadsheets. Start with a template—then add what you want. Select the sample text in the template, then type new text. To add images, drag a graphic file from your Mac to the placeholder image. Get organized with sheets.
Tip: To get instant calculations on a series of values, select the range of cells containing the values. At the bottom of the window you’ll see the sum, average, minimum, maximum, and count of the selected values. Click the Settings button to see even more options. Learn more. See Numbers Support. NAV TITLE: Pages Pages Use the Pages app to create stunning, media-rich documents on your Mac.
automatically around the image. You can fine-tune how the text wraps in the Format sidebar. Start on your Mac, finish on iPad. You can keep documents up to date across all your devices when you sign in with the same Apple ID. So you can start composing on one device, and pick up where you left off on another. Tip: Turn on change tracking to see the changes you and others make to a document. Each person’s edits and comments are color-coded, so you can see who made the change.
All-new Photos tab. View your new photos and memories by day, month, or year. It’s easier than ever to relive a specific moment by finding photos from that day—or click All Photos to quickly view your entire collection. Relive meaningful moments. New Live Photos and videos that begin playing as you scroll bring your memories to life. Animations and transitions keep your place in the timeline switching between views, so you can switch between any view—like Days and All Photos—without losing your place.
Get lively. With Live Photos, use the new Loop effect to continuously loop the action, or use Bounce to play the animation forward and backward. You can also use Long Exposure to blur motion in your Live Photos. Learn more. See the Photos User Guide. NAV TITLE: Podcasts Podcasts Use Apple Podcasts to browse, subscribe, and listen to favorite podcasts on your Mac. Get started with Listen Now. Any podcasts you’re in the middle of will be saved in Listen Now, even if you started listening from another device.
Tip: To play music or radio from a speaker using AirPlay, click the AirPlay icon and select an available speaker. in the menu bar Learn more. See the Apple Podcasts User Guide. NAV TITLE: Reminders Reminders Reminders makes it easier than ever to keep track of all of your to-dos. Create and organize reminders for grocery lists, projects at work, or anything else you want to track. You can also choose when and where to receive reminders. Keep track with smart lists.
Organize with subtasks and groups. To turn a reminder into a subtask, press Command-], or drag it on top of another reminder. The parent reminder becomes bold, and the subtask is indented underneath it. You can collapse or expand your subtasks to keep your view uncluttered. To group reminders together, choose File > New Group. Name the group whatever you’d like. Add more lists by dragging them into the group, or remove them by dragging them out. Customize list appearance.
View multiple websites in one window. Click at the far right of the tab bar or press Command-T to open a new tab, then enter an address. To keep a website handy, drag its tab left to pin it, and it stays in the tab bar. See what’s open on each of your devices. You can see open webpages on all your devices that are signed in to the same Apple ID. Just click the Show All Tabs button at the top of the window and scroll down if necessary. Browse the web safely and privately.
behind. Safari asks your permission before allowing a social network to see what you’re doing on third-party sites. For example, if you click a Facebook button to share an article to Facebook, Safari asks if you want to let Facebook see your activity on the site. And Safari defends you against web tracking by making your Mac harder to identify uniquely. When you sign up for a new account on the web, Safari automatically creates and autofills a new strong password for you.
NAV TITLE: Stocks Stocks The Stocks app is the best way to track the market on your Mac. View prices in the custom watchlist, click a stock to see more details and an interactive chart, and read about whatʼs driving the market, with stories from Apple News. Note: Apple News stories and Top Stories are available in the U.S., Canada, the UK, and Australia. News stories in other countries and regions are provided by Yahoo. Customize your watchlist.
Get a deeper view. Want to see what the market was doing last week, last month, or last year? Click the buttons above the chart to switch timeframes and see prices in the view you like best. Your watchlist on all your devices. Keep your watchlist consistent across all your devices when you sign in with the same Apple ID. Tip: Click the Top Stories section in the watchlist to see a collection of timely business articles, curated by Apple News editors. Learn more. See the Stocks User Guide.
The LEGO Movie 2: The Second Part is available on the Apple TV app Keep watching in Up Next. In Up Next, you’ll find movies or TV shows you’re watching, as well as movies and TV shows you’ve added to your queue. To add a new movie or TV show to Up Next, click the Add to Up Next button. Discover more in Movies, TV Shows, and Kids. If you’re looking for something specific, click the Movies, TV Shows, or Kids tab in the menu bar, then browse by genre. Buy, rent, or subscribe.
Record from your Mac Pro. To record, click the red button. To stop recording, click Done. Organize your recordings by giving them a name in the name field. Play back a recording by clicking the Play button. (Requires an external microphone. Accessories are sold separately at apple.com, your local Apple Store, or other resellers.) Your voice memos across all your devices. Your voice memos are available on all your devices when you sign in with the same Apple ID.
choose macOS Help to open the macOS User Guide. Or type a question or term in the search field, then choose a topic from the results list. Explore topics. To find a topic in the macOS User Guide, you can browse or search. To browse, click “Table of Contents” to see the list of topics, then click a topic to read it. Or type what you want to find in the search field to go right to your answer. Find out what’s new.
more about the latest features of macOS. Tip: If you can’t remember the location of a menu item in an app, search for it in Help. Place the pointer over the result, and an arrow shows you the command. NAV TITLE: Common questions How do I get support for my Mac Pro? Go to Mac Pro Support. Where is my serial number? Choose Apple menu last item in the list. > About This Mac.
You can press key combinations to do things on your Mac Pro that you’d normally do with a trackpad, mouse, or other device. Here’s a list of commonly used keyboard shortcuts. (table aria-label=Keyboard Shortcuts) Shortcut Description Command-X Cut the selected item and copy it to the Clipboard. Command-C Copy the selected item to the Clipboard. Command-V Paste the contents of the Clipboard into the current document or app. Command-Z Undo the previous command. Press Command-Shift-Z to redo.
If you switched to the Mac from a PC, check out the Apple Support article Mac tips for Windows switchers for a list of Mac keyboard shortcuts and the differences between Mac and Windows keyboards. For more keyboard shortcuts, see the Apple Support article Mac keyboard shortcuts. NAV TITLE: Screenshot utility Explore the Screenshot menu to find all the controls you need to take screenshots and screen recordings. You can also capture your voice during a screen recording.
Learn more. See Take screenshots or screen recordings on Mac in the macOS User Guide. NAV TITLE: Accessibility Your Mac, iOS devices, and iPadOS devices include powerful tools to make Apple product features available and easy to use by all—such as VoiceOver, Voice Control, Switch Control, and Hover Text. Voice Control lets you control your Mac entirely with your voice. With features such as Hover Text and Zoom Display, you can interact with items on the screen in a variety of sizes.
Hover and zoom. Use Hover Text to display high-resolution text for screen items under your cursor. Press Command while hovering over text with the pointer, and a window with zoomed text appears on your screen. Zoom Display lets you keep one monitor zoomed in tightly and another at its standard resolution. View the same screen up-close and at a distance simultaneously.
New enhancements for VoiceOver. If you prefer the natural voice of Siri, you can now choose to use Siri for VoiceOver or Speech. Simplified keyboard navigation requires less drilling into unique focus groups—making it even easier to navigate with VoiceOver. You can also store custom punctation marks in iCloud, and choose from International Braille tables. And if you’re a developer, VoiceOver now reads aloud line numbers, break points, and warnings errors in the Xcode text editor. Color Enhancements.
You can learn about Apple products, view online manuals, and check for software updates. Connect with other Apple users, and get service, support, and professional advice from Apple. AppleCare support. If you need assistance, AppleCare representatives can help you with installing and opening apps, and with troubleshooting. Call the support center number nearest you (the first 90 days are complimentary). Have the purchase date and your Mac Pro serial number ready when you call.
Don’t put any load on top of Mac Pro while it’s in the installation or servicing position. Don’t leave Mac Pro in the installation or servicing position. Liquid exposure. Keep your Mac Pro away from sources of liquid, such as drinks, oils, lotions, washbasins, bathtubs, shower stalls, and so on. Protect your Mac Pro from dampness, humidity, or wet weather, such as rain, snow, and fog. Power. The only way to turn off power completely is to unplug the power cord.
Repairing. If your Mac Pro is damaged, malfunctions, or comes in contact with liquid, you have several options for repair. Contact Apple or an Apple Authorized Service Provider for technical support and to help facilitate carry-in or on-site repairs. Under certain circumstances, it may be possible for you to complete the repair yourself with parts provided by Apple. Your Mac Pro contains several user-serviceable parts including memory, GPU modules, expansion cards, and the power supply.
any discrepancies. Do not use these services while performing activities that require your full attention. Always comply with posted signs and the applicable laws and regulations in the areas where you are using navigation, and always use common sense. Medical device interference. Mac Pro contains components and radios that emit electromagnetic fields. These electromagnetic fields may interfere with medical devices, such as pacemakers and defibrillators.
computer’s weight or have a someone assist you. Using connectors and ports. Never force a connector into a port. Before you plug the power cord into the power port, make sure the power port is completely free of debris. When connecting a device to a port, make sure the port is completely free of debris, that the connector matches the port, and that you have positioned the connector correctly in relation to the port.
Change hand positions often to avoid fatigue. Some computer users might develop discomfort in their hands, wrists, or arms after intensive work without breaks. If you begin to develop chronic pain or discomfort in your hands, wrists, or arms, consult a qualified health specialist. Mouse or optional trackpad. Position the mouse or trackpad at the same height as the keyboard and within a comfortable reach. Chair. An adjustable chair that provides firm, comfortable support is best.
Increase the separation between the equipment and receiver. Connect the equipment to an outlet on a circuit different from that to which the receiver is connected. Consult the dealer or an experienced radio/TV technician for help. Changes or modifications to this product not authorized by Apple could void the electromagnetic compatibility (EMC) and wireless compliance and negate your authority to operate the product.
L’exposition à l’énergie radiofréquence. La puissance de sortie rayonné de cet appareil est conforme aux limites de la FCC/ISDE Canada limites d’exposition aux fréquences radio. Cet appareil doit être utilisé avec une distance minimale de séparation de 20 cm entre l’appareil et le corps d’une personne. NAV TITLE: EU compliance statement EU compliance statement Apple Inc. hereby declares that this wireless device is in compliance with Directive 2014/53/EU.
As an ENERGY STAR partner, Apple has determined that standard configurations of this product meet the ENERGY STAR guidelines for energy efficiency. The ENERGY STAR program is a partnership with electronic equipment manufacturers to promote energy-efficient products. Reducing energy consumption of products saves money and helps conserve valuable resources. Mac Pro is shipped with power management enabled with the computer set to sleep after 10 minutes of user inactivity.
El símbolo de arriba indica que este producto y/o su batería no debe desecharse con los residuos domésticos. Cuando decidas desechar este producto y/o su batería, hazlo de conformidad con las leyes y directrices ambientales locales. Para obtener información sobre el programa de reciclaje de Apple, puntos de recolección para reciclaje, sustancias restringidas y otras iniciativas ambientales, visita www.apple.com/mx/environment o www.apple.com/la/environment.
Apple, the Apple logo, AirDrop, AirPlay, AirPods, AirPort, AirPort Time Capsule, AirPrint, Apple Music, Apple Pay, Apple TV, Apple Watch, Face ID, FaceTime, Finder, FireWire, Flyover, GarageBand, Handoff, iMovie, iPad, iPhone, iPod, iPod touch, iTunes, iTunes U, Keynote, Launchpad, Lightning, Mac, Mac Pro, macOS, Magic Mouse, Magic Trackpad, Mission Control, Numbers, Pages, Retina, Safari, Siri, Spaces, Spotlight, Time Machine, Touch ID, and watchOS are trademarks of Apple Inc., registered in the U.S.