Projector PJ-TX100 ENGLISH User's Manual - Operating Guide Thank you for purchasing this projector. WARNING ►Before using, read the "User's Manual - Safety Guide" and these manuals to ensure correct usage through understanding. After reading, store them in a safe place for future reference. About this manual Various symbols are used in this manual. The meanings of these symbols are described below.
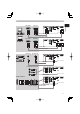
Contents Contents About this manual . . . . . . . . . . 1 Contents . . . . . . . . . . . . . . . . . 2 Projector features . . . . . . . . . . 3 Preparations . . . . . . . . . . . . . . 3 About contents of package . . . . . . . 3 Fastening the lens cover . . . . . . . . . 3 Part names . . . . . . . . . . . . . . . 4 Projector . . . . . . . . . . . . . . . . . . . . . 4 Remote control . . . . . . . . . . . . . . . . 5 Setting up . . . . . . . . . . . . . . . . 6 Arrangement . . . . . . . . . . . . . . . .
Projector features / Preparations This projector is used to project various computer signals as well as NTSC/PAL/ SECAP video signals onto a screen. Little space is required for installation and large images can easily be realized. This is the entertainment projector that will turn your room into a high definition theater! Super focus ED (Extra-low dispersion) lenses are adopted for the highest possible image quality. 720P wide LCD panels realize faithful reproduction of high-definition images.
Part names Part names Horizontal lens shift dials ( 7) Projector Vertical lens shift dials ( 7) Zoom knob ( 14) Filter cover ( 33) (An air filter is inside.) Focus knob ( 14) Remote sensor ( 11) Exhaust vent ( 6) Elevator button ( 7) is on the both sides. Elevator foot ( 7) is on the both sides. Lens cover ( 3) Lens ( 34) radiates powerful light for projecting an image.
STANDBY/ON button ( 12) prepares for turning the power on/off. POWER indicator ( 12) tells the state of power supply. MENU button ( 17) operates the menu function. INPUT button ( 13) toggles between the signal ports. COMPONENT VIDEO STANDBY/ON POWER TEMP LAMP MENU ENTER INPUT RESET S-VIDEO VIDEO TEMP indicator ( 37) lights or blinks when any problem about internal temperature has happened. LAMP indicator ( 37) light or blinks when any problem about the lamp has happened.
Setting up Setting up Arrangement WARNING ►Install the projector in a suitable environment according to instrictions of the "User's Manual - Safety Guide". CAUTION ►In installation, pay attention enough to ventilation. If internal temperature rises, it could cause malfunction. Avoid blocking vents. (about the locations of vents please see 4.) This projector has some intake vents also on the bottom. Put nothing that is sucked or sticks to the bottom of projector.
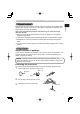
Setting up Using the lens shift dials ENGLISH CAUTION ►Do not put your fingers around the projection lens to prevent them from being caught by the lens and lens ring. The Lens of this projector can be shifted horizontally and vertically. When you want to adjust the picture position, use the lens shift dials. 1/4 (a) Using the horizontal picture shift dial shifts the picture to right or 1/4 left. (b) Using the vertical lens shift dial shifts the picture upward or downward.
Setting up Connecting your devices WARNING ►Incorrect connecting could result in fire or electrical shock. Whenever attempting to connect other devices to the projector, please thoroughly read the "User's Manual - Safety Guide", this manual and the manual of each device to be connected. CAUTION ►Turn off all devices prior to connecting them to the projector.
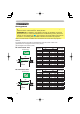
Setting up DVI out Y DVI-D S-VIDEO COMPUTER CONTROL COMPUTER CONTROL COMPUTER CONTROL COMPUTER CONTROL COMPUTER CONTROL CB/PB VIDEO CR/PR COMPONENT VIDEO DVI cable RS-232C cable RS-232C RGB out Y DVI-D S-VIDEO CB/PB VIDEO CR/PR COMPONENT VIDEO RGB cable RS-232C cable Video out S-video out Y DVI-D S-VIDEO CB/PB VIDEO CR/PR COMPONENT VIDEO S-video cable VIideo cable Component video out Y DVI-D S-VIDEO CB/PB VIDEO CR/PR COMPONENT VIDEO Component cable SCART RGB out Y DVI-D S-VIDEO
Settin up Connecting power supply WARNING ►Please use extra caution when connecting the power cord as incorrect or faulty connections may result in fire and/or electrical shock. • Only use the power cord that came with the projector. If it is damaged, contact your dealer to newly get correct one. • Only plug the power cord into an outlet rated for use with the power cord's specified voltage range. • Never modify the power cord. Never attempt to defeat the ground connection of the three-pronged plug.
Remote control Using the LIGHT button POWER OPT BLK 1. ASPECT If you don’t push the LIGHT button again, the lights will turn off in several seconds. MENU LIGHT MODE LIGHT button MEMORY ENGLISH To illuminate the buttons of the remote control, press the LIGHT button of it. Press the LIGHT button. IRIS ENTER RESET BRIGHT CONTRAST COLOR DVI PC AUTO Using the remote control CAUTION ►Be careful in handling the remote control.
Power on/off Power on/off WARNING ►When the power is on, a strong light is emitted. Do not look into the lens or vents of the projector. NOTE • Turn the power on/off in right order. Please power on the projector before the connected devices. Power off the projector after the connected devices.
Operating Selecting an input signal the projector's button, press the INPUT 1. Using button. Each time you press the INPUT button, the projector switches between its input ports. Select the signal you wish to project. MENU ENTER INPUT RESET COMPONENT VIDEO S-VIDEO VIDEO DVI-D COMPUTER the remote control's button, press the button 1. Using DVI, PC, COMPO, S-VIDEO or VIDEO according to POWER OPT BLK the input port to choose.
Operating Adjusting the zoom and focus 1. 2. Focus knob Zoom knob Use the zoom knob to adjust the screen size. Use the focus knob to focus the picture. Using the automatic adjustment feature the AUTO button (remote control). 1. Press The automatic adjustment operation requires approximately 10 seconds. Also please note that it may not function correctly with some input.
Operating POWER the MODE button (remote control) to toggle 1. Press between the modes for picture type. OPT BLK LIGHT MODE MEMORY POWER LIGHT IRIS ASPECT ENTER MENU These arrangements are combinations of a mode of GAMMA ( 19) and a mode of COLOR TEMP ( 19). Choose a suitable mode according to the projected source.
Operating Adjusting the picture (brightness, contrast, color) Brightness and contrast can be adjusted using each (+) and (-) button (remote control). At a video signal, the color can also be adjusted. Press the (+) or (-) button under the item indication to adjust. Use the (+) button to increase the item, or use the (-) button to decrease the item. A dialog will appear on the screen to aid you in adjusting the item to adjust. You can inactivate the display using the item "MESSAGE" of the SCREEN menu ( 27).
Multifunctional settings Using the menu function This projector has the following menus: PICTURE, IMAGE, INPUT, SETUP, SCREEN, OPTION and EASY MENU. Each of these menus is operated using the same methods. The basic operations of these menus are as follows.
Multifunctional settings EASY MENU EASY Menu With the EASY menu, items shown in the table below can be performed. Perform each operation in accordance with the instructions in the table below. Select an item using the ▲/▼ buttons, and press the ◄/► button to perform each function. : ASPECT KEYSTONE MODE OPTICAL BLACK BRIGHT CONTRAST COLOR TINT SHRPNESS WHISPER MIRROR RESET FILTER TIME LANGUAGE 4:3 +0 NORMAL OFF +0 +0 +0 +0 +3 NORMAL NORMAL 0 ENGLISH Go To Advance Menu...
Multifunctional settings MENU [RGB] With the PICTURE menu, the items shown in the table below can be performed. Perform each operation in accordance with the instructions in the table below. Item BRIGHT CONTRAST PICTURE IMAGE INPUT SETUP SCREEN OPTION EASY MENU :SELECT BRIGHT +0 CONTRAST +0 GAMMA DEFAULT 1 COLOR TEMP 6500K +0 COLOR +0 TINT +0 SHARPNESS PROGRESSIVE TURN OFF SAVE 1 MY MEMORY Description Adjust the brightness using the ▲/▼ buttons. : Adjust the contrast using the ▲/▼ buttons.
Multifunctional settings PICTURE Menu (continued) Item SHARPNESS PROGRESSIVE Description Adjust the sharpness using the ▲/▼ buttons. : Clear Soft Select the Progressive Mode: TV FILM TURN OFF memo This function performs only at an interlaced signal of a VIDEO input, a S-VIDEO input or a COMPONENT VIDEO input of 525i or 625i signal. The FILM mode is adaptable to the 3-2 PullDown system to the conversion. memo When the TV or FILM is selected, the screen image will be crisper.
Multifunctional settings PICTURE Menu (continued) Press the ENTER button while the CUSTOM menu of “GAMMA” or “COLOR TEMP” is displayed. And the test pattern appears at the top of the screen as shown in the right. Each time you press the ENTER button, the pattern changes as below.
Multifunctional settings MENU [RGB] IMAGE Menu With the IMAGE menu, the items shown in the table below can be performed. Perform each operation in accordance with the instructions in the table below.
Multifunctional settings IMAGE Menu (continued) H SIZE AUTO ADJUST Description Adjust the horizontal size using the ▲/▼ buttons. : Large Small memo This item can be selected only at a RGB signal. memo When this adjustment is excessive, the picture may not be displayed correctly. In such a case, please reset the adjustment pressing the RESET button during this operation. Pressing the ► (or the ENTER) button performs the automatic adjustment.
Multifunctional settings MENU [RGB] INPUT Menu With the INPUT menu, the items shown in the table below can be performed. Perform each operation in accordance with the instructions in the table below. PICTURE IMAGE INPUT SETUP SCREEN OPTION EASY MENU :SELECT COLOR SPACE COMPONENT VIDEO FORMAT DVI S-ASPECT INFORMATION AUTO COMPONENT AUTO DVD TURN OFF Item Description COLOR SPACE Select a color space mode using the ▲/▼ buttons.
Multifunctional settings INPUT Menu (continued) Description Pressing the ► (or the ENTER) button displays the INPUT INFORMATION menu. The INPUT INFORMATION menu shows the information about the current signal input as illustrated below. INPUT-INFORMATION RGB 1024x768 @60.0 FRAME LOCK INPUT-INFORMATION S-VIDEO SECAM AUTO INPUT-INFORMATION COMPONENT 576i @50 SCART RGB INFORMATION memo The “FRAME LOCK” message means the frame lock function is working.
Multifunctional settings MENU [RGB] SETUP Menu With the SETUP menu, items shown in the table below can be performed. Perform each operation in accordance with the instructions in the table below. Item KEYSTONE WHISPER IRIS PICTURE IMAGE INPUT SETUP SCREEN OPTION EASY MENU :SELECT KEYSTONE WHISPER IRIS MIRROR Description Adjust the Keystone (Vertical) Distortion: Upper in the data Lower in the data memo The adjustable range of this function will vary with the type of input signal.
Multifunctional settings MENU [RGB] With the SCREEN menu, the items shown in the table below can be performed. Perform each operation in accordance with the instructions in the table below. Item PICTURE IMAGE INPUT SETUP SCREEN OPTION EASY MENU :SELECT LANGUAGE MENU POSITION OSD BRIGHT START UP MyScreen MyScreen Lock MESSAGE ENGLISH 5 ORIGINAL TURN OFF TURN ON Description Select a menu language using the ▲/▼ buttons.
Multifunctional settings SCREEN Menu (continued) Item Description MESSAGE Select the TURN ON or the TURN OFF using the ▲/▼ buttons. : TURN ON TURN OFF When the TURN ON is selected, the following message function works. The message of the “AUTO IN PROGRESS” for the auto adjustment. The message of the ”NO INPUT IS DETECTED” The message of the ”SYNC IS OUT OF RANGE” The message of the “Detecting …” The indication of the input signal by input change.
Multifunctional settings MENU [RGB] With the OPTION menu, items shown in the table below can be performed. Perform each operation in accordance with the instructions in the table below. Item PICTURE IMAGE INPUT SETUP SCREEN OPTION EASY MENU :SELECT AUTO OFF LAMP TIME FILTER TIME SERVICE 0 0 0 ENGLISH OPTION Menu Description Set the time using the ▲/▼ buttons. : Long (max. 99 minutes) Short (min. 0 minute = DISABLE) AUTO OFF AUTO OFF ENABLE AUTO OFF DISABLE 1 0 ex.
Multifunctional settings OPTION Menu (continued) Item Description Pressing the ► (or the ENTER) button calls the SERVICE menu. SERVICE Menu Select an item using the ▲/▼ buttons, and press the ► (or the ENTER) button to perform each function. : FANSPEED FACTORY RESET SERVICE 30 SERVICE FANSPEED FANCTORY RESET NORMAL FANSPEED Select the fan speed level using the ▲/▼ buttons. : HIGH LOW The HIGH ups rotation speeds of fans. Please use this function in using a projector at highlands etc.
Maintenance LAMP WARNING HIGH VOLTAGE HIGH TEMPERATURE HIGH PRESSURE ►The projector uses a high-pressure mercury glass lamp. The lamp can break with a loud bang, or burn out, if jolted or scratched, handled while hot, or worn over time. Note that each lamp has a different lifetime, and some may burst or burn out soon after you start using them.
Maintenance Lamp If the indicators or a message prompts you to replace the lamp, replace the lamp as soon as possible. Turn off the projector, and unplug the power cord. Allow the lamp bulb to cool for at least 45 minutes. Contact your dealer to prepare a new lamp. Tell the dealer your lamp type number: DT00661. If the projector is mounted on the ceiling, or if the lamp has broken, also ask the dealer to replace the lamp. 1. 2.
Maintenance WARNING ►Before replacing the lamp, make sure the power switch is off and the power cord is not plugged in, then wait at least 45 minutes for the lamp to cool sufficiently. ►Use only the air filter of the specified type. Do not use the projector with the air filter and filter cover removed. CAUTION ►If the air filter becomes clogged by dust or the like, internal tempereture rises and the power may be automatically turned off for malfunction prevention .
Maintenance WARNING ►Please carefully read the "User's Manual - Safety Guide". ►Before caring, make sure the power switch is off and the power cord is not plugged in. ►Be cautious of high temperature. Do not touch about the lens and ventilation openings during use or immediately after prevent a burn. ►Never try to care for the inside of the unit yourself. Doing so is dangerous. CAUTION ►Incorrect care could have adverse influence such as discoloration, peeling paint, etc.
Troubleshooting Related messages When the unit's power is on, messages such as those shown below may be displayed. When any such message is displayed on the screen, please respond as described below. If the same message is displayed after the treatment, or if a message other than the following appears, please contact your dealer or service company. Although these messages will be automatically disappeared around several minutes, it will be reappeared every time the power is turned on.
Troubleshooting Related messages (continued) Message SYNC IS OUT OF RANGE ON *** fH *****kHz fV *****Hz Description The horizontal or vertical wavelength of the inputted signal is outside of the response parameters of this unit. Please confirm the specs for this unit or the signal source specs. The internal portion temperature is rising. CHECK THE AIR FLOW CLEAN THE AIR FILTER POWER OFF FIRST, THEN CLEAN THE AIR FILTER. AFTER CLEANING THE AIR FILTER, RESET THE FILTER TIMER.
Troubleshooting Lighting and flashing of the POWER indicator, the LAMP indicator, and the TEMP indicator have the meanings as described in the table below. Please respond in accordance with the instructions within the table. If the same indication is displayed after the treatment, or if an indication other than the following is displayed, please contact your dealer or service company.
Troubleshooting Regarding the indicator lamps (continued) POWER LAMP TEMP indicator indicator indicator Description The cooling fan is not operating. Blinking In Red or Lighting In Red Turned off Blinking In Red Please turn the power off, and allow the unit to cool down at least 20 minutes. After the projector has sufficiently cooled down, please make confirmation that no foreign matter has become caught in the fan, etc., and then turn the power on again.
Troubleshooting WARNING ►Never use the projector if abnormal operations such as smoke, strange odor, excessive sound, damaged casing or elements or cables, penetration of liquids or foreign matter, etc. should occur. In such cases, immediately turn off the power switch and then disconnect the power plug from the power outlet After making sure that the smoke or odor has stopped, contact your dealer or service company. Before requesting repair, please check in accordance with the following chart.
Troubleshooting Phenomena that may easily be mistaken for machine defects (continued) Phenomenon Cases not involving a machine defect The PC cannot detect the projector as a plug and play monitor. Make sure that the PC’s can detect a plug and play monitor using other plug and play monitor. If the connected PC has a DVI output, the driver software of the DVI board is too old. No pictures are displayed. Reference page 8 - Consult with the dealer of your PC to install new software.
Warranty And After-Service If a problem occurs with the equipment, first refer to the “Troubleshooting” and run through the suggested checks. If this does not resolve the problem, please contact your dealer or the service company. They will tell you what warranty condition is applied. Specifications Specifications NOTE • This specifications are subject to change without notice. Item Product name Liquid Crystal panel Specification Liquid crystal projector Panel size 1.8 cm (0.
Projector PJ-TX100 PJ-TX100W/E/U ENGLISH Users Manual - Quick Guide Thank you for purchasing this projector. WARNING ►Before using, read the "User's Manual - Safety Guide" and these manuals to ensure correct usage through understanding. After reading, store them in a safe place for future reference. NOTE • The information in this manual is subject to chance without notice. • The manufacture assumes no responsibility for any errors that may appear in this manual.
Arrangement / Adjusting the projector's elevator Arrangement WARNING ►Install the projector in a suitable environment according to instrictions of the "User's Manual - Safety Guide". CAUTION ►This projector has some intake vents also on the bottom. Avoid blocking vents. Put nothing that is sucked or sticks to the bottom of projector. (calculated for a full size screen, ±10%) Screen a: Projection distance [inch (m)] Screen size 16:9 4:3 a Projector Screen size [inch (m)] 30 (0.8) 40 (1.0) 50 (1.
Connecting your devices RS-232C DVI out Y DVI-D S-VIDEO COMPUTER CONTROL COMPUTER CONTROL COMPUTER CONTROL COMPUTER CONTROL COMPUTER CONTROL CB/PB VIDEO CR/PR COMPONENT VIDEO DVI cable RS-232C cable RS-232C RGB out Y DVI-D S-VIDEO CB/PB VIDEO CR/PR COMPONENT VIDEO RGB cable RS-232C cable Video out S-video out Y DVI-D S-VIDEO CB/PB VIDEO CR/PR COMPONENT VIDEO S-video cable VIideo cable Component video out Y DVI-D S-VIDEO CB/PB VIDEO CR/PR COMPONENT VIDEO Component cable SCART RGB
Connecting the power supply / Putting batteries into the remote control Connecting the power supply WARNING ►Please use extra caution when connecting the power cord as incorrect or faulty connections may result in fire and/or electrical shock. • Only use the power cord that came with the projector. If it is damaged, contact your dealer to newly get correct one. • Only plug the power cord into an outlet rated for use with the power cord's specified voltage range. • Never modify the power cord.
Operating WARNING ►When the power is on, a strong light is emitted. Do not look into the lens or vents of the projector. Turning on the power POWER 1. the button STANDBY/ON (projector) 2. Press or POWER (remote control). Set the power switch to the ON position. (Solid orange) POWER POWER (Blinking green) (Solid green) Displaying select an input signal, use the button INPUT (projector), or the buttons of 1. To PC, COMPO, S-VIDEO, VIDEO, DVI (remote control).
Lamp Lamp WARNING HIGH VOLTAGE HIGH TEMPERATURE HIGH PRESSURE ►The projector uses a high-pressure mercury glass lamp. The lamp can break with a loud bang, or burn out, if jolted or scratched, handled while hot, or worn over time. Note that each lamp has a different lifetime, and some may burst or burn out soon after you start using them.
Lamp (continued) If the indicators or a message prompts you to replace the lamp, replace the lamp as soon as possible. Turn off the projector, and unplug the power cord. Allow the lamp bulb to cool for at least 45 minutes. Contact your dealer to prepare a new lamp. Tell the dealer your lamp type number: DT00661 DT00661. If the projector is mounted on the ceiling, or if the lamp has broken, also ask the dealer to replace the lamp. 1. 2.
Air filter Air filter WARNING ►Before replacing the lamp, make sure the power switch is off and the power cable is not plugged in, then wait at least 45 minutes for the lamp to cool sufficiently. ►Use only the air filter of the specified type. Do not use the projector with the air filter and filter cover removed. CAUTION ►If the air filter becomes clogged by dust or the like, internal tempereture rises and the power may be automatically turned off for malfunction prevention .