Designing AirPort Networks Using AirPort Utility Mac OS X v10.
1 2 Contents Chapter 1 3 5 6 6 6 6 Getting Started Configuring an Apple Wireless Device for Internet Access Using AirPort Utility Extending the Range of Your AirPort Network Sharing a USB Hard Disk Connected to an AirPort Extreme Base Station or Time Capsule Printing with an Apple Wireless Device Sharing Your Computer’s Internet Connection Chapter 2 9 9 10 11 AirPort Security Security for AirPort Networks at Home Security for AirPort Networks in Businesses and Classrooms Wi-Fi Protected Access (WPA)
1 Getting Started 1 AirPort offers the easiest way to provide wireless Internet access and networking anywhere in the home, classroom, or office. AirPort is based on the latest Institute of Electrical and Electronics Engineers (IEEE) 802.11n draft specification and provides fast and reliable wireless networking in the home, classroom, or small office. You can enjoy data transfer rates of up to five times faster than data rates provided by the 802.11g standard and more than twice the network range.
With an AirPort Extreme Base Station or a Time Capsule, you can connect a USB hard disk so that everyone on the network can back up, store, and share files. Every Time Capsule includes an internal AirPort disk, so you don’t need to connect an external one. If you want, you can connect additional USB disks to the USB port on your Time Capsule. You can also connect a USB printer to the USB port on any Apple wireless device, so that everyone on the network can access the printer or hub.
Configuring an Apple Wireless Device for Internet Access Using AirPort Utility Like your computer, Apple wireless devices must be set up with the appropriate hardware and IP networking information to connect to the Internet. Install AirPort Utility, which came on the CD with your wireless device, and use it to provide Internet configuration information and other network settings. This version of AirPort Utility combines the ease of use of AirPort Setup Assistant and the power of AirPort Admin Utility.
Extending the Range of Your AirPort Network You can extend the range of your network by using AirPort Utility to set up wireless connections between several devices in your network, known as a Wireless Distribution System (WDS), or to connect a device using Ethernet to create a roaming network. For more information on setting up a WDS or a roaming network, see “Connecting Additional Wireless Devices to Your AirPort Network” on page 40.
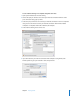
To start Internet sharing on a computer using Mac OS X v10.5: 1 Open System Preferences and click Sharing. 2 Choose the port you want to use to share your Internet connection from the “Share your connection using” pop-up menu. 3 Select the port you want to use to share your Internet connection in the “To computers using” list. You can choose to share your Internet connection with AirPort-enabled computers or computers with built-in Ethernet, for example. 4 Select Internet Sharing in the Services list.
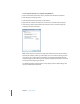
To start Internet sharing on a computer using Windows: 1 Open Control Panel from the Start menu, and then click “Network and Internet.” 2 Click “Network and Sharing Center.” 3 Click “Manage network connections” in the Tasks list. 4 Right-click the network connection you want to share, and then select Properties. 5 Click Sharing and then select “Allow other network users to connect through this computer’s Internet connection.
2 AirPort Security 2 This chapter provides an overview of the security features available in AirPort. Apple has designed its wireless devices to provide several levels of security, so you can enjoy peace of mind when you access the Internet, manage online financial transactions, or send and receive email. The AirPort Extreme Base Station and Time Capsule also include a slot for inserting a lock to deter theft.
Password Protection and Encryption AirPort uses password protection and encryption to deliver a level of security comparable to that of traditional wired networks. Users can be required to enter a password to log in to the AirPort network. When transmitting data and passwords, the wireless device uses up to 128-bit encryption, through either Wi-Fi Protected Access (WPA), WPA2, or Wired Equivalent Privacy (WEP), to scramble data and help keep it safe. If you are setting up an 802.
RADIUS Support The Remote Authentication Dial-In User Service (RADIUS) makes securing a large network easy. RADIUS is an access control protocol that allows a system administrator to create a central list of the user names and passwords of computers that can access the network. Placing this list on a centralized server allows many wireless devices to access the list and makes it easy to update. If the MAC address of a user’s computer (which is unique to each 802.
The EAP protocol known as TLS (Transport Layer Security) presents a user’s credentials in the form of digital certificates. A user’s digital certificates can comprise user names and passwords, smart cards, secure IDs, or any other identity credentials that the IT administrator is comfortable using.
WPA and WPA2 Enterprise WPA is a subset of the draft IEEE 802.11i standard and effectively addresses the wireless local area network (WLAN) security requirements for the enterprise. WPA2 is a full implementation of the ratified IEEE 802.11i standard. In an enterprise with IT resources, WPA should be used in conjunction with an authentication server such as RADIUS to provide centralized access control and management.
3 AirPort Network Designs 3 This chapter provides overview information and instructions for the types of AirPort Extreme networks you can set up, and some of the advanced options of AirPort Extreme. Use this chapter to design and set up your AirPort Extreme network. Configuring your Apple wireless device to implement a network design requires three steps: Step 1: Setting Up the AirPort Extreme Network Computers communicate with the wireless device over the AirPort wireless network.
Using AirPort Utility To set up and configure your computer or Apple wireless device to use AirPort Extreme for basic wireless networking and Internet access, use AirPort Utility and answer a series of questions about your Internet settings and how you would like to set up your network. 1 Open AirPort Utility, located in the Utilities folder in the Applications folder on a Mac, or in Start > All Programs > AirPort on a Windows computer.
Select from the following checkboxes: Â Select “Check for Updates when opening AirPort Utility” to automatically check the Apple website for software and firmware updates each time you open AirPort Utility. Â Select the “Check for updates” checkbox, and then choose a time interval from the pop-up menu, such as weekly, to check for software and firmware updates in the background. AirPort Utility opens if updates are available.
On a computer using Mac OS X, select AirPort from the network connection services list in the Network pane of System Preferences. Click Advanced, and then choose Using DHCP from the Configure IPv4 pop-up menu in the TCP/IP pane. On a computer using Windows, right-click the wireless connection icon that displays the AirPort network, and choose Status. Click Properties, select Internet Protocol (TCP/IP), and then click Properties. Make sure “Obtain an IP address automatically” is selected.
3 Choose Manual Setup from the Base Station menu and enter the password if necessary. The default device password is public. You can also double-click the name of the wireless device to open its configuration in a separate window. When you open the manual setup window, the Summary pane is displayed. The summary pane provides information and status about your wireless device and network.
If the wireless device reports a problem, the status icon turns yellow. Click Base Station Status to display the problem and suggestions to resolve it. Wireless Device Settings Click the AirPort button, and then click Base Station. Use the Base Station pane of AirPort Utility to enter information about the wireless device. Give the Wireless Device a Name Give the device an easily identifiable name.
Set Base Station Options Click Base Station Options and set the following: Â Enter a contact name and location for the wireless device. The name and location are included in some logs the device generates. The contact and location fields may be helpful if you have more than one wireless device on your network. Â Set status light behavior to either Always On or Flash On Activity. If you choose Flash On Activity, the device status light blinks when there is network traffic.
Naming the AirPort Extreme Network Give your AirPort network a name. This name appears in the AirPort status menu on the AirPort-enabled computers that are in range of your AirPort network. Choosing the Radio Mode Choose “802.11n (802.11b/g compatible)” from the Radio Mode pop-up menu if computers with 802.11n, 802.11g, or 802.11b wireless cards will join the network. Each client computer will connect to the network and transmit network traffic at the highest possible speed. Choose “802.11n only (2.
 None: Choosing this option turns off all password protection for the network. Any computer with a wireless adapter or card can join the network, unless the network is set up to use access control. See “Setting Up Access Control” on page 51.  WEP: If your device supports it, choose this option and enter a password to protect your network with a Wired Equivalent Privacy (WEP) password. Your Apple wireless device supports 40-bit and 128-bit encryption. To use 40-bit WEP, don’t use an 802.11n radio mode.
Setting Wireless Options Click Wireless Options to set additional options for your network. Setting Additional Wireless Options Use the Wireless Options pane to set the following: Â Region: Set the region code for the location of your network. Â Multicast rate: Choose a multicast rate from the pop-up menu. If you set the multicast rate high, only clients on the network that are within range and can achieve the speed you set will receive transmissions.
Configuring and Sharing Internet Access The next step is setting up your wireless device’s Internet connection and sharing its Internet access with client computers. The following sections tell you what to do, depending on how your device connects to the Internet. You’re Using a DSL or Cable Modem In most cases, you can implement this network design using AirPort Utility and following the onscreen instructions to set up your wireless device and network.
What You Need for a DSL or Cable Modem Connection Components Check Internet account with DSL or cable modem service provider Does your service provider use a You can get this information static IP or DHCP configuration? from your service provider or the Network preferences pane on the computer you use to access the Internet through this service provider.
 If your provider gave you an IP address and other numbers with your subscription, use that information to configure the wireless device IP address manually. If you aren’t sure, ask your service provider. Enter the IP address information in the fields below the Configure IPv4 pop-up menu.  If you chose PPPoE, your ISP provides your IP address automatically using DHCP. Contact your service provider for the information you should enter in these fields.
If you configure TCP/IP using DHCP, choose Using DHCP from the Configure IPv4 pop-up menu. Your IP information is provided automatically by your ISP using DHCP. Your service provider may require you to enter information in these fields. 5 If you chose PPPoE from the Connect Using pop-up menu, enter the PPPoE settings your service provider gave you. Leave the Service Name field blank unless your service provider requires a service name.
If you are connecting to the Internet through a router that uses PPPoE to connect to the Internet, and your wireless device is connected to the router via Ethernet, you do not need to use PPPoE on your device. Choose Ethernet from the Connect Using popup menu in the Internet pane, and deselect the “Distribute IP addresses” checkbox in the Network pane. Because your router is distributing IP addresses, your wireless device doesn’t need to.
 Enter Domain Name System (DNS) server addresses and a specific domain name your wireless device accesses when you connect to the Internet. 7 Click the Network button and configure how the device will share its Internet access with AirPort and Ethernet computers. If you chose Ethernet from the Connect Using pop-up menu, choose how your device will share the Internet connection from the Connection Sharing pop-up menu.
Using the wireless device as a bridge can be a way to address incompatibilities between the device’s Internet sharing features and your ISP’s connection method. Setting DHCP and NAT Options If you chose “Share a public IP address” from the Connection Sharing pop-up menu, you can set DHCP and NAT options. Click DHCP. Â Choose a range of IP addresses from the DHCP Range pop-up menu. Choose 10.0, 192.168, or 172.
Next you can set NAT options for the network. Click NAT. Â You can set up a default on your network. A default host (sometimes known as a DMZ) is a computer on your network that is exposed to the Internet and receives all inbound traffic. A default host may be useful if you use a computer on your AirPort network to play network games, or want to route all Internet traffic through a single computer. Â You can set up NAT Port Mapping Protocol (NAT-PMP).
Setting DHCP Only Options If you chose “Distribute a range of IP addresses” from the Connection Sharing pop-up menu, your wireless device is set up to use DHCP to distribute a range of IP addresses using only DHCP. You cannot use NAT if you chose this option. Click DHCP and enter the beginning and ending addresses you want to distribute to computers joining your wireless network. You can set the additional DHCP options, such as DHCP Lease, DHCP Message, and other options following the instructions above.
Next, choose DHCP from the Configure IPv4 pop-up menu. b If you enabled a DHCP server when you set up the wireless device’s network, and the client computer is using Ethernet, select Ethernet in the network connection services list, and then choose Using DHCP from the Configure pop-up menu.
c If you selected “Distribute a range of IP addresses” when you set up the wireless device’s network, you can provide Internet access to client computers using Ethernet by setting the client IP addresses manually. Select Ethernet in the network connection services list, and then choose Manually from the Configure pop-up menu. Enter the IP and router addresses from the range your device is providing. Enter the DNS and Search Domain addresses if necessary.
5 Click Internet Protocol Version 4 (TCP/IPv4), and then click Properties. Â If you chose “Share a public IP address” in the Network pane of AirPort Utility, select “Obtain an IP address automatically.” Â If you chose “Distribute a range of IP addresses” when you set up the wireless device’s network, you can provide Internet access to client computers by setting the client IP addresses manually. Select “Use the following IP address.
You’re Using an Existing Ethernet Network You can use AirPort Utility to easily set up the Apple wireless device for Internet access through an existing Ethernet network that already has a router, switch, or other network device providing IP addresses. Use the manual setup features of AirPort Utility if you need to adjust optional advanced settings.
What to Do If you are using AirPort Utility to help you set up an Apple wireless device on an existing Ethernet network: 1 Open AirPort Utility, located in the Utilities folder in the Applications folder on a Mac, or in Start > All Programs > AirPort on a Windows computer. 2 Click Continue and follow the onscreen instructions to connect to your local area network (LAN).
If your IP address is provided by DHCP, choose Using DHCP from the Configure IPv4 pop-up menu. 5 Choose Off (Bridge Mode) from the Connection Sharing pop-up menu. Your wireless device “bridges” the Ethernet networks Internet connection to computers connected to the device wirelessly or by Ethernet. See “Setting Up Client Computers” on page 32 for information about how to set up client computers to connect to the Ethernet network.
Connecting Additional Devices to Your AirPort Extreme Network Connect a USB printer to the USB port of your Apple wireless device (in this example, a Time Capsule) and everyone on the network can print to it. Connect a USB hub to the USB port of an AirPort Extreme Base Station or a Time Capsule, and then connect a hard disk and a printer so everyone on the network can access them. If you connect a Time Capsule, you can use Time Machine in Mac OS X Leopard (v10.5.
Using Apple TV on Your AirPort Extreme Network to Play Content from iTunes When you connect Apple TV to your AirPort Extreme network wirelessly, or using Ethernet, and then connect Apple TV to your widescreen TV, you can enjoy your favorite iTunes content including movies, TV shows, music and more. (See the documentation that came with your Apple TV for instructions setting it up.
3 Give each device the same network name and password. 4 Set up the devices as bridges, following the instructions in the previous section. If you want one device to assign IP addresses using DHCP, also do the following: 1 Set up one device to act as the DHCP server. 2 Set up the other devices as bridges, following the instructions in the previous section.
Setting Up a Wireless Distribution System (WDS) When you connect devices wirelessly in a WDS, you set up each device as either a main, a remote, or a relay device. You can connect AirPort Extreme 802.11n Base Stations or Time Capsules and use the 5 GHz frequency band in the network. Only client computers that have 802.11n wireless cards installed can join the network. If you want client computers using 802.11b or 802.11g wireless cards to join the network, set up the network using the 2.
To set up the main wireless device to share its Internet connection with other wireless devices: 1 Click the AirPort status menu in the menu bar and choose the wireless network created by the device you want to set up as the main device. 2 Open AirPort Utility (located in the Utilities folder in the Applications folder on a Mac, or in Start > All Programs > AirPort on a Windows computer).
7 Click Update to send the new settings to the devices in the WDS. By default, the “Allow wireless clients” checkbox is selected. If you deselect the checkbox and later want to change the settings on the wireless device, you must connect to the device’s LAN port with an Ethernet cable. You will not be able to connect to the device wirelessly.
6 Enter the MAC address of the main device in the WDS Main field. The MAC address is also referred to as the AirPort ID and is printed on the label on the bottom of the device. 7 Click Update to transfer the settings. By default, the “Allow wireless clients” checkbox is selected. If you deselect the checkbox and later want to change the settings on the wireless device, you must connect to the device’s LAN port with an Ethernet cable. You will not be able to connect to the device wirelessly.
Relay and remote devices need to be on the same channel as the main device. Before setting up a relay or remote device, find the channel of the main device in the Summary pane of AirPort settings in AirPort Utility. 1 Click the AirPort status menu in the menu bar to join the wireless network created by the wireless device you want to set up as the relay device.
4 Choose “Create a wireless network” from the Wireless Mode pop-up menu, and then select the “Allow this network to be extended” checkbox. 5 Next, select the device that will extend this network and choose Manual Setup from the Base Station menu, or double-click the device’s icon to open its configuration in a separate window. Enter the password if necessary.
8 Click Update to update the device with new network settings. Setting up a Dual-Band (2.4 GHz and 5 GHz) Network You can set up a dual-band network that utilizes both the 2.4 GHz and 5 GHz frequency bands, so client computers using 802.11n wireless cards join the 5 GHz segment of the network, and computers using 802.11b or 802.11g wireless cards join the 2.4 GHz segment. 2.4 GHz client AirPort Express AirPort Extreme (2.
Setting up a dual-band network: See “Choosing the Radio Mode” on page 21 for instructions about how to set up your Apple wireless device in the 5 GHz frequency range. Set up your device to connect to the Internet based on the type of service you use (DSL or cable modem service, or connecting to an existing Ethernet network that has Internet access). Give your 5 GHz network a name, such as Business 5G, so that 802.11n client computers can join the 5 GHz segment of the network. Connect your 2.
To help protect your network and wireless device: 1 Open AirPort Utility, select your device, and choose Manual Setup from the Base Station menu, or double-click the device icon to open its configuration in a separate window. Enter the password if necessary. 2 Click the Advanced button, and then click Logging & SNMP. 3 Make sure the Allow SNMP Access and “Allow SNMP over WAN” checkboxes are not selected.
To set up a WPA or WPA2 Enterprise network: On a computer using Mac OS X, you first need to set up an 802.1x connection. 1 Open System Preferences, click Network, and then click AirPort. 2 Click Advanced, and then click 802.1X 3 Enter the settings for the connection. Note: Some of the authentication protocols require digital certificate authorization on the server. See the documentation that came with your server to create and distribute digital certificates. 4 Click OK to save the connection settings.
To set up the access control list: 1 Open AirPort Utility, select your wireless device, and then choose Manual Setup from the Base Station menu. Enter the password if necessary. 2 Click the AirPort button, and then click Access. 3 Choose Timed Access or RADIUS from the MAC Address Access Control pop-up menu, depending on the device you're setting up.
You can also add the MAC address of a third-party 802.11 wireless networking card to the access control list. Most third-party cards have the MAC address on a label attached to the metal case of the card. Access control is not compatible with WPA or WPA2 Enterprise mode. You can use either access control or WPA Enterprise in a network, but you can’t use both.
5 Enter the IP address, port, and shared secret (or password) for the primary and secondary servers. See the RADIUS documentation that came with your server, or check with the network administrator for more information on setting up the RADIUS server. The access control list and RADIUS work together.
If you are using a web, AppleShare, or FTP server on your AirPort Extreme network, other computers initiate communication with your server. Because the Apple wireless device has no table entries for these requests, it has no way of directing the information to the appropriate computer on your AirPort network.
Type any additional information you need in the text fields. To use port mapping, you must configure TCP/IP manually on the computer that is running the web, AppleShare, or FTP server. You can also set up a computer as a default host to establish a permanent IP address for the computer and provide inbound port mapping information to the AirPort Extreme Base Station or AirPort Express. This is sometimes known as a DMZ and is useful when playing some network games or videoconferencing.
3 Enter the IP address of the computer that will receive the logs in the Syslog Destination Address field. 4 Choose a level from the Syslog Level pop-up menu. You need to assign a Network Time Protocol (NTP) server for each wireless device, so the log information will contain the accurate time of the status logs.
2 Choose Manually from the Configure IPv6 pop-up menu, and enter the information you were given from your ISP or network administrator. Customizing the IPv6 firewall If your wireless device supports it, you can use AirPort Utility to adjust IPv6 firewall settings. To adjust IPv6 firewall settings: 1 Open AirPort Utility, located in the Utilities folder inside the Applications on a Mac, or in Start > All Programs > AirPort on a Windows computer.
To share a hard disk on you network: 1 Plug the hard disk into the USB port on the back of the AirPort Extreme Base Station or Time Capsule. 2 Open AirPort Utility, located in the Utilities folder in the Applications folder on a Mac, or in Start > All Programs > AirPort on a Windows computer. 3 Select your AirPort Extreme Base Station or your Time Capsule, and then choose Manual Setup from the Base Station menu, or double-click the device icon to open its configuration in a separate window.
Using a Time Capsule in Your Network If you’re using a Time Capsule and a computer with Mac OS X Leopard (v10.5.2 or later), you can use Time Machine to automatically back up all of the computers on the network that are using Leopard. Other Mac computers and Windows computers can access the Time Capsule’s internal AirPort disk to back up, store, and share files. And because every Time Capsule is also a full-featured 802.
 On a computer using Mac OS X v10.2.3 or later, open Printer Setup Utility located in the Utilities folder in the Applications folder, and then select the printer from the list. If the printer is not in the list, click Add, choose Bonjour from the pop-up menu, and then select the printer from the list.  On a computer using Windows, install Bonjour for Windows from AirPort Utility CD, and follow the onscreen instructions to connect to the printer.
Solving Problems If you have trouble connecting to the Internet with any AirPort Extreme network design, try the following: On a computer using Mac OS X: Â Make sure the wireless device is connected to the Internet. The computers on your AirPort network cannot connect to the Internet if your device is not connected to the Internet. Â Check your Internet connection using your computer. If you can’t connect with your computer, the problem may be with your Internet connection. Â On a Mac using Mac OS X v10.
 Make sure that the computer has joined the AirPort network created by your wireless device.  Restart your computer. This renews the IP address you receive from the wireless device. The IP addresses should be in the range of 10.0.1.2 to 10.0.1.200, 172.16.1.2 to 172.16.1.200, or 192.168.1.2 to 192.168.1.200 depending on the address scheme the device uses.
4 Behind the Scenes 4 This chapter defines terms and concepts used to discuss computer networks. Use it as a reference to help you understand what is taking place behind the scenes of your AirPort wireless network. Basic Networking Packets and Traffic Information travels across a network in chunks called packets. Each packet has a header that tells where the packet is from and where it’s going, like the address on the envelope when you send a letter.
So, your computer also has an Internet Protocol (IP) address that defines exactly where and in what network it’s located. IP addresses ensure that your local Ethernet network receives only the traffic intended for it. Like the hierarchical system used to define zip codes, street names, and street numbers, IP addresses are created according to a set of rules, and their assignment is carefully administered. The hardware address is like your name; it uniquely and permanently identifies you.
Using the Time Capsule This section describes the different network interfaces of the Time Capsule and describes the functions it can provide. Time Capsule Interfaces To use your Time Capsule, you configure how its networking interfaces will be used. The Time Capsule has five hardware networking interfaces: Â AirPort interface: The AirPort interface creates an AirPort network for AirPortenabled computers to join. The Time Capsule can provide IP services such as DHCP and NAT using this interface.
 Audio (-) interface: Use the analog and optical digital audio stereo mini-jack to connect an AirPort Express to a home stereo or powered speakers. Status light AC plug adapter d USB port G Ethernet port ∏ Reset button - Line Out port (Analog and optical digital audio mini-jack) Apple Wireless Device Functions  Bridge: Each Apple wireless device is configured by default as a bridge between the wireless AirPort network and the wired Ethernet network.
 Cordless telephones that operate in the 2.4 gigahertz (GHz) range. If you have problems with your phone or AirPort communication, change the channel of your base station.  Other AirPort and wireless networks  Adjacent base stations using nearby channels. If base station A is set to channel 1, base station B should be set to channel 6 or 11. For best results, use channels 1, 6, or 11 when operating your base station in the 2.4 GHz range.
Glossary Glossary 10Base-T The most common cabling method for Ethernet. 10Base-T conforms to IEEE standard 802.3. It was developed to enable data communications over unshielded twisted pair (telephone) wiring at speeds of up to 10 megabits per second up to distances of approximately 330 feet on a network segment. 10/100Base-T A networking standard that supports data transfer rates up to 100 Mbps (100 megabits per second).
backbone The central part of a large network that links two or more subnetworks. The backbone is the primary data transmission path on large networks such as those of enterprises and service providers. A backbone can be wireless or wired. bandwidth The maximum transmission capacity of a communications channel at any point in time. Bandwidth, usually measured in bits per second (bps), determines the speed at which information can be sent across a network.
channel One portion of the available radio spectrum that all devices on a wireless network use to communicate. Changing the channel on the access point/router can help reduce interference. client Any computer or device connected to a network that requests files and services (files, print capability) from the server or other devices on the network. The term also refers to end users. DHCP Dynamic Host Configuration Protocol.
firewall A system of software and/or hardware that resides between two networks to prevent access by unauthorized users. The most common use of a firewall is to provide security between a local network and the Internet. Firewalls can make a network appear invisible to the Internet and can block unauthorized and unwanted users from accessing files and systems on the network.
LAN Local area network. A system of connecting PCs and other devices within the same physical proximity for sharing resources such as an Internet connections, printers, files, and drives. When Wi-Fi is used to connect the devices, the system is known as a wireless LAN or WLAN. See WAN. MAC address Media Access Control address. A unique hardware number that identifies each device on a network. A device can be a computer, printer, and so on. A MAC address is also known as an AirPort ID.
roaming (Wi-Fi) The ability to move from one area of Wi-Fi coverage to another with no loss in connectivity (hand-off ). router A wireless router is a device that accepts connections from wireless devices to a network, includes a network firewall for security, and provides local network addresses. See hub. server A computer that provides resources or services to other computers and devices on a network. Types of servers include print servers, Internet servers, mail servers, and DHCP servers.
WEP Wired equivalent privacy. The original security standard used in wireless networks to encrypt the wireless network traffic. See WPA, Wireless local area network Wi-Fi A term developed by the Wi-Fi Alliance to describe wireless local area network (WLAN) products that are based on the Institute of Electrical and Electronics Engineers. Wi-Fi Certified The certification standard designating IEEE 802.
WPA2 - Enterprise Wi-Fi Protected Access 2 - Enterprise. The follow-on wireless security method to WPA that provides stronger data protection for multiple users and large managed networks. It prevents unauthorized network access by verifying network users through an authentication server. See WPA2. WPA2 - Personal Wi-Fi Protected Access 2 - Personal. The follow-on wireless security method to WPA that provides stronger data protection and prevents unauthorized network access for small networks.
www.apple.com/airportextreme www.apple.com/airport © 2008 Apple Inc. All rights reserved. Apple, the Apple logo, AirPort, AirPort Extreme, AppleShare, AppleTalk, Bonjour, Mac, and Mac OS are trademarks of Apple Inc., registered in the U.S. and other countries. AirPort Express, AirTunes, Time Capsule, and Time Machine are trademarks of Apple Inc. Other product and company names mentioned herein may be trademarks of their respective companies.