
User Manual


Chapter 17 Exporting Your Images 489
IV
Exporting Copies of Masters
When you export masters, duplicates of the files that were imported from your camera
or other source are created; no adjustments, file modifications, or any other changes
are exported with the file.
To export copies of masters:
1 Select an image or images in the Browser.
2 Choose File > Export > Masters (or press Command-Shift-S).
3 Navigate to the location where you want the exported files placed.
4 Do one of the following:
 Choose None from the Subfolder Format pop-up menu to specify that the files be
stored as separate individual files in the selected folder.
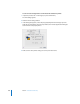
 To specify that Aperture create a hierarchy of subfolders with specific folder names to
hold your files, choose a folder name preset from the Subfolder Format pop-up
menu. For more information about creating folders to hold your exported images,
see “Exporting Masters into Folders in the Finder” on page 490.
 Enter a custom folder name in the Custom Subfolder Name field.
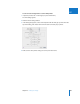
5 Choose a name format for your masters from the Name Format pop-up menu.
For more information about selecting and setting up filenaming formats, see “Creating
Custom Name Formats” on page 130. Aperture shows an example of the selected name
format in the dialog.
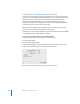
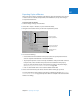
Choose a location
for the exported files.
Choose a name format
for your masters here.
Click this button to
export files.