
User guide

Chapter 7 Make image adjustments 297
3 Do one of the following:
•
To adjust levels based on the total luminance of the red, green, and blue channels combined: In the
Levels area of the Adjustments inspector, choose Luminance from the Channel pop-up menu,
and click the Auto Levels Combined button.
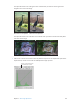
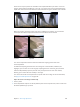
Click the Auto Levels Combined
button to automatically set the
levels for the photo based on
the combined luminance of all
three color channels.
•
To adjust levels based on an evaluation of each color channel: Choose RGB from the Channel
pop-up menu, and click the Auto Levels Separate button.
Click the Auto Levels Separate
button to automatically set the
levels for the photo based on
an evaluation of each color
channel’s luminance values.
To ne-tune the automatic levels adjustment, see “Manually adjust levels in an image based on
luminance,” below.
Adjust black and white clipping points for Auto Levels adjustments
Aperture provides the option to set both the black and white clipping point parameters for the
Auto Levels adjustments. Modifying the black and white clipping points from their default value
of 0% expands the tonal range of the image. One reason for expanding the tonal range of an
image is to preserve shadow and highlight detail when the image is printed.
Note: You may have to perform a few print tests to determine the output characteristics of your
printer before settling on nal values for black and white clipping points.
1 Choose Aperture > Preferences, and click Advanced.
2 In the Advanced pane, specify the following settings:
•
To adjust the black clipping point: Use the “Auto adjust Black Clip” parameter controls.
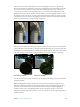
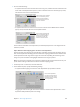
Use the Auto Adjust Black
Clip slider and value slider to
add tolerance to Auto Levels
adjustments when evaluating
colors beyond black.
Dragging the slider to the right increases the tolerance of Auto Levels adjustments to colors
beyond the analyzed black point in the image.
67% resize factor