Late-Breaking News About Aperture This document provides updated information about Aperture and covers these topics: Â Late-Breaking News About Aperture 1.5.2 (p. 2) Â Previous Release Information About Aperture 1.5 (p. 4) Â Previous Release Information About Aperture 1.1 (p. 24) Â Previous Release Information About Aperture 1.0 (p. 27) This document may be updated as new versions of Aperture are released or new information becomes available.
Late-Breaking News About Aperture 1.5.2 Aperture 1.5.2 provides performance, reliability, and compatibility enhancements. Note: Aperture 1.5.2 is designed to run natively on both PowerPC-based and Intelbased Macintosh computers. Suppressing Preview Generation When Opening Aperture When Aperture is opened, it begins updating previews for those projects whose Maintain Previews setting is enabled.
5 If necessary, choose an output dimension option from the Size To pop-up menu. Note: Watermarks are never scaled above 100 percent of the size at which they were created. If an image is exported at 100 percent of its original size, the watermark is not scaled. If the watermark is too small in relation to the image as a whole, you will need to create a new watermark at a larger size. 6 Select the Show Watermark checkbox. 7 Click the Choose Image button.
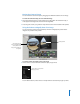
Previous Release Information About Aperture 1.5 Aperture 1.5 provides performance, reliability, and compatibility enhancements. Note: Aperture 1.5 is designed to run natively on both PowerPC-based and Intel-based Macintosh computers. Viewing Images with the Centered Loupe Aperture 1.5 has an additional, enhanced Loupe called the Centered Loupe.
Moving the Centered Loupe You can move the Centered Loupe by dragging it to different locations over an image. To move the Centered Loupe, do one of the following: m Drag the Centered Loupe to a new location. If you drag within the Centered Loupe, a circle appears that targets the area that will be magnified. m Press the grave accent (`) key, and the Loupe moves to the current location of the pointer.
Changing the Size and Magnification of the Centered Loupe You can also change the size of the Centered Loupe and increase or decrease its magnification level. The Loupe scaling settings are respected by both the regular Loupe and the Centered Loupe. To change the size of the Centered Loupe, do one of the following: m Choose View > Loupe Scaling > Decrease Diameter, or press Shift-Option-hyphen (-), to decrease the size.
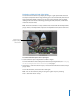
Displaying a Pixel Grid and Color Values You can have the Centered Loupe display the image as a grid of pixels that shows the actual pixel composition of the image, allowing you to see the individual pixel values at high magnification (400% or higher). You can also set the Centered Loupe to display readings of the color values of the image, showing the RGB, CMYK, HSL, or HSB values chosen for the Color meter.
You can turn on the display of Color meter values within the Centered Loupe. To turn on the display of color values in the Centered Loupe, do one of the following: m Choose View > Show Color Value in Loupe, or press Shift–Option–grave accent (`). m Choose Color Value from the Centered Loupe pop-up menu. To turn off this feature, choose the menu item again. Note: You can also display color values in the regular Loupe by choosing View > Show Color Value in Loupe.
Uses of Preview Images Aperture preview images improve the display of images in Aperture and allow you to easily use your images in other applications. Displaying Images in Aperture Slideshows In previous versions, Aperture decoded the master file and applied the adjustments as the image was displayed during the slideshow. Now it uses the JPEG previews to display images in slideshows. The result is smoother, more responsive slideshows.
Integration with iLife and iWork You can use previews to distribute your Aperture pictures in movies, on the web, on DVDs, in slideshows, and in podcasts. You can also download your Aperture pictures to your iPod, import them into iPhoto, or use them to create Pages documents. The media browsers in the iLife and iWork applications now support browsing Aperture Libraries.
Upgrading the Aperture Library To use an existing Library with Aperture 1.5, you must upgrade it. Aperture prompts you with the following dialog: Select “Create previews for existing images” to have Aperture create a preview for each image in the Library. By default, previews are created for images in the Library. Previews are built in the background after the Library is upgraded to version 1.5. Regardless of what you choose here, it is easy to switch the setting in Aperture later.
The Preferences window appears, and the Previews preferences are at the bottom of the window. Â New projects automatically generate previews: Selecting this checkbox tells Aperture to automatically build and maintain previews for new projects you create in the current Library (and, by extension, in new Libraries). This checkbox sets the Maintain Previews for Project setting (discussed below) for each new project as it is created.
Controlling Previews with the Project Action Pop-Up Menu You enable or disable automatic preview maintenance on a project-by-project basis, or for all projects in a Library. A checkmark indicates that automatic preview maintenance is enabled. To have Aperture automatically update previews in the Library: 1 In the Projects panel, select Library. 2 Choose Maintain Previews For All Projects from the Project Action pop-up menu (with a gear icon).
Controlling Previews with Shortcut Menus You can control previews in projects by Control-clicking a project in the Projects panel and choosing an item from the shortcut menu that appears. In addition, you can control previews for single images or for a selection of images by Control-clicking images in the Browser. In the Projects panel, you can delete all the previews for a project or update all the previews for a project.
To force the rebuilding of JPEG previews in a project: 1 In the Projects panel, hold down the Option key while Control-clicking the project whose JPEG previews you want to force Aperture to update. Hold down the Option key while Control-clicking a project to make Generate Previews for Project appear in the shortcut menu. 2 Choose Generate Previews for Project from the shortcut menu. In the Browser, you can select one or more images and either delete or update the JPEG previews.
To update JPEG previews for an image selection: 1 In the Browser, select an image or group of images whose JPEG previews you want to update. 2 Control-click the image selection, then choose Update Previews from the shortcut menu. You can also force the rebuilding of previews for an image selection. To force the rebuilding of JPEG previews for an image selection: 1 In the Browser, select an image or group of images whose JPEG previews you want to force Aperture to update.
Viewing Preview Generation Progress in the Background Task List Window Aperture renders preview images in the background; however, there may be times when you want to stop this operation. You can view the progress of the preview render operation, as well as cancel this operation, in the Background Task List window. To stop building previews: 1 Choose Window > Show Task List. Select this task, then click the Cancel Task button.
Rendering Preview Images Aperture renders preview images in four situations: Â When a Library is upgraded to version 1.5—provided that the “Create previews for existing images” checkbox is selected in the Welcome to Aperture 1.
To stop building previews Library-wide and build previews on a project-by-project basis: 1 Choose Window > Show Task List. 2 Select the “Processing previews” task, then click the Cancel Task button. 3 Close the Background Task List window. 4 In the Projects panel, select Library and choose Maintain Previews For All Projects from the Project Action pop-up menu (with a gear icon). No checkmark or dash (–) next to the menu item indicates that preview maintenance is disabled for the entire Library.
Generating Previews for Images Based on Rating Another way to use previews is to create a search that displays only low-rated images. You can then build previews just for those images, and take their master files offline (for example, burn them to a DVD). That way you still have good-quality images for all of your photos, without using a lot of disk space. You can also create a search that displays only highly rated images, and then build previews for those images only.
Note: Previews for Smart Albums are not automatically maintained—automatic preview maintenance is a project-level and Library-level setting only. In this workflow, you need to update the previews yourself periodically, by Control-clicking the images in the album and choosing Update Previews from the shortcut menu. Aperture will build previews only for the versions that have changed, so you don’t need to determine which ones to update.
Comparing the File Sizes of JPEG Previews and Their Master Files Previews use less disk space than their associated master files, especially for high-resolution RAW files. The charts below show the disk space that previews take for fifty 16-megapixel 1Ds Mark II images. The previews were created at three compression quality settings (10, 8, and 6) and at three size settings (No limit, 2560, and 1680).
Controlling Slideshows with the Apple Remote In Aperture 1.5, you can control slideshows with the Apple Remote that comes with MacBook, MacBook Pro, and iMac computers. Apple Remote function Effect Pressing left button Moves back one slide and pauses the slideshow. Pressing right button Moves forward one slide and pauses the slideshow. Pressing Play Plays or pauses the slideshow. Pressing and holding right button Exits the slideshow. Copying Your Presets to Another Aperture System In Aperture 1.
Consolidating Master Files When consolidating master files, you are given the choice of either moving or copying the master files from their current location in the Finder to the Aperture Library. When you have master files stored on a server or RAID, and then decide to store them in the Library (so that you can work on them efficiently), selecting the ”Copy files” option in the Consolidate Master Images dialog won’t affect the source volume.
Removing Spaces from Filenames When Exporting When exporting images for specific uses, such as for use on websites, you may need to use filenames without spaces so that they are compatible with the intended application or website. Aperture adds spaces to filenames depending on the name format you use. You can easily modify name formats to remove spaces from filenames. To modify a name format to remove spaces: 1 Choose Aperture > Presets > File Naming.
Improved Web Gallery and Web Journal Updating In previous versions of Aperture, when you updated the images in a web gallery or web journal posted to .Mac, Aperture would first export all the web gallery or web journal images to temporary storage on your hard disk and then transfer only the new or changed images to your .Mac site. Aperture 1.
Previous Release Information About Aperture 1.0 The following information was included with Aperture 1.0. Maximizing the Performance of the Library To maximize performance, place the Library on an internal hard disk. You can set the Library’s location in the Preferences window (choose Aperture > Preferences). Working with Master Files This section contains information about working with digital master files.
Working with Vaults This section contains information about working with vaults. Hard Drives You Can Use to Store Vaults You can store vaults only on internal hard disks and external FireWire hard disk drives. To protect your image assets against hardware failure, make sure you store the vault on a disk other than the one where the Library is stored. Supported Drive Formats for Vaults Vaults can be saved only to disks formatted in Mac OS Extended format (also called HFS Plus).
To set the Browser Query HUD to show rejected images only: 1 In the Query HUD, make sure the Rating checkbox is selected. 2 Choose “is” from the Rating pop-up menu, and set the Rating slider to X (Reject). Only images with the Reject rating appear in the Browser, and X appears in the Browser’s search field. Selectively Removing Keywords You can easily remove an individual keyword from a selection of multiple images without removing the remaining keywords applied to the images.
To link your web gallery or journal to your .Mac homepage: 1 Go to http://www.mac.com, then click HomePage at the top of the screen. 2 If you haven’t already done so, log in. 3 In the Pages list, select a Menu page, such as Home, then click Edit. Note: The page category is listed to the right of the selection. 4 In the “Edit your page” section, click the plus sign (+) button next to an existing link to add a new link. A new empty link is created to the right of the previous link.
To turn off color management in an Epson R2400 printer: 1 In Aperture, choose File > Print (or press Command-P). The Print dialog appears. 2 Click the Printer Settings button. 3 In the dialog that appears, choose Color Management from the third pop-up menu from the top of the dialog, and select Off (No Color Adjustment). 4 Make sure the other printer settings are correct, then click Done. To turn off color management in a Canon i9100 printer: 1 In Aperture, choose File > Print (or press Command-P).
To turn off color management in an HP Photosmart 8700 series printer: 1 In Aperture, choose File > Print (or press Command-P). The Print dialog appears. 2 Click the Printer Settings button. 3 In the dialog that appears, choose Paper Type/Quality from the third pop-up menu from the top of the dialog, click the Paper button, then choose Application Managed Color from the Color pop-up menu. 4 Make sure the other printer settings are correct, then click Done. © 2006 Apple Computer, Inc. All rights reserved.