iPod shuffle User Guide
2 Contents Chapter 1 3 About iPod shuffle Chapter 2 4 4 5 6 8 iPod shuffle Basics iPod shuffle at a Glance Using the iPod shuffle Controls Connecting and Disconnecting iPod shuffle Charging the Battery Chapter 3 10 10 11 14 15 Setting Up iPod shuffle About iTunes Importing Music into Your iTunes Library Organizing Your Music Adding Music to iPod shuffle Chapter 4 20 20 22 Listening to Music Playing Music Using the VoiceOver Feature Chapter 5 26 26 Storing Files on iPod shuffle Using iPod
1 About iPod shuffle 1 Congratulations on purchasing iPod shuffle. Read this chapter to learn about the features of iPod shuffle, how to use its controls, and more. ± WARNING: To avoid injury, read all operating instructions in this guide and the safety information in “Safety and Handling” on page 32 before using iPod shuffle. To use iPod shuffle, you put songs and other audio files on your computer and then sync them with iPod shuffle.
2 2 iPod shuffle Basics Read this chapter to learn about the features of iPod shuffle, how to use its controls, and more. Your iPod shuffle package includes iPod shuffle, the Apple Earphones with Remote, and a USB 2.0 cable to connect iPod shuffle to your computer.
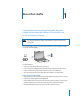
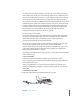
To use the Apple Earphones with Remote: m Plug the earphones into the earphone port on iPod shuffle. Then place the earbuds in your ears as shown. Use the buttons on the remote to control playback. Remote The earphone cord is adjustable. WARNING: Read all safety instructions about avoiding hearing damage on page 33 before use. You can purchase other accessories, such as the Apple In-Ear Earphones with Remote and Mic, and the Apple Earphones with Remote and Mic, at www.apple.com/ipodstore.
To Do this with the earphone remote Play or pause Click the Center button. Change the volume Click the Volume Up (∂ ) or Volume Down (D) button. Go to the next track Double-click the Center button. Fast-forward Double-click and hold the Center button. Go to the previous track Triple-click the Center button within 6 seconds of the track starting. Triple-clicking after 6 seconds restarts the current track. Rewind Triple-click and hold the Center button.
The first time you connect iPod shuffle to your computer, iTunes helps you configure iPod shuffle and sync it with your iTunes library. By default, iTunes automatically syncs songs on iPod shuffle when you connect it to your computer. When iTunes is finished, you can disconnect iPod shuffle. You can sync songs while your battery is charging. If you connect iPod shuffle to a different computer and iPod shuffle is set to sync music automatically, iTunes prompts you before syncing any music.
Charging the Battery iPod shuffle has an internal battery that is rechargeable and not user-replaceable. For best results, the first time you use iPod shuffle, let it charge for about three hours to fully charge it. The battery is 80-percent charged in about two hours and fully charged in about three hours. If iPod shuffle isn’t used for a while, the battery might need to be recharged. You can sync music while the battery is charging. You can disconnect and use iPod shuffle before it’s fully charged.
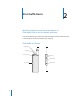
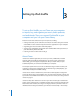
4 Plug the power adapter into a working power outlet. Apple USB Power Adapter (your adapter may look different) iPod shuffle USB cable WARNING: Make sure the power adapter is fully assembled before plugging it into a power outlet. Read all safety instructions about using the Apple USB Power Adapter on page 33 before use. Rechargeable batteries have a limited number of charge cycles. Battery life and number of charge cycles vary by use and settings. For information, go to www.apple.com/batteries.
3 Setting Up iPod shuffle 3 To set up iPod shuffle, you use iTunes on your computer to import, buy, and organize your music, audio podcasts, and audiobooks. Then you connect iPod shuffle to your computer and sync it to your iTunes library.
If you already have iTunes installed on your computer and you’ve set up your iTunes library, you can skip to the next section, “Adding Music to iPod shuffle” on page 15. Importing Music into Your iTunes Library To listen to music on iPod shuffle, you first need to get that music into your iTunes library on your computer. There are three ways to get music and other audio into your iTunes library: Â Purchase music and audiobooks or download podcasts online from the iTunes Store.
You can browse or search the iTunes Store to find the album, song, or artist you’re looking for. Open iTunes and click iTunes Store in the list on the left. Â To browse the iTunes Store, choose a category (for example, Music) on the left side of the iTunes Store home page. You can choose a genre, look at new releases, click one of the featured songs, look at Top Songs and more, or click Browse under Quick Links in the main iTunes Store window.
To add songs on your computer to your iTunes library: m Drag the folder or disk containing the audio files to your iTunes library (or choose File > Add to Library and select the folder or disk). If iTunes supports the song file format, the songs are automatically added to your iTunes library. You can also drag individual song files to iTunes. Note: Using iTunes for Windows, you can convert nonprotected WMA files to AAC or MP3 format. This can be useful if you have a library of music encoded in WMA format.
3 Enter the song information. 4 Click Next to enter information for the next track. 5 Click OK when you finish. Organizing Your Music Using iTunes, you can organize songs and other items into lists, called playlists, in any way you want. For example, you can create playlists with songs to listen to while exercising, or playlists with songs for a particular mood. You can also create Smart Playlists that update automatically based on rules you define.
2 Follow the onscreen instructions. 3 Connect and sync iPod shuffle. You can now use Genius to create a Genius playlist that you can sync to iPod shuffle. To create a Genius playlist in iTunes: 1 Click Music in the Library list or select a playlist. 2 Select a song. 3 Click the Genius button at the bottom of the iTunes window. 4 To change the maximum number of songs included in the playlist, choose a number from the pop-up menu. 5 To save the playlist, click Save Playlist.
 Manually add music to iPod shuffle: When you connect iPod shuffle, you can drag songs and playlists individually to iPod shuffle, and delete songs and playlists individually from iPod shuffle. Using this option, you can add songs from more than one computer without erasing songs from iPod shuffle. When you manage music yourself, you must always eject iPod shuffle from iTunes before you can disconnect it. See “Managing iPod shuffle Manually” on page 17.
You can sync audiobooks when you sync music. Audiobooks appear in the list of selected playlists. You can choose to sync all or none of the audiobooks in your iTunes library. 5 Click Apply. The update begins automatically. If “Sync only checked songs” is selected in the Summary pane, iTunes syncs only items that are checked in your Music and other libraries. Syncing Podcasts Automatically The settings for adding podcasts to iPod shuffle are unrelated to the settings for adding songs.
2 Drag a song or other item to iPod shuffle. You can also drag entire playlists to sync them with iPod shuffle. You can select multiple items and drag them all at once to iPod shuffle. To remove a song or other item from iPod shuffle: 1 In iTunes, select iPod shuffle in the list of devices. 2 Select Music, Audiobooks, or Podcasts under iPod shuffle. 3 Select a song or other item and press the Delete or Backspace key on your keyboard.
4 Click the Settings button to select from the following options: Replace all items when Autofilling: iTunes replaces the songs on iPod shuffle with the new songs you’ve chosen. If this option isn’t selected, songs you’ve already synced with iPod shuffle remain and iTunes selects more songs to fill the available space. Choose items randomly: iTunes shuffles the order of songs as it syncs them with iPod shuffle.
4 Listening to Music 4 After you set up iPod shuffle, you can listen to songs, audiobooks, and podcasts. Read this chapter to learn about listening to iPod shuffle on the go. When you disconnect iPod shuffle from your computer, you can clip on iPod shuffle and listen to music, audiobooks, and podcasts, while controlling playback with the earphone remote. VoiceOver lets you hear the name of the song you’re playing, choose from a spoken menu of playlists, or get battery status.
The status light on iPod shuffle blinks in response when you click the buttons on the earphone remote. To Do this Play Click the Center button once. Pause Click the Center button once. Status light response Blinks green once Blinks green for 30 seconds Change the volume Click the Volume Up (∂ ) or Volume Blinks green for each Down (D) button to increase or decrease volume increment the volume.
Using the VoiceOver Feature iPod shuffle can provide more control over your playback options by speaking your song titles and artist names, and announcing a menu of playlists for you to choose from. VoiceOver also tells you battery status and other messages. VoiceOver is available in selected languages. To hear these announcements, install the VoiceOver Kit and enable the VoiceOver feature in iTunes. You can enable VoiceOver when you first set up iPod shuffle, or you can do it later.
To disable VoiceOver: 1 In iTunes, select iPod shuffle in the list of devices, and click the Summary tab. 2 Under Voice Feedback, click to deselect Enable VoiceOver. 3 Click Apply. When syncing is finished, VoiceOver is disabled. You’ll still hear some system announcements in English on iPod shuffle, such as battery status, error messages, and a generic numbered playlist menu. You won’t hear song titles and artist names.
The playlist menu announces items in this order: Â Â Â Â The current playlist (if applicable) “All Songs” (default playlist of all the songs on iPod shuffle) Any remaining playlists in order “Podcasts” (if you choose this, you go to the first podcast in your list; you can navigate from there to other podcasts) Â Audiobooks (each audiobook title is a separate playlist announcement) To choose an item from the playlist menu: 1 Click and hold the Center button on the remote.
Setting a Volume Limit You can set a limit for the volume on iPod shuffle. You can also set a password in iTunes to prevent anyone else from changing this setting. If you’ve set a volume limit on iPod shuffle, the status light blinks orange three times if you try to increase the volume beyond the limit. To set a volume limit for iPod shuffle: 1 Set iPod shuffle to the desired maximum volume. 2 Connect iPod shuffle to your computer.
5 Storing Files on iPod shuffle 5 Use iPod shuffle to carry your data as well as your music. Read this chapter to find out how to use iPod shuffle as an external disk. Using iPod shuffle as an External Disk You can use iPod shuffle as an external disk to store data files. To sync iPod shuffle with music and other audio that you want to listen to, you must use iTunes. You can’t play audio files that you’ve copied to iPod shuffle using the Macintosh Finder or Windows Explorer.
Transferring Files Between Computers When you enable disk use on iPod shuffle, you can transfer files from one computer to another. iPod shuffle is formatted as a FAT-32 volume, which is supported by both Macs and PCs. This allows you to use iPod shuffle to transfer files between computers with different operating systems. To transfer files between computers: 1 After enabling disk use on iPod shuffle, connect it to the computer you want to get the files from.
6 Tips and Troubleshooting 6 Most problems with iPod shuffle can be solved quickly by following the advice in this chapter. The 5 Rs: Reset, Retry, Restart, Reinstall, Restore Remember these five basic suggestions if you have a problem with iPod shuffle. Try these steps one at a time until the problem is resolved. If one of the following doesn’t help, read on for solutions to specific problems. Â Reset iPod shuffle by turning it off, waiting 10 seconds, and then turning it back on again.
If iPod shuffle isn’t playing music  iPod shuffle might not have any music on it. If you hear the message “Please use iTunes to sync music,” connect iPod shuffle to your computer to sync music to it.  Slide the three-way switch off and then on again.  Make sure the earphone or headphone connector is pushed in all the way.  Make sure the volume is adjusted properly. A volume limit might be set. See “Setting a Volume Limit” on page 25.  iPod shuffle might be paused.
A song encoded using Apple Lossless format has near full CD-quality sound, but takes up only about half as much space as a song encoded using AIFF or WAV format. The same song encoded in AAC or MP3 format takes up even less space. When you import music from a CD using iTunes, it’s converted to AAC format by default. You can have iPod shuffle automatically convert files encoded at higher bit rates to 128 kbps AAC files as they’re synced with iPod shuffle.
If you want to use iPod shuffle with a Mac and a Windows PC If your iPod shuffle is set to manually manage music, you can add content to it from more than one iTunes library, regardless of the operating system on the computer. If your iPod shuffle is set to sync automatically, when you connect iPod shuffle to a different computer or user account, a message asks if you want to erase iPod shuffle and sync with the new iTunes library. Click Cancel if you want to keep the contents of iPod shuffle as is.
7 Safety and Handling 7 This chapter contains important safety and handling information for iPod shuffle. ± Read all safety information below and operating instructions before using iPod shuffle to avoid injury. Keep this user guide for your iPod shuffle handy for future reference. Important Safety Information WARNING: Failure to follow these safety instructions could result in fire, electric shock, or other injury or damage.
Using the Apple USB Power Adapter (available separately) If you use the Apple USB Power Adapter (sold separately at www.apple.com/ipodstore) to charge iPod shuffle, make sure that the power adapter is fully assembled before you plug it into a power outlet. Then insert the Apple USB Power Adapter firmly into the power outlet. Do not connect or disconnect the Apple USB Power Adapter with wet hands. Do not use any power adapter other than the Apple USB Power Adapter to charge your iPod shuffle.
Important Handling Information NOTICE: Failure to follow these handling instructions could result in damage to iPod shuffle or other property. Carrying iPod shuffle iPod shuffle contains sensitive components. Do not bend, drop, or crush iPod shuffle. Using connectors and ports Never force a connector into a port. Check for obstructions on the port. If the connector and port don’t join with reasonable ease, they probably don’t match.
8 Learning More, Service, and Support 8 You can find more information about using iPod shuffle in onscreen help and on the web. The following table describes where to get iPod-related software and service information. To learn about Do this Service and support, discussions, tutorials, and Apple software downloads Go to: www.apple.com/support/ipodshuffle Using iTunes Open iTunes and choose Help > iTunes Help. For an online iTunes tutorial (available in some areas only), go to: www.apple.
Regulatory Compliance Information FCC Compliance Statement This device complies with part 15 of the FCC rules. Operation is subject to the following two conditions: (1) This device may not cause harmful interference, and (2) this device must accept any interference received, including interference that may cause undesired operation. See instructions if interference to radio or television reception is suspected.
Russia European Community Complies with European Directives 2006/95/EEC and 89/336/EEC. Disposal and Recycling Information European Union—Disposal Information: This symbol means that according to local laws and regulations your product should be disposed of separately from household waste. When this product reaches its end of life, take it to a collection point designated by local authorities. Some collection points accept products for free.
A AAC, converting songs to 19 albums, purchasing 12 announcements playlist menu order 24 song title and artist name 23 song titles and artist names 23 Apple Earphones with Remote 5 Apple USB Power Adapter 33 artist names, announcing 23 audiobooks hearing name 23 listening to 21 purchasing 12 syncing 17 audio file formats 29 autofilling iPod shuffle 18 B battery charge status 8 charging 8, 28 checking status in iTunes 8 rechargeable 9 replacement information 32 status 9 status lights when connected 9 status
H headphones.
settings autofill 19 manually manage music 17 playing songs at relative volume 24 shuffle songs 21 speech options 22 volume limit 25 shuffling songs 5, 21 skipping to next track 6 sleep mode and charging the battery 8 software, updating and restoring 31 songs autofilling 18 deleting 18 entering information manually 13 fast-forwarding 6 hearing title of currently playing song 23 playing and pausing 6 playing at relative volume 24 playing in order 5 playing next or previous 6 purchasing 12 removing 18 reshuff