iPod touch User Guide For iOS 6.
Contents 7 7 8 9 11 Chapter 1: iPod touch at a Glance 12 12 12 13 13 13 13 14 14 15 16 Chapter 2: Getting Started 17 17 20 22 25 26 27 28 29 30 31 31 32 32 33 Chapter 3: Basics 35 35 36 38 39 39 39 40 Chapter 4: Siri iPod touch overview Accessories Buttons Status icons What you need Setting up iPod touch Connecting iPod touch to your computer Connecting to the Internet Setting up mail and other accounts Apple ID Managing content on your iOS devices iCloud Syncing with iTunes Viewing this user g
41 41 41 43 43 44 44 45 45 46 46 Chapter 5: Music 47 Chapter 6: Videos 49 49 50 50 51 Chapter 7: Messages 52 Chapter 8: FaceTime 54 54 55 56 57 Chapter 9: Camera 58 58 59 59 60 61 Chapter 10: Photos 62 62 63 63 Chapter 11: Game Center 64 64 65 66 66 67 Chapter 12: Mail Getting music Playing music Cover Flow Podcasts and audiobooks Playlists Genius Siri and Voice Control iTunes Match Home Sharing Music settings Sending and receiving messages Managing conversations Sending photos, vid
68 Chapter 13: Passbook 70 Chapter 14: Reminders 71 Chapter 15: Safari 74 Chapter 16: Newsstand 75 75 76 77 77 Chapter 17: Calendar 78 Chapter 18: Stocks 80 80 81 82 82 Chapter 19: Maps 83 Chapter 20: Weather 85 Chapter 21: Notes 87 Chapter 22: Clock 88 Chapter 23: Calculator 89 89 90 Chapter 24: Voice Memos 91 91 92 Chapter 25: iTunes Store 93 93 94 Chapter 26: App Store 95 95 96 97 Chapter 27: Contacts 98 Chapter 28: Nike + iPod At a glance Working with mult
103 Syncing books and PDFs 103 Printing or emailing a PDF 103 iBooks settings 104 Chapter 30: Podcasts 106 106 106 114 115 115 115 116 116 116 116 116 116 117 118 118 118 118 Chapter 31: Accessibility 119 119 119 120 120 120 121 125 126 126 Chapter 32: Settings Accessibility features VoiceOver Siri Triple-click Home Zoom Large Text Invert Colors Speak Selection Speak Auto-text Mono Audio Assignable tones Guided Access AssistiveTouch Widescreen keyboards Voice Control Closed captioning Accessibility
136 Disposal and recycling information 137 Apple and the environment Contents 6
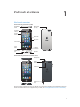
iPod touch at a Glance 1 iPod touch overview iPod touch 5th generation (16 GB) Sleep/Wake button Microphone (on top) FaceTime camera Volume buttons Status bar App icons Touchscreen Home button Headphones port Lightning connector Speaker iPod touch 5th generation (32 GB or more) Microphone iSight camera LED flash iPod touch loop iPod touch apps and features may vary based on your location, language, and model of iPod touch. To find out which features are supported in your area, see www.apple.
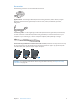
Accessories The following accessories are included with iPod touch: Apple EarPods: Use the Apple EarPods (iPod touch 5th generation, shown above) or Apple Earphones (iPod touch 4th generation) to listen to music, videos, audiobooks, podcasts, and games.
Buttons Sleep/Wake button When you’re not using iPod touch, you can lock it to turn off the display and save the battery. When iPod touch is locked, nothing happens if you touch the screen. You can still listen to music and adjust the volume using the buttons on the side of iPod touch. Lock iPod touch: Press the Sleep/Wake button. Sleep/Wake button Unlock iPod touch: Press the Sleep/Wake button or the Home button , then drag the slider.
Volume buttons When you listen to songs, movies, or other media, the buttons on the side of iPod touch adjust the audio volume. Otherwise, the buttons control the volume for alerts and other sound effects. WARNING: For important information about avoiding hearing loss, see Appendix B, Safety, Handling, & Support, on page 129. Volume up Volume down Lock the ringer and alerts volume: Go to Settings > Sounds and turn off “Change with Buttons.
Status icons The icons in the status bar at the top of the screen give information about iPod touch: Status icon What it means Wi-Fi* Shows that iPod touch is connected to the Internet over a Wi-Fi network. The more bars, the stronger the connection. See Wi-Fi on page 119. Network activity Shows network activity. Some third-party apps may also use this icon to indicate an active process. Syncing Shows that iPod touch is syncing with iTunes.
Getting Started · 2 WARNING: To avoid injury, read Important safety information on page 129 before using iPod touch. What you need To use iPod touch, you need: •• An Apple ID (for some features, including iCloud, the App Store, and the iTunes Store). You can create an Apple ID during setup. •• A Wi-Fi Internet connection To use iPod touch with your computer, you need: •• An Internet connection for your computer (broadband is recommended) •• A Mac or a PC with a USB 2.0 or 3.
Connecting iPod touch to your computer If you don’t have Wi-Fi access, you might need to connect iPod touch to your computer to complete setup. You can also connect iPod touch to your computer to sync music, videos, and other information with iTunes. You can also sync content with your computer wirelessly. See iCloud on page 14 and Syncing with iTunes on page 15.
Managing content on your iOS devices You can transfer information and files between your iOS devices and computers using iCloud or iTunes. •• iCloud stores your photos, apps, contacts, calendars, and more, and wirelessly pushes them to your devices, keeping everything up to date. See iCloud below. •• iTunes syncs music, video, photos, and more between your computer and iPod touch. You can connect iPod touch to your computer using USB, or set it up to sync wirelessly using Wi-Fi.
•• iTunes Match—With an iTunes Match subscription, all your music, including music you’ve imported from CDs or purchased somewhere other than iTunes, appears on all of your devices and can be downloaded and played on demand. See iTunes Match on page 45. •• iCloud Tabs—See the webpages you have open on your other iOS devices or computers with OS X Mountain Lion v10.8 or later installed. See Chapter 15, Safari, on page 71.
•• In the device’s Info pane, when you sync mail accounts, only the settings are transferred from your computer to iPod touch. Changes you make to a mail account on iPod touch don’t affect the account on your computer. •• In the device’s Info pane, click Advanced to select options that let you replace the information on iPod touch with the information from your computer during the next sync.
3 Basics Using apps You interact with iPod touch using your fingers to tap, double-tap, drag, swipe, and pinch objects on the touchscreen. Opening and switching between apps To go to the Home screen, press the Home button . Open an app: Tap it. To return to the Home screen, press the Home button again. See another Home screen: Swipe left or right. Swipe left or right to switch to another Home screen. Go to the first Home screen: Press the Home button .
Tap an app to use it again. Swipe left to see more apps. Recently used apps If you have a lot of apps, you might want to use Spotlight to find and open them. See Searching on page 27. Scrolling Drag up or down to scroll. On some screens, such as webpages, you can also scroll side to side. Dragging your finger to scroll won’t choose or activate anything on the screen. Flick to scroll quickly. You can wait for the scrolling to come to a stop, or touch anywhere on the screen to stop it immediately.
Some lists have an index along the side to help you navigate quickly. Drag your finger along the index to scroll quickly. Tap a letter to jump to a section. Return to a previous list: Tap the back button in the upper-left corner. Zooming in or out Depending on the app, you may be able to zoom in to enlarge, or zoom out to reduce the image on the screen. When viewing photos, webpages, mail, or maps, for example, pinch two fingers together to zoom out or spread them apart to zoom in.
Adjusting brightness You can manually adjust the brightness of the screen. On iPod touch 4th generation, you can turn on Auto-Brightness to have iPod touch use the built-in ambient light sensor to automatically adjust the brightness. Adjust the screen brightness: Go to Settings > Brightness & Wallpaper, then drag the slider. Turn Auto-Brightness on or off (iPod touch 4th generation): Go to Settings > Brightness & Wallpaper. See Brightness & Wallpaper on page 126.
Organizing with folders You can use folders to organize the apps on your Home screens. Rearrange folders—just as you do apps—by dragging them around your Home screens or to the Dock. Create a folder: Touch and hold an app until the Home screen icons begin to jiggle, then drag an app onto another. iPod touch creates a new folder that includes the two apps, and names the folder based on the type of apps. To enter a different name, tap the name field. Open a folder: Tap the folder.
Typing The onscreen keyboard lets you type when you need to enter text. Entering text Use the onscreen keyboard to enter text, such as contact information, mail, and web addresses. Depending on the app and the language you’re using, the keyboard may correct misspellings, predict what you’re typing, and even learn as you use it. You can also use an Apple Wireless Keyboard to type. See Apple Wireless Keyboard on page 24. To use dictation instead of typing, see Dictation on page 25.
Editing text If you need to edit text, an onscreen magnifying glass lets you position the insertion point where you need it. You can select text, and cut, copy, and paste text. In some apps, you can also cut, copy, and paste photos and videos. Position the insertion point: Touch and hold to bring up the magnifying glass, then drag to position the insertion point. Select text: Tap the insertion point to display the selection buttons.
Each time you reject a suggestion for the same word, iPod touch becomes more likely to accept the word. iPod touch also underlines words you type that might be misspelled. Replace a misspelled word: Tap the underlined word, then tap the correct spelling. If the word you want doesn’t appear, retype it. Turn auto-correction or spell checking on or off: Go to Settings > General > Keyboard.
Dictation On iPod touch 5th generation, you can dictate text instead of typing. To use dictation, Siri must be turned on and iPod touch must be connected to the Internet. You can include punctuation and give commands to format your text. Note: Dictation may not be available in all languages or in all areas, and features may vary. Turn on dictation: Go to Settings > General > Siri, then turn on Siri. Dictate text: From the onscreen keyboard, tap , then speak. When you finish, tap Done.
Voice Control Voice Control lets you control music playback using voice commands. On iPod touch 5th generation, you can also use Siri to control iPod touch by voice. See Chapter 4, Siri, on page 35. Note: Voice Control may not be available in all languages. Voice Control and Voice Control settings are not available when Siri is turned on. Use Voice Control: Press and hold the Home button and you hear a beep. until the Voice Control screen appears For best results: •• Speak clearly and naturally.
Searching You can search many of the apps on iPod touch, as well as Wikipedia and the web. Search an individual app, or search all the apps at once using Spotlight. Spotlight also searches the names of apps on iPod touch—if you have a lot of apps, you might want to use Spotlight to locate and open them. Search an individual app: Enter text in the search field. Search iPod touch using Spotlight: Swipe right from the first Home screen, or press the Home button from any Home screen.
Notifications To help make sure you don’t miss important events, many iPod touch apps can provide alerts. An alert can appear briefly as a banner at the top of the screen, which goes away if you don’t respond to it, or as a notice in the center of the screen that remains until you acknowledge it. Some apps can also display badges on their icons on the Home screen, to let you know how many new items await—for example, how many new email messages you have.
Manage alerts for your apps: Go to Settings > Notifications. See Do Not Disturb and Notifications on page 120. Choose alert sounds, adjust the alert volume, or turn vibrate on or off: Go to Settings > Sounds. Sharing iPod touch gives you lots of ways to share with other people. Sharing within apps In many apps, tapping displays options for sharing, as well as other actions such as printing or copying. The options vary depending on the app you’re using.
When you’re composing a Tweet, the number in the lower-right corner of the Tweet screen shows the number of characters remaining that you can enter. Attachments use some of a Tweet’s 140 characters. Add Twitter user names and photos to your contacts: Go to Settings > Twitter, then tap Update Contacts. Set options for Twitter: Go to Settings > Twitter. Install the Twitter app: Go to Settings > Twitter, then tap Install. To learn how to use the Twitter app, open the app, tap Me, then tap Help.
Printing with AirPrint AirPrint lets you print wirelessly to AirPrint-enabled printers from the following iOS apps: •• Mail—email messages and attachments that can be viewed in Quick Look •• Photos and Camera—photos •• Safari—webpages, PDFs, and other attachments that can be viewed in Quick Look •• iBooks—PDFs •• Maps—the portion of the map showing on the screen •• Notes—the currently displayed note Other apps available from the App Store may also support AirPrint.
Return audio output to iPod touch when a Bluetooth headset is connected: Turn off or unpair the device, or turn off Bluetooth in Settings > Bluetooth. Audio output returns to iPod touch whenever the device is out of range. You can also use AirPlay to switch audio output to iPod touch. See AirPlay on page 30. Note: The use of certain accessories with iPod touch may affect wireless performance. Unpair a Bluetooth device: Go to Settings > Bluetooth and turn on Bluetooth.
Find My iPod Find My iPod can help you locate and secure your iPod touch using the free Find My iPhone app on another iPhone, iPad, or iPod touch, or using a Mac or PC web browser signed in to www.icloud.com. Find My iPod includes: •• Play Sound: Play a sound for two minutes. •• Lost Mode: You can immediately lock your missing iPod touch with a passcode and send it a message displaying a contact number.
Charge the battery using a power adapter: Connect iPod touch to a power outlet using the included cable and a USB power adapter (available separately). Note: Connecting iPod touch to a power outlet can initiate iCloud backup or wireless iTunes syncing. See Backing up iPod touch on page 133 and Syncing with iTunes on page 15. The battery icon in the upper-right corner shows the battery level or charging status.
Siri 4 What is Siri? Siri is the intelligent personal assistant that helps you get things done just by talking. Siri understands natural speech, so you don’t have to learn specific commands or remember keywords. You can ask things in different ways. For example, you can say “Set the alarm for 6:30 a.m.” or “Wake me at 6:30 in the morning.” Either way, Siri gets it. WARNING: For important information about avoiding distraction while driving, see Important safety information on page 129.
Using Siri Starting Siri Siri comes to life with the press of a button. Start Siri: Press the Home button until Siri appears. If you didn’t turn Siri on when you set up iPod touch, go to Settings > General > Siri. You’ll hear two quick beeps and see “What can I help you with?” on the screen. Just start speaking. The microphone icon lights up to let you know that Siri hears you talking. Once you’ve started a dialogue with Siri, tap the microphone icon to talk to it again.
Siri also wants to know about the important people in your life, so put those relationships on your personal info card—Siri can help you. For example, if you tell Siri to text your sister, Siri asks you who your sister is (if you don’t already have that info on your card). Siri adds that relationship to your personal info card so it doesn’t have to ask next time.
Accessibility Siri is accessible to blind and visually impaired users through VoiceOver, the screen reader built into iOS. VoiceOver describes aloud what’s onscreen—including any text in Siri’s responses—so you can use iPod touch without seeing it. Turn on VoiceOver: Go to Settings > General > Accessibility. Turning on VoiceOver causes even your notifications to be read aloud for you. For more information, see VoiceOver on page 106.
Movies Ask Siri about what movies are playing, or where you can see a specific movie. Find out when a film premiered, who directed it, and what awards it won. Siri gives theater locations, show times, and Rotten Tomato reviews. Siri works with Fandango to help you purchase tickets (for theaters that support it). Ask about showtimes for a movie, or tell Siri you want to buy tickets. When you tap Buy Tickets, Fandango opens if it’s installed, or you’ll be prompted to install the app from the App Store.
Correcting Siri If Siri is having trouble Siri may sometimes have trouble understanding you—in a noisy environment, for example. If you speak with an accent, it can take Siri some time to get used to your voice. If Siri doesn’t hear you exactly right, you can make corrections. Siri shows what it heard you say, along with its response. Correct what Siri hears you say: Tap the bubble showing what Siri heard you say. Edit your request by typing, or tap on the keyboard to dictate.
5 Music Getting music Get music and other audio content onto iPod touch: •• Purchase and download from the iTunes Store: In Music, tap Store. See Chapter 25, iTunes Store, on page 91. •• Automatically download music purchased on your other iOS devices and computers: See iCloud on page 14. •• Sync content with iTunes on your computer: See Syncing with iTunes on page 15. •• Use iTunes Match to store your music library in iCloud: See iTunes Match on page 45.
Play a track: Browse by playlist, artist, song, or other category, then tap the track. •• See additional browse buttons: Tap More. •• Change which browse buttons appear at the bottom: Tap More, tap Edit, then drag an icon over the button you want to replace. The Now Playing screen shows you what’s playing, and provides playback controls.
Display audio controls while in another app: Double-click the Home button , then swipe the multitasking bar to the right. Swipe right again to display a volume control and the AirPlay button (when in range of an Apple TV or AirPlay speakers). Current audio app—tap to open it. Currently playing song. Display audio controls while the screen is locked: Double-click the Home button Play music on AirPlay speakers or Apple TV: Tap . . See AirPlay on page 30.
Playlists Create a playlist: View Playlists, tap Add Playlist near the top of the list, then enter a title. Tap to add songs and videos, then tap Done. Edit a playlist: Select the playlist to edit, then tap Edit. •• Add more songs: Tap . •• Delete a song: Tap . Deleting a song from a playlist doesn’t delete it from iPod touch. Change the song order: Drag .
Siri and Voice Control You can use Siri (iPod touch 5th generation) or Voice Control to control music playback on iPod touch. See Chapter 4, Siri, on page 35 and Voice Control on page 26. Use Siri or Voice Control: Press and hold the Home button . •• Play or pause music: Say “play” or “play music.” To pause, say “pause,” “pause music,” or “stop.” You can also say “next song” or “previous song.” •• Play an album, artist, or playlist: Say “play,” then say “album,” “artist,” or “playlist” and the name.
Home Sharing Home Sharing lets you play music, movies, and TV shows from the iTunes library on your Mac or PC. iPod touch and your computer must be on the same Wi-Fi network. Note: Home Sharing requires iTunes 10.2 or later, available at www.itunes.com/download. Bonus content, such as digital booklets and iTunes Extras, can’t be shared. Play music from your iTunes library on iPod touch: 1 In iTunes on your computer, choose File > Home Sharing > Turn On Home Sharing. Log in, then click Create Home Share.
6 Videos Use the Videos app to watch movies, TV shows, and music videos. To watch video podcasts, install the free Podcasts app from the App Store. See Chapter 30, Podcasts, on page 104. To watch videos you record using Camera on iPod touch, open the Photos app. Tap a video to play it. Swipe down to search. See additional episodes of a series. WARNING: For important information about avoiding hearing loss, see Important safety information on page 129.
Convert a video to work with iPod touch: If you try to add a video from iTunes to iPod touch and a message says the video can’t play on iPod touch, you can convert the video. Select the video in your iTunes library and choose File > Create New Version > “Create iPod or iPhone Version.” Then add the converted video to iPod touch. Drag to skip forward or back. Choose a chapter. Tap the video to show or hide controls. Drag to adjust the volume. Watch the video on a TV with Apple TV.
7 Messages Sending and receiving messages WARNING: For important information about avoiding distraction while driving, see Important safety information on page 129. Using the Messages app and the built-in iMessage service, you can send unlimited text messages over Wi-Fi to other iOS and OS X Mountain Lion users. Messages can include photos, videos, and other info. You can see when other people are typing, and notify them when you’ve read their messages.
Resume a conversation: Tap the conversation in the Messages list. Use picture characters: Go to Settings > General > Keyboard > Keyboards > Add New Keyboard, then tap Emoji to make that keyboard available. Then while typing a message, tap to bring up the Emoji keyboard. See Special input methods on page 128. See a person’s contact info: Scroll to the top (tap the status bar) to see actions you can perform, such as making a FaceTime call.
Messages settings Go to Settings > Messages to set options for Messages, including: •• Turning iMessage on or off •• Notifying others when you’ve read their messages •• Specifying a phone number, Apple ID, or email address to use with Messages •• Showing the Subject field Manage notifications for messages: See Do Not Disturb and Notifications on page 120. Set the alert sound for incoming text messages: See Sounds on page 125.
8 FaceTime You can use FaceTime to make video calls to other iOS devices or computers that support FaceTime. The FaceTime camera lets you talk face-to-face; switch to the rear camera (not available on all models) to share what you see around you. Note: FaceTime may not be available in all areas. Drag your image to any corner. Mute (you can hear and see; the caller can see but not hear). Switch to the rear camera (available on some models).
Make a FaceTime call: Tap Contacts, choose a name, then tap FaceTime. If you don’t see the FaceTime button, make sure FaceTime is turned on in Settings > FaceTime. Rotate iPod touch to use FaceTime in either landscape or portrait orientation. To avoid unwanted orientation changes, lock iPod touch in portrait orientation. See Portrait and landscape orientation on page 19. Restart a recent call: Tap Recents, then choose a name or number. User Favorites: Tap Favorites.
9 Camera At a glance To quickly open Camera when iPod touch is locked, swipe up. With iPod touch, you can take both still photos and videos, using the FaceTime camera on the front or the camera on the back (available on some models). Set LED flash mode.* Turn on the grid or HDR, or take a Panorama photo.* Switch between cameras (available on some models). Take a photo. Camera/Video switch View the photos and videos you’ve taken. *Models with an iSight camera.
On iPod touch 5th generation, a rectangle briefly appears to show where the exposure is set. When you photograph people, face detection balances the exposure across up to 10 faces. A rectangle appears for each face detected. With an iSight camera, the focus is set in addition to the exposure. Take a photo: Tap or press either volume button. Record a video: Switch to stop recording.
Set the focus and exposure: •• Set the focus and exposure for the next shot: Tap the object on the screen. Face detection is temporarily turned off. •• Lock the focus and exposure: Touch and hold the screen until the rectangle pulses. AE/AF Lock appears at the bottom of the screen, and the settings remain locked until you tap the screen again. Viewing, sharing, and printing The photos and videos you take with Camera are saved in your Camera Roll album.
Editing photos and trimming videos Remove red-eye Rotate Auto-enhance Crop Edit a photo: While viewing a photo in full screen, tap Edit, then tap a tool. •• Auto-enhance: Enhancing improves a photo’s overall darkness or lightness, color saturation, and other qualities. If you decide against the enhancement, tap the tool again (even if you saved the changes). •• Remove red-eye: Tap each eye that needs correcting. •• Crop: Drag the corners of the grid, drag the photo to reposition it, then tap Crop.
10 Photos Viewing photos and videos Photos lets you view photos and videos on iPod touch, in your: •• Camera Roll album—photos and videos you took on iPod touch, or saved from an email, text message, webpage, or screenshot •• Photo Stream albums—photos in My Photo Stream and your shared photo streams (see Photo Stream on page 59) •• Photo Library and other albums synced from your computer (see Syncing with iTunes on page 15) Edit the photo. Tap the screen to display the controls. Delete the photo.
Albums you sync with iPhoto 8.0 (iLife ’09) or later, or Aperture v3.0.2 or later, can be viewed by events or by faces. You can also view photos by location, if they were taken with a camera that supports geotagging. View a slideshow: Tap a thumbnail, then tap . Select options, then tap Start Slideshow. To stop the slideshow, tap the screen. To set other options, go to Settings > Photos & Camera. Stream a video or slideshow to a TV: See AirPlay on page 30.
Note: Although deleted photos are removed from photo streams on your devices, the original photos remain in the Camera Roll album on the device they originated from. Photos saved to a device or computer from a photo stream are also not deleted. To delete photos from Photo Stream, you need iOS 5.1 or later on iPod touch and your other iOS devices. See support.apple.com/kb/HT4486. Shared photo streams Shared photo streams let you share selected photos with just the people you choose.
Printing photos Print to AirPrint-enabled printers: •• Print a single photo: Tap , then tap Print. Print multiple photos: While viewing a photo album, tap Edit, select the photos, tap Share, then tap Print. See Printing with AirPrint on page 31.
11 Game Center At a glance Game Center lets you play your favorite games with friends who have an iPhone, iPad, iPod touch, or a Mac with OS X Mountain Lion. You must be connected to the Internet to use Game Center. WARNING: For important information about avoiding repetitive motion injuries, see Important safety information on page 129. Play the game. See who’s the best. See a list of game goals. Find someone to play against. Choose a game to play. Check for challenges from friends.
Playing with friends Invite friends to a multiplayer game: Tap Friends, choose a friend, choose a game, then tap Play. If the game allows or requires more players, choose additional players, then tap Next. Send your invitation, then wait for the others to accept. When everyone is ready, start the game. If a friend isn’t available or doesn’t respond to your invitation, you can tap Auto-Match to have Game Center find another player for you, or tap Invite Friend to invite someone else.
12 Mail Reading mail Change mailboxes or accounts. Delete, move, or mark multiple messages. Search this mailbox. VIP Change the preview length in Settings > Mail, Contacts, Calendars. Compose a message. Flag a message or mark it as unread: Tap . To mark multiple messages at once, tap Edit while viewing the message list. Identify messages addressed specifically to you: Go to Settings > Mail, Contacts, Calendars, then turn Show To/Cc Label on or off.
Load new messages: Pull the message list or mailbox list downward to refresh the list. •• Set the number of older messages retrieved: Go to Settings > Mail, Contacts, Calendars > Show. Turn off new message notifications for an account: Go to Settings > Notifications > Mail > account name, then turn Notification Center off. Change the tones played by Mail: Go to Settings > Sound. •• Change the tone played for new mail in each account: Go to Settings > Notifications > Mail > account name > New Mail Sound.
Organizing mail See messages from VIPs: Go to the Mailboxes list (tap Mailboxes to get there), then tap VIP. •• Add a person to the VIP list: Tap the person’s name or address in a From, To, or Cc/Bcc field, then tap Add to VIP. Group related messages together: Go to Settings > Mail, Contacts, Calendars, then turn Organize by Thread on or off. Search messages: Open a mailbox, scroll to the top, then enter text in the Search field.
Mail accounts and settings Change Mail and mail account settings: Go to Settings > Mail, Contacts, Calendars. You can set up: •• iCloud •• Microsoft Exchange and Outlook •• Google •• Yahoo! •• AOL •• Microsoft Hotmail Other POP and IMAP accounts Settings vary based on the type of account you’re setting up. Your Internet service provider or system administrator can provide the information you need to enter.
13 Passbook Use Passbook to keep boarding passes, movie tickets, coupons, gift cards, and more, all in one place. Add passes from airlines, theaters, stores, and other participating merchants. Scan a pass on iPod touch to check in for a flight, get in to a movie, or redeem a coupon. Tap a pass to view it. Passes can include useful information, such as the balance on your coffee card, a coupon’s expiration date, or your seat number for a concert.
Use a pass: If an alert for a pass appears on the lock screen, slide the alert to display the pass. Or open Passbook, select the pass, then present the barcode on the pass to the scanner. View more information: Tap . Passes are usually updated automatically. To refresh a pass manually, tap pass downward. Delete a pass: Tap , then pull the , then tap . Prevent passes from appearing on your Lock screen: Go to Settings > General > Passcode Lock and tap Turn Passcode On.
14 Reminders Reminders lets you keep track of all the things you need to do. View lists Add an item. Completed item See reminder details: Tap a reminder. You can: •• Change or delete it •• Set a due date •• Set a priority •• Add notes •• Move a reminder to a different list Search your reminders: Tap to see the search field, or search from the Home screen. Reminders are searched by name. You can also use Siri to find or add reminders.
15 Safari Safari features include: •• Reader—view articles without ads or clutter •• Reading list—collect articles to read later •• Full-screen mode—when viewing webpages in landscape orientation Use iCloud to see pages you have open on other devices, and to keep your bookmarks and reading list up to date on your other devices. Enter a web address (URL). Tap the status bar to quickly scroll to the top. Search the web and the current page. Double-tap an item or pinch to zoom in or out.
See webpages you have open on your other devices: Tap , then tap iCloud Tabs. To share webpages you have open on iPod touch with your other devices using iCloud Tabs, go to Settings > iCloud and turn on Safari. Follow a link on a webpage: Tap the link. •• See a link’s destination: Touch and hold the link. •• Open a link in a new tab: Touch and hold the link, then tap “Open in New Page.” Detected data—such as phone numbers and email addresses—may also appear as links in webpages.
Set options for Safari: Go to Settings > Safari.
16 Newsstand Newsstand organizes your magazine and newspaper apps and lets you know when new issues are ready for reading. Find Newsstand apps. Touch and hold a publication to rearrange. Newsstand organizes magazine and newspaper apps with a shelf for easy access. Find Newsstand apps: Tap Newsstand to reveal the shelf, then tap Store. When you purchase a newsstand app, it’s added to your shelf. After the app is downloaded, open it to view its issues and subscription options.
17 Calendar At a glance iPod touch makes it easy to stay on schedule. You can view calendars individually, or view several calendars at once. Change calendars or accounts. A day with a dot has events. View invitations. View or edit an event: Tap the event.
Search for events: Tap List, then enter text in the search field. The titles, invitees, locations, and notes for the calendars you’re viewing are searched. You can also search calendar events from the Home screen. See Searching on page 27. Set the calendar alert tone: Go to Settings > Sounds > Calendar Alerts. View by week: Rotate iPod touch sideways. Import events from a calendar file: If you receive an .
Sharing iCloud calendars You can share an iCloud calendar with other iCloud users. When you share a calendar, others can view it, and you can let them add or change events, too. You can also share a read-only version that anyone can view. Create an iCloud calendar: Tap Calendars, tap Edit, then tap Add Calendar. Share an iCloud calendar: Tap Calendars, tap Edit, then tap the iCloud calendar you want to share. Tap Add Person, then choose someone from Contacts.
18 Stocks Keep track of your stocks, see the change in value over time, and get news about your investments. Note: To use Stocks, iPod touch must be connected to the Internet. See Connecting to the Internet on page 13. Tap to see percent change. Tap again to see market capitalization. Swipe left or right to see stats or news articles. Go to yahoo.com for more info. Manage your stock list: Tap tap Done. Customize your stock list. , then add stocks or make other changes.
Quotes may be delayed 20 minutes or more, depending upon the reporting service. To display your stocks as a ticker in Notification Center, see Notifications on page 28. View a full-screen chart: Rotate iPod touch to landscape orientation. •• See the value at a specific date or time: Touch the chart with one finger. •• See the difference in value over time: Touch the chart with two fingers.
19 Maps Finding locations WARNING: For important information about navigating safely and avoiding distraction while driving, see Important safety information on page 129. Get directions. Enter a search. Get more info. Tap a pin to display the info banner. Quick driving directions Double-tap to zoom in; tap with two fingers to zoom out. Or, pinch. Current location Show your current location. Flyover (3D in standard view) Print, show traffic, list results, or choose the view.
Find a location: Tap the search field, then type an address or other information, such as: •• Intersection (“8th and market”) •• Area (“greenwich village”) •• Landmark (“guggenheim”) •• Zip code •• Business (“movies,” “restaurants san francisco ca,” “apple inc new york”) Or tap one of the suggestions in the list below the search field. Navigate maps: •• Move up or down, left or right: Drag the screen. •• Rotate the map: Rotate two fingers on the screen.
3D and Flyover On iPod touch 5th generation, use 3D (standard view) or Flyover (satellite or hybrid view) for three-dimensional views of many cities around the world. You can navigate in the usual ways, and zoom in to see buildings. You can also adjust the camera angle. The Transamerica Pyramid Building is a registered service mark of Transamerica Corporation. Use 3D or Flyover: Zoom in until or becomes active, then tap the button. Or drag two fingers up.
20 Weather Get the current temperature and six-day forecast for one or more cities around the world, with hourly forecasts for the next 12 hours. Weather also uses Location Services to get the forecast for your current location. Current conditions Current temperature Current hourly forecast Add or delete cities. Number of cities stored Note: To use Weather, iPod touch must be connected to the Internet. See Connecting to the Internet on page 13.
Turn local weather on or off: Go to Settings > Privacy > Location Services. See Privacy on page 126. See information about a city at yahoo.com: Tap . Use iCloud to push your list of cities to your other iOS devices: Go to Settings > iCloud > Documents & Data, then turn on Documents & Data (it’s on by default). See iCloud on page 14.
21 Notes Type notes on iPod touch, and iCloud makes them available on your other iOS devices and Mac computers. You can also read and create notes in other accounts, such as Gmail or Yahoo!. View the list of notes. Add a new note. Tap the note to edit it. Email or print the note. Delete the note. View the previous or next note. Use iCloud to keep your notes up to date on your iOS devices and Mac computers: •• If you use an icloud.com, me.com, or mac.
Print or email a note: While reading the note, tap . To email the note, iPod touch must be set up for email. See Setting up mail and other accounts on page 13. Change the font: Go to Settings > Notes.
22 Clock You can add clocks to show the time in other major cities and time zones around the world. Delete clocks or change their order. Add a clock. View clocks, set an alarm, time an event, or set a timer. Add a clock: Tap , then type the name of a city or choose a city from the list. If you don’t see the city you’re looking for, try a major city in the same time zone. Organize clocks: Tap Edit, then drag to move or tap to delete. Set an alarm: Tap Alarm, then tap .
23 Calculator Tap numbers and functions in Calculator just as you would with a standard calculator. Clear memory. Add a number to memory. Subtract a number from memory. Get a number from memory (a white ring indicates a number is stored in memory). Clear the display. Use the scientific calculator: Rotate iPod touch to landscape orientation.
24 Voice Memos At a glance Voice Memos lets you use iPod touch as a portable recording device using the built-in microphone, or a supported headset or external microphone. Recording level See your list of recordings. Start, pause, or stop recording. Make a recording: Tap . Tap to pause or to stop recording. Recordings using the built-in microphone are mono, but you can record stereo using an external stereo microphone that works with the iPod touch headphones port or the Lightning connector.
Play a recording: Tap , tap a recording, then tap . Tap to pause. Listen to the recording. Trim or relabel the recording. Drag to skip to any point. Attach the recording to an email or text message. Trim a recording: Tap next to the recording, then tap Trim Memo. Drag the edges of the audio region, then tap to preview. Adjust if necessary, then tap Trim Voice Memo to save. The portions you trim can’t be recovered.
25 iTunes Store At a glance Use the iTunes Store to add music, movies, and TV shows to iPod touch. Browse See purchases, downloads, and more. Use iTunes Store to: •• Find music, TV shows, movies, tones, and more, by browsing or searching •• Download previous purchases Note: You need an Internet connection and an Apple ID to use the iTunes Store. Browse content: Tap one of the categories. Tap Genres to refine the listings. To see more information about an item, tap it.
Download a previous purchase: Tap More, then tap Purchased. To automatically download purchases made on other devices, go to Settings > iTunes & App Stores. Redeem a gift card or code: Tap any category (such as music), scroll to the bottom, then tap Redeem. Send a gift: While viewing the item you want to give as a gift, tap , then tap Gift. View or edit your account: Go to Settings > iTunes & App Stores, tap your Apple ID, then tap View Apple ID. Tap an item to edit it.
26 App Store At a glance Use the App Store to browse, purchase, and download apps to iPod touch. View a category. View updates and previous purchases. Browse buttons Use the App Store to: •• Find new free or purchased apps by browsing or searching •• Download updates and previous purchases •• Redeem a gift card or download code •• Recommend an app to a friend •• Manage your App Store account Note: You need an Internet connection and an Apple ID to use the App Store.
Redeem a gift card or download code: Tap Featured, scroll to the bottom, then tap Redeem. Tell a friend about an app: Find the app, then tap and select how you want to share it. View and edit your account: Go to Settings > iTunes & App Stores, tap your Apple ID, then tap View Apple ID. You can subscribe to iTunes newsletters, and view Apple’s privacy policy. To change your password, tap the Apple ID field.
27 Contacts At a glance iPod touch lets you easily access and edit your contact lists from personal, business, and organizational accounts. Send an email. Send a Tweet. Send a text message. Make a FaceTime video call. Set your My Info card: Go to Settings > Mail, Contacts, Calendars, then tap My Info and select the contact card with your name and information. The My Info card is used by Siri and other apps.
Edit a contact: Choose a contact, then tap Edit. You can: •• Add a new field: Tap , then choose or enter a label for the field. •• Change a field label: Tap the label and choose a different one. To add a new field, tap Add Custom Label. •• Change the ringtone or text tone for the contact: Tap the ringtone or text tone field, then choose a new sound. To change the default tone for contacts, go to Settings > Sounds. •• Assign a photo to the contact: Tap Add Photo.
If you link contacts with different first or last names, the names on the individual cards won’t change, but only one name appears on the unified card. To choose which name appears when you view the unified card, Tap Edit, tap the linked card with the name you prefer, then tap Use This Name For Unified Card. View contact information from a source account: Tap one of the source accounts. Unlink a contact: Tap Edit, tap , then tap Unlink.
28 Nike + iPod With a Nike + iPod Sensor (sold separately), the Nike + iPod app gives you audible feedback on pace, distance, elapsed time, and calories burned during a run or walk. Choose a workout type. Calibrate based on your last workout. Choose or create a custom workout. Choose a standard workout. Review your workout history. The Nike + iPod app doesn’t appear on the Home screen until you turn it on. Turn on Nike + iPod: Go to Settings > Nike + iPod.
Reset to the default calibration: Go to Settings > Nike + iPod. Send workout data to nikeplus.com: With iPod touch connected to the Internet, open Nike + iPod, tap History, then tap “Send to Nike+.” See your workouts on nikeplus.com: In Safari, go to nikeplus.com, log in to your account, and follow the onscreen instructions.
29 iBooks At a glance iBooks is a great way to read and buy books. Download the free iBooks app from the App Store, and then enjoy everything from classics to bestsellers. Contents, bookmarks, and notes Bookmark Go to a different page. To download the iBooks app and use the iBookstore, you need an Internet connection and an Apple ID.
Update a book: If there’s an update to a book you’ve downloaded, a badge notifies you of the new version. To see and download the updated book, tap Purchased, then tap Updates. Reading books Each book has a particular set of features, based on its contents and format. Some of the features described below might not be available in the book you’re reading. Open a book: Tap the book you want to read. If you don’t see it, swipe left or right on the shelf to see other collections.
Organizing the bookshelf Use the bookshelf to browse your books and PDFs. You can also organize items into collections. View collections. Touch and hold a book to rearrange. Move a book or PDF to a collection: Tap Edit. Select the items you want to move, then tap Move and select a collection. View and manage collections: Tap the name of the current collection at the top of the screen. You can’t edit or remove the built-in collections.
Syncing books and PDFs Use iTunes to sync your books and PDFs between iPod touch and your computer, and to buy books from the iTunes Store. When iPod touch is connected to your computer, the Books pane lets you select which items to sync. You can also find DRM-free ePub books and PDFs on the web and add them to your iTunes library. Sync a book or PDF to iPod touch: In iTunes on your computer, choose File > Add to Library and select the file. Then sync.
30 Podcasts Download the free Podcasts app from the App Store, then browse, subscribe to, and play your favorite audio and video podcasts. Browse all available podcasts. See the playback controls. Refresh your podcast list. Scroll to see your entire library. Tap a podcast to view available episodes. Organize your podcasts. View the podcasts in your library. Browse and preview the most popular podcasts. Get podcasts: •• Browse the full catalog: Tap Store, then tap any podcast that interests you.
Control audio playback: To see the playback controls, tap Now Playing. Adjust the playback speed. Drag the playhead to jump to another part of the podcast. Share this podcast. Set the sleep timer. Skip to the next episode. Play previous episode. Skip forward 15 seconds. Control video playback: Tap the screen while you’re watching a video podcast. Synchronize subscriptions across devices or change other settings: Go to Settings > Podcasts.
Accessibility 31 Accessibility features iPod touch incorporates these accessibility features: •• VoiceOver screen reader •• Siri voice assistant •• Zoom magnification •• Large Text •• Invert Colors •• Speak Selection •• Speak Auto-text •• Mono Audio and balance •• Assignable tones •• Guided Access •• AssistiveTouch •• Support for braille displays •• Playback of closed-captioned content Turn on accessibility features using iPod touch: Go to Settings > General > Accessibility.
Note: VoiceOver speaks in the language specified in International settings, which may be influenced by the Region Format setting in Settings > General > International. VoiceOver is available in many languages, but not all. VoiceOver Basics Important: VoiceOver changes the gestures used to control iPod touch. Once VoiceOver is turned on, you have to use VoiceOver gestures to operate iPod touch—even to turn VoiceOver off again to resume standard operation.
•• Use pitch change: VoiceOver uses a higher pitch when speaking the first item of a group (such as a list or table) and a lower pitch when speaking the last item of a group. Go to Settings > General > Accessibility > VoiceOver > Use Pitch Change. •• Change the language for iPod touch: Go to Settings > General > International > Language. VoiceOver pronunciation of some languages is affected by Settings > General > International > Region Format.
Learning VoiceOver gestures When VoiceOver is turned on, the standard touchscreen gestures have different effects. These and some additional gestures let you move around the screen and control individual items. VoiceOver gestures include two- and three-finger gestures to tap or flick. For best results when using two- and three-finger gestures, relax and let your fingers touch the screen with some space between them. You can use different techniques to enter VoiceOver gestures.
•• Two-finger double-tap: Play or pause in Music, Videos, Voice Memos, or Photos. Take a photo in Camera. Start or pause recording in Camera or Voice Memos. Start or stop the stopwatch. •• Two-finger double-tap and hold: Relabel the selected item. •• Two-finger triple-tap: Open the Item Chooser. •• Three-finger double-tap: Mute or unmute VoiceOver. •• Three-finger triple-tap: Turn the screen curtain on or off.
VoiceOver makes a sound when the insertion point moves, and speaks the character, word, or line that the insertion point moves across. When moving forward by words, the insertion point is placed at the end of each word, before the space or punctuation that follows. When moving backward, the insertion point is placed at the end of the preceding word, before the space or punctuation that follows it.
Using VoiceOver with Maps With VoiceOver, you can zoom in or out, select a pin, or get information about a location. Explore the map: Drag your finger around the screen, or swipe left or right to move to another item. Zoom in or out: Select the map, set the rotor to Zoom, then swipe up or down with one finger. Pan the map: Swipe with three fingers. Browse visible points of interest: Set the rotor to Points of Interest, then swipe up or down with one finger.
•• Double-tap with two fingers: VO–”-” •• Select the next or previous item specified by the rotor: VO–Up Arrow or VO–Down Arrow •• Adjust the speech rotor: VO–Command–Left Arrow or VO–Command–Right Arrow •• Adjust the setting specified by the speech rotor: VO–Command–Up Arrow or VO–Command– Down Arrow •• Mute or unmute VoiceOver: VO–S •• Switch apps: Command–Tab or Command–Shift–Tab •• Turn the screen curtain on or off: VO–Shift–S •• Turn on VoiceOver help: VO–K •• Return to the previous s
Using a braille display with VoiceOver You can use a refreshable Bluetooth braille display to read VoiceOver output in braille, and you can use a braille display with input keys and other controls to control iPod touch when VoiceOver is turned on. iPod touch works with many wireless braille displays. For a list of supported displays, go to www.apple.com/accessibility/iphone/braille-display.html. Set up a braille display: Turn on the display, then go to Settings > General > Bluetooth and turn on Bluetooth.
Triple-click Home Triple-click Home lets you turn some Accessibility features on or off by pressing the Home button quickly three times. You can use Triple-click Home for: •• VoiceOver •• Invert Colors •• Zoom •• AssistiveTouch •• Guided Access (Triple-click Home starts Guided Access if it’s already turned on. See Guided Access on page 116.) Set the Triple-click Home function: Go to Settings > General > Accessibility > Triple-click Home.
Invert Colors Sometimes, inverting the colors on the iPod touch screen may make it easier to read. When Invert Colors is turned on, the screen looks like a photographic negative. Invert the screen’s colors: Go to Settings > General > Accessibility > Invert Colors. Speak Selection Even with VoiceOver turned off, you can have your iPod touch read aloud any text you can select. Turn on Speak Selection: Go to Settings > General > Accessibility > Speak Selection.
Use Guided Access: Go to Settings > General > Accessibility > Guided Access, where you can: •• Turn Guided Access on or off •• Set a passcode that controls the use of Guided Access and prevents someone from leaving an active session •• Set whether iPod touch can go to sleep during a session Start a Guided Access session: Open the app you want to run, then triple-click the Home button. Adjust settings for the session, then click Start.
Widescreen keyboards Many apps, including Mail, Safari, Messages, Notes, and Contacts, let you rotate iPod touch when you’re typing, so you can use a larger keyboard. Voice Control Voice Control lets you control iPod music playback using voice commands. See Siri and Voice Control on page 45. Closed captioning Turn on closed captioning for videos: Go to Settings > Videos > Closed Captioning. Note: Not all video content includes closed captions.
32 Settings Settings lets you configure iPod touch, set app options, add accounts, and set other preferences. See other chapters for information about settings for the built-in apps. For example, for Safari settings, see Chapter 15, Safari, on page 71. Airplane mode Airplane mode disables the wireless features in order to reduce potential interference with aircraft operation and other electrical equipment. Turn on airplane mode: Go to Settings and turn on airplane mode.
•• Join a closed Wi-Fi network: In the list of network names, tap Other, then enter the name of the closed network. You must already know the network name, password, and security type to connect to a closed network. •• Adjust the settings for connecting to a Wi-Fi network: Tap next to a network. You can set an HTTP proxy, define static network settings, turn on BootP, or renew the settings provided by a DHCP server.
•• Automatically turn on Do Not Disturb: Turn on Scheduled, then set the time when you don’t want to be disturbed. iPod touch automatically turns on Do Not Disturb during this period every day. •• Allow some FaceTime calls during Do Not Disturb: When Do Not Disturb is on, FaceTime calls are silenced. To allow some callers to ring through, tap Allow Calls From. You can allow calls from your Favorites list or other Contacts groups you define.
Change the device name: Go to Settings > General > About, then tap Name. The device name is used by both iTunes and iCloud. To help Apple improve products and services, iPod touch sends diagnostic and usage data. This data does not personally identify you but may include location information. View or turn off diagnostic information: Go to Settings > General > About > Diagnostics & Usage. Restrict or reset Ad Tracking: Go to Settings > General > About > Advertising.
Spotlight Search The Spotlight Search setting lets you specify the content areas searched by Search, and rearrange the order of the results. Set which content areas are searched by Search: Go to Settings > General > Spotlight Search, then select the items to search. You can also change the order of the result categories. Auto-Lock Locking iPod touch turns off the display in order to save the battery and prevent unintended operation of iPod touch.
You can also restrict the following: •• Installing Apps: The App Store is disabled and its icon is removed from the Home screen. You cannot install apps on iPod touch. •• Deleting Apps: You cannot delete apps from iPod touch. you’re customizing the Home screen. •• Explicit Language: Siri attempts to replace explicit words you speak by replacing them with asterisks and beep sounds.
International Go to Settings > General > International to set the following: •• The language for iPod touch •• The calendar format •• The language for Voice Control •• The keyboards you use •• The date, time, and telephone number formats Accessibility Go to Settings > General > Accessibility and turn on the features you want. See Chapter 31, Accessibility, on page 106. Profiles This setting appears if you install one or more profiles on iPod touch.
Brightness & Wallpaper Screen brightness affects battery life. Dim the screen to extend the time before you need to recharge iPod touch. Adjust the screen brightness: Go to Settings > Brightness & Wallpaper and drag the slider. If Auto-Brightness is turned on (iPod touch 4th generation only), iPod touch adjusts the screen brightness for current light conditions using the built-in ambient light sensor. Wallpaper settings let you set an image or photo as wallpaper for the Lock screen or Home screen.
A Using international keyboards International keyboards let you type text in many different languages, including Asian languages and languages written from right to left. For a list of supported keyboards, go to www.apple.com/ipodtouch/specs.html. Manage keyboards: Go to Settings > General > International > Keyboards. •• Add a keyboard: Tap Add New Keyboard, then choose a keyboard from the list. Repeat to add more keyboards. •• Remove a keyboard: Tap Edit, tap tap Delete.
Special input methods You can use keyboards to enter some languages in different ways. A few examples are Chinese Cangjie and Wubihua, Japanese Kana, and Facemarks. You can also use your finger or a stylus to write Chinese characters on the screen. Build Chinese characters from the component Cangjie keys: As you type, suggested characters appear. Tap a character to choose it, or continue typing up to five components to see more options.
B Important safety information WARNING: Failure to follow these safety instructions could result in fire, electric shock, or other injuries, or damage to iPod touch or other property. Read all the safety information below before using iPod touch. Handling Handle iPod touch with care. It is made of metal, glass, and plastic and has sensitive electronic components inside. iPod touch can be damaged if dropped, burned, punctured, or crushed, or if it comes in contact with liquid.
Hearing loss Listening to sound at high volumes may damage your hearing. Background noise, as well as continued exposure to high volume levels, can make sounds seem quieter than they actually are. Use only compatible receivers, earbuds, headphones, speakerphones, or earpieces with your device. Turn on the audio and check the volume before inserting anything in your ear. For more information about hearing loss, see www.apple.com/sound.
iPod touch loop Certain activities when using the iPod touch loop may pose a risk of injury, especially if the loop becomes caught or trapped—for example, while working around machinery. Don’t swing iPod touch when using the loop, as the loop might come off causing injury or damage. Choking hazard Some iPod touch accessories may present a choking hazard to small children. Keep these accessories away from small children.
Important: You may not be able to use iPod touch while the temperature warning screen is displayed. If iPod touch can’t regulate its internal temperature, it goes into deep sleep mode until it cools. Move iPod touch to a cooler location out of direct sunlight and wait a few minutes before trying to use iPod touch again. For more information, go to support.apple.com/kb/HT2101. iPod touch Support Comprehensive support information is available online at www.apple.com/support/ipodtouch.
Quick Look supports the following document types: •• .doc, .docx—Microsoft Word •• .htm, .html—webpage •• .key—Keynote •• .numbers—Numbers •• .pages—Pages •• .pdf—Preview, Adobe Acrobat •• .ppt, .pptx—Microsoft PowerPoint •• .rtf—Rich Text Format •• .txt—text •• .vcf—contact information •• .xls, .xlsx—Microsoft Excel For additional troubleshooting information, go to www.apple.com/support/ipodtouch.
Stop iCloud backups: Go to Settings > iCloud > Storage & Backup > Backup, then turn off iCloud Backup. Music that isn’t purchased in iTunes isn't backed up in iCloud. Use iTunes to back up and restore that content. See Syncing with iTunes on page 15. Important: Backups for music or TV show purchases are not available in all areas. Previous purchases may be unavailable if they are no longer in the iTunes Store, App Store, or iBookstore.
Updating and restoring iPod touch software You can update iPod touch software in Settings or by using iTunes. You can also erase or restore iPod touch, and then use iCloud or iTunes to restore a backup. Deleted data is no longer accessible via the iPod touch user interface, but it isn’t erased from iPod touch. For information about erasing all content and settings, see Reset on page 125. Updating iPod touch You can update software in iPod touch Settings or by using iTunes.
Disposal and recycling information Your iPod touch must be disposed of properly according to local laws and regulations. Because this product contains a battery, the product must be disposed of separately from household waste. When your iPod touch reaches its end of life, contact Apple or your local authorities to learn about recycling options.
Europeiska unionen—information om kassering: Symbolen ovan betyder att produkten och/eller dess batteri enligt lokala lagar och bestämmelser inte får kastas tillsammans med hushållsavfallet. När produkten har tjänat ut måste den tas till en återvinningsstation som utsetts av lokala myndigheter. Genom att låta den uttjänta produkten och/eller dess batteri tas om hand för återvinning hjälper du till att spara naturresurser och skydda hälsa och miljö.
KKApple Inc. © 2013 Apple Inc. All rights reserved. NIKE and the Swoosh Design are trademarks of NIKE, Inc. and its affiliates, and are used under license.