
Instruction Manual

22 Chapter 2
To set access privileges to the Web folder, follow these steps:
1 Open Mac OS Server Admin.
2 Press the Web Services button and choose Start Web Server.
If file services aren’t running, click OK to start them.
3 Press the Privileges button and choose Set Privileges.
4 Locate the Web folder, then click Choose.
5 Click “Share this item and its contents.”
6 Choose Read Only from the Everyone pop-up menu, and make sure Read & Write is selected
for the Owner category.
7 Close the Access Privileges window and click Save.
Setting Up Windows File Sharing
If any Windows or Windows NT–based computers will connect to your AppleShare IP server,
you need to configure file services for Windows file sharing and make sure the appropriate
networking software is installed on Windows client computers.
This section describes how to set up a network in which all your Windows clients are on the
same subnetwork (or subnet) as your AppleShare IP file server.
If your Windows clients are not on the same subnet as the file server, you need to follow the
setup instructions in the File Services section of AppleShare IP Help.
To set up Windows file sharing when your Windows clients are on the same subnet as the file
server, follow these steps:
1 Open Mac OS Server Admin.
2 Press the File Services button and choose Configure File Server.
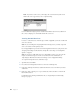
3 Click the Windows tab.
4 Select the “Enable Windows file sharing (SMB)” checkbox.
5 If necessary, enter a name for the file server in the Server Name text field.
By default, the file server assigns the AppleShare IP server’s unqualified DNS name (the
name before the first dot) as the Windows file sharing server name. (For example, an
AppleShare IP server with the DNS name “myserver.company.com” has “myserver” as the
unqualified Windows server name.) Apple recommends you use the name provided because
that makes it easier for some clients to connect to the file server.