Before You Begin Who should read this document If your Mac OS–based computer is running System 7.1, refer to this document for instructions on using the Monitors & Sound control panel and DigitalColor Meter. If your computer is running System 7.5 or later, refer to Macintosh (or Mac OS) Guide and DigitalColor Meter Guide. If you need to set up your AppleVision monitor or install the AppleVision software, refer to the AppleVision Display User’s Manual.
2 The Monitors & Sound Control Panel Use the Monitors & Sound control panel to set color, resolution, sound, geometry, and other controls for your monitor. This chapter describes how to open the control panel and introduces each of its main functions. About Monitors & Sound The Monitors & Sound control panel displays video and sound options based on the capabilities of your computer system.
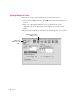
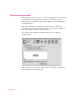
Opening Monitors & Sound There are two ways to open the Monitors & Sound control panel: m Choose Control Panels from the Apple (K) menu, then select Monitors & Sound. m Press one of the buttons under the screen on the left-front of your AppleVision monitor. (The buttons on the right won’t open the control panel.) After a moment, the Monitors & Sound control panel appears on your screen. Available only if you have multiple monitors Settings in this window are for this monitor.
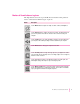
Monitors & Sound buttons at a glance The large buttons across the top of the Monitors & Sound control panel are used to select between different types of options. Button Description Use the Monitor button to adjust color depth, resolution, contrast, and brightness. Use the Arrange button to configure more than one monitor. This button appears on your screen if you have more than one monitor or video card connected to your computer.
Using more than one monitor If you have more than one monitor or video card attached to your computer, a separate Monitors & Sound window appears on each monitor, and an Arrange button automatically appears in the Monitors & Sound window on your main monitor. The options available in each Monitors & Sound window reflect the capabilities of the monitor where the window opened, and the settings you choose in that window affect only that monitor.
Using other devices with Monitors & Sound If you have additional audio or video equipment attached to your computer, such as a sound or video digitizer, you may need to use the separate Sound control panel, or the separate Monitor control panel, to adjust some of the device’s settings. Copies of the Sound control panel and Monitor control panel are available in the AppleVision Extras folder, inside the Apple Extras folder, on your hard drive.
3 Monitor Settings This chapter explains how to change these settings: m contrast and brightness m color depth m resolution Before you begin Open the Monitors & Sound control panel, then make sure the Monitor button is selected.
Adjusting contrast and brightness Change the contrast and brightness of your monitor by adjusting the sliders to the desired level. For best results, Apple recommends that you set the brightness to the middle setting, then adjust the contrast to the setting that looks best to you. Displaying colors or grays To change the color depth of your monitor, follow these steps: 1 Click either Grays or Colors. 2 Select the number of grays or colors you want to display. Your selection takes effect immediately.
Changing resolutions To change the number of pixels displayed by your monitor, follow these steps: 1 Use the Resolution pop-up menu to choose “Recommended” or “All” resolutions. Most of the time, you’ll want to use “Recommended.” These are resolutions that are known to be valid and safe for your monitor. 2 Select a resolution from the scrolling list. Tips m After adjusting the brightness, contrast, resolution, or color depth you should recalibrate your AppleVision monitor.
4 Sound Settings This chapter describes how to adjust sound settings for your computer and the speakers on your AppleVision AV-model monitor. You can connect a sound input source, such as a CD or cassette player, to your AppleVision AV monitor. For information about connecting audio and video equipment, see the manuals that came with your computer and monitor.
Sound output devices m the AppleVision monitor If your AppleVision display is an AV-model with integrated speakers, you can play sound on the built-in speakers or on sound equipment (such as headphones) attached to the monitor’s sound output port. m equipment attached to the back of your computer This can be headphones, speakers, and so on. To play and record sound, you select a sound input source and a sound output device using the Monitors & Sound control panel.
2 The Sound Input portion of the Monitors & Sound window lists the input ports available for your computer. Open the pop-up menu and choose a sound input port. To record or listen to a device connected to your AppleVision monitor, select the computer audio port that your monitor is connected to. On most computers it will be called Microphone. On others it will be called External Microphone, Line In, or External Audio. 3 Click the Listen checkbox to hear sound from the selected input device.
2 Select a Monitor Sound Input source. m Sound Input Off: Click to disable sound input on the monitor. m Built-in Microphone: Click to use the built-in microphone on the monitor. m Sound Input Port: Click to use equipment connected to the sound input port on the left side of the monitor. 3 If you select Sound Input Port, select a Sound Input Port Gain setting. Gain affects sound quality when you record or play sound.
To select a sound output device, follow these steps: 1 Open the Monitors & Sound control panel, then click the Sound button. Adjust these settings. Confirm this says “Built-in”. Select a quality setting. 2 Select the port the monitor sound cable is connected to. If necessary, select a Sound Output device. For most computers, Sound Output is automatically set to “Built-in” and no selection is necessary.
3 If available, select the desired Sound Output Quality setting. Sound quality options are based on the capabilities of your computer. The higher the setting, the better the quality. Note: This setting determines the default sound output quality setting. Many applications, such as games and AppleCD Audio Player, automatically set sound quality. 4 If available, set the Sound Out balance and level. The availability of these options depends on the capabilities of your computer.
2 Click the Routing button. 3 Select a Routing option. m Computer: Sound is sent directly from the sound input port on the monitor to the computer’s sound input port. If you want to record from a device connected to the monitor, select this option. m Computer and Speakers: Sound is sent to the computer’s sound input port and to the speakers on the AppleVision monitor.
Setting volume controls Several different volume settings affect how you hear sound on your computer and AppleVision monitor. You use the Monitors & Sound control panel to set these volume levels: m computer speaker m computer sound output m system alert m AppleVision speakers m AppleVision headphones You might need to adjust more than one volume setting in order to obtain the results you want.
2 Adjust the volume of the computer speaker by moving the Computer Speaker Volume slider. Note: On some computers, the sliders shown may have different names, but they will still adjust the internal speaker settings. 3 Adjust the Computer Speaker Balance slider, if available. If your computer doesn’t support balance adjustment, the slider won’t appear in your control panel.
Adjusting the alert sound volume To change the volume of the sound the computer makes when it needs your attention, follow these steps: 1 Open the Monitors & Sound control panel, then click the Alerts button. 2 Move the System Alert Volume slider to adjust the volume of the alert sound. For information on selecting and recording an alert sound, refer to Chapter 7, “Alert Settings.” Note: The maximum volume of the alert sound is limited by the current volume setting for the sound output device.
Adjusting AppleVision speaker volume If you have an AV-model AppleVision monitor, follow these steps to adjust the speaker volume: 1 Open the Monitors & Sound control panel, then click the Monitor Sound button. 2 Adjust the volume, treble, and bass settings by moving the sliders. 3 If you want to silence the speakers and other devices attached to the monitor, click the Mute Monitor Sound box.
Adjusting AppleVision headphones volume To adjust the volume of headphones attached to the AppleVision monitor, follow these steps: 1 Open the Monitors & Sound control panel, then click the Monitor Sound button. 2 Adjust the Headphone Volume slider. 3 To leave the monitor’s speakers on when you connect something, such as a subwoofer, to the headphone port click the Preferences button; then click Mute checkbox to remove the X.
5 Color Settings 5This chapter explains how to fine-tune the color on your AppleVision monitor. In most cases, you won’t need to change the color settings from their factory adjustments. However, if you’re working with detailed color graphics, you may need to match monitor colors as closely as possible to colors created by a printer or other device.
You can use the Color settings in the Monitors & Sound control panel to further characterize the monitor to your preferences and lighting conditions. You can alter these color settings: m Brightness and contrast: Changes to these settings can impact color. The higher the brightness setting for your screen, the more washed-out the colors may appear. For best color, set the brightness to the middle setting, then adjust the contrast to change the overall luminance of the monitor.
About white point All lights have a white point. It’s the measurement of the color content of the light. Midday sun has a color temperature, or white point, of 6500 degrees Kelvin (sometimes represented as D65). Kelvin is a temperature scale used in scientific applications. Lighting used in graphic arts is based on a white point of 5000 degrees Kelvin (or D50).
2 In the White Point pop-up menu, choose the setting you want to use. The standard, predefined white points are: m D50: A standard for graphic arts work. m 6500 + 8MPCD: Equivalent to the midday sun. (MPCD stands for Minimum Perceptible Color Difference.) m 9300 + 8MPCD: A standard white point used by most Macintosh computer monitors and high-definition television (HDTV). If you’ve created a custom setting, it also appears in the menu.
3 To set the white point in degrees Kelvin, move the slider to the desired setting. Note: Kelvin settings on the slider are not the same as the predefined settings in the White Point pop-up menu. For example, 6500 Kelvin on the slider is different from the 6500 + 8MPCD setting in the White Point menu. 4 To set the white point using CIE xy or CIE u’v’ color spaces, click the appropriate button; then adjust the white point by moving the crosshairs or typing values in the text boxes.
Modifying a white point To modify a custom white point that you’ve previously defined, follow these steps: 1 Open the Monitors & Sound control panel, then click the Color button. 2 Open the White Point pop-up menu, then choose the setting you want to modify. 3 Open the pop-up menu again, then choose the Modify command. (The command will include the name of the setting you’re modifying.) The Custom White Point window appears. Adjust the white point setting as desired.
Deleting a white point setting To remove a custom setting, follow these steps: 1 Open the Monitors & Sound control panel, then click the Color button. 2 Open the White Point pop-up menu and choose the setting you want to delete. 3 Open the White Point pop-up menu again and choose Delete. (The Delete menu item will include the name of the setting you are removing.) The setting is immediately deleted. You cannot recover a setting you’ve deleted.
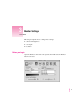
Using a gamma curve setting To use a standard gamma curve setting, or a custom setting you’ve already created, follow these steps: 1 Open the Monitors & Sound control panel, then click the Color button. Select a gamma curve. Click to use the color settings. 2 Open the gamma curve pop-up menu and choose the setting you want to use. 3 Click the Recalibrate button to calibrate the monitor to the selected color settings.
The Custom Gamma Curve dialog box appears. 3 Click the Preview Gamma Effect box to preview the effects of your changes as you make them. Drag to change gamma. 4 Change the gamma setting by moving the crosshairs or typing in a new value. 5 Click Save. 6 Enter a name for the setting, then click Save again. The name will appear in the Gamma Curve pop-up menu so you can use the setting in the future. 7 Click the Recalibrate button to calibrate the monitor to the selected color settings.
Modifying a custom gamma curve setting To modify a gamma setting you’ve previously defined, follow these steps: 1 Open the Monitors & Sound control panel, then click the Color button. 2 Open the Gamma Curve pop-up menu, then choose the gamma setting you want to modify. 3 Open the pop-up menu again, then choose the Modify command. (The command now includes the name of the setting you’re modifying.) The Custom Gamma window appears.
Deleting a gamma curve setting To modify a custom setting, follow these steps: 1 Open the Monitors & Sound panel, then click the Color button. 2 Open the Gamma Curve pop-up menu and choose the setting you want to delete. 3 Open the Gamma Curve pop-up menu again and choose Delete. (The Delete menu item will include the name of the setting you are removing.) The setting is immediately deleted. You cannot recover a setting you’ve deleted.
Adjusting for ambient light You can adjust your AppleVision monitor for the lighting conditions in your environment. You may want to create and use more than one ambient light setting. For example, if your monitor is near a window, you might want one setting for the morning and another for the afternoon. Note: Adjusting for ambient light will be difficult if the monitor’s screen is in direct sunlight.
2 Open the Monitors & Sound control panel, then click the Color button. 3 Open the Ambient Light pop-up menu, then choose Custom. The Ambient Light window appears. 4 Hold the ambient light tool against the screen and select the square that most closely matches the color of the tool. If you find a square that matches, click Save; then enter a name for this setting.
5 If none of the squares match the tool to your satisfaction, select the square that most closely matches; then click More Choices. The Expert Ambient Light window appears.
6 Hold the tool against the square color sample and look through the hole in the tool. Color sample O ¤ ® Z 7 Drag the picker in the color triangle until the color sample is similar to the gray color on the tool. The picker is the small circle inside the color triangle. Moving the picker makes a general color adjustment. 8 Drag the control on the Brightness slider until the color sample closely matches the tool. When the tool and sample match, the hole in the tool seems to disappear.
Using an ambient light setting To use an ambient light setting you’ve already created, follow these steps: 1 Open the Monitors & Sound control panel, then click the Color button. 2 Open the Ambient Light pop-up menu, then choose the setting you want use. 3 Click Recalibrate. Modifying an ambient light setting To modify an ambient light setting you’ve previously created, follow these steps: 1 Open the Monitors & Sound control panel, then click the Color button.
Recalibrating your AppleVision monitor Whenever you change the white point, ambient light, or gamma value, the changes don’t take effect until you recalibrate your monitor. Also, when you make adjustments such as brightness, contrast, and screen geometry, it’s a good idea to recalibrate to get maximum color accuracy. To recalibrate your monitor, follow these steps: 1 In the Monitors & Sound control panel, click the Color button. Click to use the color settings.
Recalibrating automatically You can set preferences in the Monitors & Sound control panel so your monitor is recalibrated automatically. To set recalibration preferences, follow these steps: 1 In the Monitors & Sound control panel, click the Color button. 2 Click Preferences. A dialog box appears with a list of recalibration preferences. 3 Click the Recalibrate After checkbox; then select your recalibration preferences.
Calibration Accuracy settings The Calibration Accuracy slider adjusts the recalibration cycle. Higher settings take longer to calibrate but provide better accuracy. The Normal setting takes about 30 seconds to calibrate your monitor; the Pro setting takes more than 2 minutes. Depending on the image displayed on your monitor, you might not notice a difference between the results of the Normal and Pro settings.
Using color settings To use color settings you’ve previously saved, follow these steps: 1 Open the Monitors & Sound control panel, then click the Color button. 2 Click a name in the settings list. 3 Click Recalibrate. Tip: Double-click a name in the Saved Settings list to immediately recalibrate to that setting. Deleting a color setting To delete a color setting, follow these steps: 1 Open the Monitors & Sound control panel, then click the Color button.
Importing and exporting ColorSync profiles When you create custom color settings for your monitor, you can share those settings with others you’re working with to ensure consistent color results. See Appendix A, “Using ColorSync,” in the AppleVision User’s Manual for information about setting up ColorSync on your computer. Use the Monitors & Sound control panel to create a ColorSync profile that describes the white point and gamma value of your AppleVision monitor.
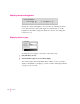
Exporting a ColorSync profile To create a ColorSync profile of the current settings of your monitor, follow these steps: 1 Open the Monitors & Sound control panel, then click the Color button. Saves current color settings Use and create ColorSync profiles Recalibrates monitor to current color settings 2 Select the white point and gamma value you want to export. 3 If necessary, click Recalibrate.
6 Geometry Settings This chapter describes how to control the size and shape, or geometry, of the image on your monitor. Normally, these settings don’t need to be adjusted. However, environmental factors of your work area, such as magnetic or electrical interference, might affect your monitor. You can compensate for these factors using the geometry controls in the Monitors & Sound control panel.
Adjusting screen geometry To adjust the height, width, position, pincushion, rotation, keystone, or parallelogram settings, follow these steps: 1 Open the Monitors & Sound control panel, then click the Geometry button. Fine-tune your changes. Select a geometry setting. Use the mouse to adjust the picture. 2 Click the geometry setting you want to adjust. 3 Move the pointer over the picture of the monitor. The shape of the pointer changes when it is over the picture.
Adjusting convergence Red, green, and blue signals in your monitor intersect, or converge, to create the colors you see on your screen. If the convergence is not set properly, images or text on your screen may appear blurred, or you may get a “rainbow” effect in which several colors form the edges of images on the screen. Also, over time the convergence may need to be adjusted to maintain a clear, distinct screen image.
3 Adjust the convergence at the center of the screen by moving the handles on the grid lines. If your AppleVision monitor supports it, there are additional handles near the top and bottom of the monitor. Adjust the top convergence first, then the bottom. You may need to readjust the center convergence after moving the top or bottom. Click the Reset button to undo all your changes. This is a quick way to start over if you’re dissatisfied with your results so far.
Turning overscan on and off Overscan moves the screen image as far to the edges of the screen as possible. This setting is not recommended for normal use, but can be useful for viewing video. To turn overscan on or off, follow these steps: 1 Open the Monitors & Sound control panel, then click the Geometry button. 2 To turn overscan on, click On. The screen image expands until there is a smaller black border between the image and the edge of the screen.
Resetting the screen to original levels The screen geometry for your monitor is set at the factory. If you decide you want to change back to the factory preset levels, follow these steps: 1 Open the Monitors & Sound control panel, then click the Geometry button. 2 Click the Factory Settings button. Your screen image returns to the factory preset geometry and convergence for the current screen resolution.
7 Alert Settings This chapter describes how to use the Monitors & Sound control panel to change the Mac OS alert sound. The alert sound is played whenever the computer needs your attention, such as when an error message displays on the screen. Changing the alert sound To change the alert sound, follow these steps: 1 Open the Monitors & Sound control panel, then click the Alerts button. 2 To select and hear a sound, click its name in the Alert Sound list. Your new choice takes effect immediately.
Recording a new alert sound To record a new alert sound, follow these steps: 1 Open the Monitors & Sound control panel, then click the Alerts button. Select an alert sound to use. Click this button to record a new alert sound. 2 Click the Add button. A recorder dialog box appears. 3 Click Record. When you’re finished, click Stop. 4 To hear your recording, click Play. If you don’t like your recording, you can record it again. 5 To save your recording, click Save.
Removing an alert sound To delete an alert sound installed on your computer, follow these steps: 1 Open the Monitors & Sound control panel, then click the Alerts button. 2 Select the sound you want to delete from the Alert Sound list. The computer plays the sound when you select it. If you click the sound more than once, it will play once for each click. 3 Click the Delete button. Note: The Simple Beep sound is permanent and can’t be deleted.
8 DigitalColor Meter This chapter explains how to use the DigitalColor Meter application to identify colors displayed on your AppleVision monitor. You can use DigitalColor Meter to identify RGB, CIE, or Pantone colors. About DigitalColor Meter There are many different ways to reproduce color. Printers, for example, form colors by mixing cyan, magenta, and yellow ink. Mixed together in equal quantities these colors create black. By using less of some colors, other colors are created.
DigitalColor Meter and your AppleVision monitor work together to identify colors on your screen based on the standard color gamuts defined by the CIE. DigitalColor Meter can also identify colors using the Pantone system. Pantone is a color-matching system used to specify ink colors for high-end printers. Pantone colors are described using their printing ink formulation, which is identified by a specific Pantone number.
Launching DigitalColor Meter To use DigitalColor Meter, choose it from the Apple (K) menu. It was installed by the AppleVision software installer. Measuring a color To measure or identify a color, follow these steps: 1 Choose DigitalColor Meter from the Apple (K) menu. The DigitalColor Meter window appears. 2 Adjust the size of the DigitalColor Meter aperture by moving the Aperture Size slider. The aperture determines the number of pixels that DigitalColor Meter uses to identify a color.
4 Point to the color you want to measure. Use the magnified view in the DigitalColor Meter window to help you position the pointer. The rectangular box below the numbers in DigitalColor Meter represents the average color of the aperture area. This is the color that DigitalColor Meter will measure. 5 When the pointer is positioned, press x-H on your keyboard. This holds the color you’re pointing to. After you press the keys, you can move the pointer and DigitalColor Meter will remember the held color.
Identifying a Pantone color To look up a Pantone color, follow these steps: 1 Choose DigitalColor Meter from the Apple (K) menu. The DigitalColor Meter window appears. 2 Adjust the size of the DigitalColor Meter aperture by moving the Aperture Size slider. The aperture determines the number of pixels that DigitalColor Meter uses to identify a color. If you’re measuring a dithered area made up of varied color, use a larger aperture to obtain an average color for the area.
The Pantone Match window displays the color you selected for matching in each of the three standard Pantone color gamuts. The value shown below the color samples (ßE*) indicates how closely DigitalColor Meter was able to match your color with a Pantone color. A small value indicates a better match. If you want to identify another color, repeat the above procedure. Otherwise, close the DigitalColor Meter window to quit the application.
Apple Monitors & Sound User’s manual for AppleVision monitors
K Apple Computer, Inc. © 1996 Apple Computer, Inc. All rights reserved. Under the copyright laws, this manual may not be copied, in whole or in part, without the written consent of Apple. Your rights to the software are governed by the accompanying software license agreement. The Apple logo is a trademark of Apple Computer, Inc., registered in the U.S. and other countries.
Contents 1 Before You Begin 1 Who should read this document Using Adobe Acrobat Reader 1 1 2 The Monitors & Sound Control Panel 3 About Monitors & Sound 3 Opening Monitors & Sound 4 Monitors & Sound buttons at a glance Using more than one monitor 5 6 Using other devices with Monitors & Sound For more information 7 7 3 Monitor Settings 9 Before you begin 9 Adjusting contrast and brightness Displaying colors or grays Changing resolutions Tips 10 10 11 11 iii
4 Sound Settings 13 Sound source options 13 Sound input sources 13 Sound output devices 14 Selecting a sound input source 14 Selecting a sound input port on your computer 14 Selecting a sound input source for the monitor 15 Selecting a sound output device Routing monitor sound Setting volume controls 16 18 20 Adjusting computer speaker volume 20 Adjusting computer sound output volume Adjusting the alert sound volume 21 22 Adjusting AppleVision speaker volume 23 Adjusting AppleVision he
About ambient light 35 Adjusting for ambient light 36 Creating an ambient light setting Using an ambient light setting 36 40 Modifying an ambient light setting Deleting an ambient light setting 40 40 Recalibrating your AppleVision monitor Recalibrating automatically 42 Calibration Accuracy settings Using color settings 41 43 43 Saving color settings 43 Using color settings 44 Deleting a color setting 44 Importing and exporting ColorSync profiles Importing a ColorSync profile 45 Export
8 DigitalColor Meter 57 About DigitalColor Meter Before you begin 57 58 Launching DigitalColor Meter Measuring a color 59 Identifying a Pantone color Tips vi Contents 62 61 59