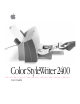
ColorStyleWriter2400 User’s Guide
K Apple Computer, Inc. © 1994 Apple Computer, Inc. All rights reserved. Under the copyright laws, this manual may not be copied, in whole or in part, without the written consent of Apple. Your rights to the software are governed by the accompanying software license agreement. The Apple logo is a trademark of Apple Computer, Inc., registered in the U.S. and other countries.
Contents Communications regulation information 1 Setting Up Your Printer vi 1 Main features of the Color StyleWriter 2400 Important safety instructions Unpacking the printer System requirements Plugging in the printer 1 2 4 5 6 Turning the printer on and off Installing the ink cartridge 7 8 Connecting the printer to your Macintosh Loading paper into the sheet feeder Checking the print nozzles 12 13 15 Installing your printer software 16 Telling your computer to use the Color StyleWriter 240
2 Using Your Printer 21 Loading the sheet feeder Defining the page setup Printing a document 22 25 26 Adjusting color options 27 Printing while you use your computer Checking your printer’s progress 29 30 Sharing your printer with other users 31 Printing on a shared Color StyleWriter 2400 33 Connecting a Color StyleWriter 2400 to a LocalTalk network 3 Tips on Paper, Quality, Speed, and Cost Choosing print materials Quality Speed Cost 35 35 37 38 38 4 Maintaining Your Printer 39 Replacin
Troubleshooting 49 Safety precautions 50 The Chooser doesn’t show the Color SW 2400 icon Installation is unsuccessful 50 50 The Macintosh doesn’t recognize the Color StyleWriter 2400 Text appears in the Geneva font or prints jagged Paper is jammed 53 54 55 Paper or envelopes feed improperly The lights indicate a problem 55 57 The Color StyleWriter 2400 won’t print a particular document 58 The printer acts as if it’s working, but nothing is printed on the page The printer seems slow 58 Me
Communications regulation information FCC statement This equipment has been tested and found to comply with the limits for a Class B digital device in accordance with the specifications in Part 15 of FCC rules. See instructions if interference to radio or television reception is suspected. Radio and television interference The equipment described in this manual generates, uses, and can radiate radio-frequency energy.
DOC statement DOC Class B Compliance This digital apparatus does not exceed the Class B limits for radio noise emissions from digital apparatus as set out in the interference-causing equipment standard entitled “Digital Apparatus,” ICES-003 of the Department of Communications.
1 Setting Up Your Printer This chapter introduces the Apple Color StyleWriter 2400 printer and explains how to set it up. After you follow the instructions in this chapter, you’ll be ready to print. Before you begin Make sure that your computer is already set up and that you know the basics of its operation. Main features of the Color StyleWriter 2400 m High-quality color graphics and text are printed quietly on a variety of materials, including plain paper.
Important safety instructions Always take the following precautions: m Keep the printer cover closed when printing. m Always turn off the printer before unplugging it. m Keep the ink tanks and ink cartridges away from children. n Keep the printer away from sources of liquids, such as wash basins, bathtubs, and shower stalls. n Protect the printer from dampness or wet weather, such as rain and snow. n Read all the installation instructions carefully before you plug the printer into a wall socket.
Watch for these situations, and if one occurs pull the plug! n the power cord or plug becomes frayed or otherwise damaged n you spill something into the printer n the printer is exposed to rain or any other excess moisture n the printer has been dropped or otherwise damaged n you suspect that your printer needs service or repair n you want to clean the printer (use only the procedure recommended in Chapter 4) WARNING Electrical equipment may be hazardous if misused.
Unpacking the printer 1 Remove everything from the shipping box, but leave the ink cartridges in their packages. Be sure to remove packing material from the sheet feeder. Be sure to open the printer’s cover and remove the packing tape from inside. Color StyleWriter 2400 Ink cartridges (Leave them in the plastic tubs for now.) Storage case for ink cartridges Software disks Power cord 2 Apple System/Peripheral-8 cable Remove the tape and packing material from the inside and outside of the printer.
4 Place the printer in your work area. Choose a location near your computer that has a grounded electrical outlet and good ventilation, is out of direct sunlight, never gets damp or very hot or very cold, and is away from devices that could cause electromagnetic interference, such as stereo speakers or cordless telephone transmitters. Do not place the printer on a slanted surface. See Appendix A, “Technical Information,” for specific information about the physical requirements of your printer.
Plugging in the printer WARNING This equipment is intended to be electrically grounded. Your Color StyleWriter 2400 printer is equipped with a three-wire grounding plug—a plug that has a third (grounding) pin. This plug fits only a grounded AC outlet. This is a safety feature. If you are unable to insert the plug into the outlet because the outlet is not grounded, contact a licensed electrician to replace the outlet with a properly grounded outlet.
Turning the printer on and off To turn the printer on (and off), press this button. This light blinks. This light glows while the printer is on. The first time you turn on the printer, the green power light glows and the yellow error light blinks because you haven’t installed an ink cartridge yet. (The next section tells you how to install the cartridge.) To save power, the printer turns itself off after sitting unused for about 5 minutes.
Installing the ink cartridge The ink cartridge contains the print head, which sprays the ink onto the paper. Treat it gently so you don’t damage its tiny nozzles. WARNING The carrier holds the ink cartridge and moves it back and forth when you are printing a document. When the printer is plugged in, don’t slide the carrier by hand or you may damage the printer. Before you start, make sure the printer is turned on. (The green light glows, and the yellow light flashes.
3 Raise the bright blue lever on the carrier. Carrier 4 Remove the cover from the plastic tub that contains the ink cartridge. You can install either the black-only cartridge or the four-color cartridge. (These instructions show the four-color cartridge being installed, but the process is the same for either cartridge.) 5 Remove the ink cartridge from the plastic tub, grasping it by its sides. You may touch the black plastic, but be careful not to touch any other part.
7 Peel the orange tape off the print head. 8 Slide the ink cartridge straight into its place in the printer. Note: There are instructions inscribed inside the printer cover to remind you how to install either ink cartridge.
9 Lower the lever to secure the ink cartridge in place. 10 Close the printer’s front cover.
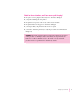
Connecting the printer to your Macintosh IMPORTANT The serial cable must connect the printer directly to the computer. Use only the cable that comes with the printer. Replace the cable only with another Apple System/Peripheral-8 cable that contains special shielding to prevent interference with radio and television signals. Plug one end of the cable into the printer. (Both ends of the cable are the same.
Loading paper into the sheet feeder The sheet feeder holds up to 100 sheets of 20-pound paper and feeds the paper automatically into the printer. You can load many sizes of paper and other media into the sheet feeder as described in Chapter 2, but to do a nozzle check, as described in the next section, you must use U.S. letter-size or A4 paper. To load paper into the sheet feeder, follow these steps: 1 Open the printer cover. 2 Adjust the internal paper selector.
3 Close the printer cover. 4 Load a stack of U.S. letter-size or A4 paper into the sheet feeder. Slide this guide so it just touches the edge of the paper. If the stack of paper bows out even slightly, the guide is too tight. Extend this paper support. Make sure the paper extends above the support (and doesn’t slide down inside the printer). Make sure the paper lines up evenly at this side of the feeder. Do not stack paper above this line ( ). Make sure the external paper selector is next to the « icon.
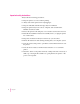
Checking the print nozzles The Color StyleWriter 2400 prints by spraying colored ink onto the paper through tiny nozzles. Sometimes these small nozzles can get clogged after sitting unused for a long time. To make sure all the nozzles are working, follow these steps. 1 If necessary, turn off the printer. The green power light should be off. 2 Press and hold down the power button until the power light starts to blink. Press the power button. When the power light blinks, release the button.
4 Examine the nozzle test pattern for broken or missing horizontal lines. The nozzle test pattern appears near the bottom of the test page. The test pattern for the four-color ink cartridge looks like this: A broken line means a nozzle on the print head needs to be cleaned. A missing color means you need to replace an ink tank (or the black-only cartridge).
IMPORTANT The Installer determines whether you have the correct system software and enough memory to use this printer. If you do not, the Installer displays a message telling you what you need. You won’t be able to install the printer software until you correct the system software or memory problem. If the message reports a problem, you can purchase new system software or memory from an Apple-authorized dealer. 4 In the Installer dialog box, click Install.
Telling your computer to use the Color StyleWriter 2400 Before using your printer, you must select it in the Chooser. 1 Select Chooser from the Apple (K) menu. 2 In the Chooser dialog box, click items to select them. On most Macintosh computers, the Chooser looks like this: Then click one of these items to indicate which port you connected the printer to: the printer port ([) or the modem port (W). If no port is available and your computer is a PowerBook, see the information below.
Even when a PowerBook has two serial ports, if it also has an internal modem, the modem port (W) may look available but actually be in use. If the printer port ([) is available, connect the Color StyleWriter 2400 to it. If the printer port is unavailable and you must use the modem port, make sure the modem serial port setting is Normal or External. To check the setting, open the PowerBook, PowerBook Setup, or Express Modem control panel.
2 Using Your Printer When your printer is set up (plugged in, loaded with paper, and selected in the Chooser), you are ready to print. Printing can be as simple as choosing Print from the File menu. You can also make optional changes to parts of the printing process.
Loading the sheet feeder The sheet feeder holds paper, envelopes, or other materials and feeds them automatically into the printer. To load the sheet feeder, follow these steps: 1 Adjust the external paper selector and load the paper. IMPORTANT Don’t mix envelopes with paper in the feeder. Insert letterhead paper face up with the top of the page pointing downward. Slide this guide so it just touches the edge of the paper. If the stack of paper bows out even slightly, the guide is too tight.
If you’re changing print materials (from paper to envelopes, for example), continue with steps 2 through 4. 2 Open the printer’s front cover. Wait while the carrier moves to the center position. 3 Adjust the internal paper selector and extend the output tray. The lever has three positions (two for paper, one for envelopes).
Here are details about the kinds of material you can use in your Color StyleWriter 2400 printer. Print material Maximum Special instructions Plain paper 100 sheets m Use 16- to 24-pound paper. Premium coated paper 20 sheets m Use only paper designed for this printer. m The whiter side should face you. Glossy paper 20 sheets m Use only paper designed for this printer. m To prevent misfeeds, put one sheet of plain paper at the back of the stack. m The shinier side should face you.
Defining the page setup Almost every Macintosh program has a Page Setup command in the File menu. You can use this command to set a variety of options, from changing the page size to applying visual effects. The most common options are already selected for you, so choose Page Setup only if you want to change them. 1 Choose Page Setup from the File menu. The Page Setup dialog box appears, as shown in the next step.
Printing a document To print a document, follow these steps: 1 Open the document you want to print, or select its icon in the Macintosh Finder. 2 Choose Print from the File menu. A dialog box appears, displaying a number of printing options. 3 Set any options you like. The most common choices are already set for you. Click Best for highest quality, Normal for typical use, or Draft for lower ink consumption.
Adjusting color options To adjust the way colors are printed, follow these steps: 1 Choose Print from the File menu. 2 In the dialog box that appears, click Color. Click Color. Some programs provide a second box you must click before the color options dialog box opens. See the Read Me file for information about printing in color with specific programs. 3 Select your color options. The printer blends the four ink colors in either a repeating pattern of dots or a random scattering of dots.
With ColorSync turned on and the Automatic matching method selected, the Macintosh chooses the best matching method for the contents of the document you are printing. If you need to override the automatically selected color-matching method, you can choose the option you want from the Matching Method pop-up menu. Most of the time, however, the Automatic setting is best. Automatic lets the Macintosh choose the best color-matching method for your document.
Printing while you use your computer You can continue to work on your computer while printing on the Color StyleWriter 2400. The feature that gives you this ability is called background printing, and is automatically turned on when you install your Color StyleWriter 2400 software. To turn background printing on or off, follow these steps: 1 Select Chooser from the Apple (K) menu. The Chooser opens. 2 Click the Color SW 2400 icon in the Chooser. Click this icon.
Checking your printer’s progress While a document is being printed in the background, you can use PrintMonitor to check its progress. In addition, PrintMonitor lets you know when there’s a problem. (PrintMonitor is a program that’s part of the Macintosh system software.) 1 While the document is printing, choose PrintMonitor from the Application menu at the far right of the menu bar. PrintMonitor is available only when background printing is on.
Sharing your printer with other users If your computer is connected to other computers over an AppleTalk network, you can allow other users on the network to print on your Color StyleWriter 2400. The technology that lets you do this is called ColorShare. To share the printer with other users, follow these steps: 1 Select Chooser from the Apple (K) menu. 2 In the Chooser dialog box, make the changes you want. First, click this icon. (If you don’t see the icon, use the scroll bar and arrows to find it.
4 To keep a record of what’s printed on your printer, click the “Keep Log of Printer Usage” checkbox to put an X in it. You can open and print the log with SimpleText, TeachText, or another wordprocessing program. To find the log file, open your System Folder; then open the Preferences folder, and open the Printing Prefs folder. Note: You can keep a log even if your printer is not shared. 5 Click OK to close the sharing setup dialog box. Sharing works only if background printing is turned on.
Printing on a shared Color StyleWriter 2400 After you turn on sharing (as described in the previous section), others on your network can share your printer. People on the network who want to print on your shared printer must install the Color StyleWriter 2400 software on their computers, as described in Chapter 1. Then they must follow these steps: 1 Select Chooser from the Apple (K) menu. The Chooser opens. 2 First, click this icon. (If necessary, use the scroll bar and arrows to find the icon.
Connecting a Color StyleWriter 2400 to a LocalTalk network If you have the optional Color StyleWriter 2400 LocalTalk Module, you can connect a Color StyleWriter 2400 printer to a LocalTalk network. To attach the LocalTalk Module and connect your Color StyleWriter 2400 to the network, follow the instructions that come with the module. Once the printer is on the network, its name appears in the Chooser just like other network printers. If you want to change the name, click Rename.
3 Tips on Paper, Quality, Speed, and Cost This chapter explains how to use different materials and printing options to meet your needs. Choosing print materials Here are some tips on when and how to use different print materials. Plain paper Use plain paper for everyday printing. m Print quality may vary depending on the manufacturer of the paper. If you’re not happy with one kind of paper, try a different brand.
Premium coated paper Use premium coated paper for exceptional print quality—for example, for a final draft, a colorful notice, or the master copy of a presentation. Colors appear richer and more vibrant on such paper. m Use only coated paper designed for use with the Color StyleWriter 2400. m One side of the paper is a little whiter than the other and is better for printing. See the package label on the coated paper to determine which side is better, and load that side so that it faces you.
Transparencies Use transparencies when you want to present your document on an overhead projector. m Use only transparencies designed for use with the Color StyleWriter 2400. These special transparencies have a sheet of paper attached to them; leave the paper attached until after printing. m Load the transparencies so that the shiny side faces you and the edge where the paper and the transparencies are attached points downward.
Speed For faster printing, change the Print Quality setting in the Print dialog box. (To display the dialog box, choose Print from the File menu.) Select Normal or Draft. Draft is faster than Normal. Also use the following selections in the Color Options dialog box. (To open the Color Options dialog box, click the Color button in the Print dialog box.) Select Pattern. Turn off ColorSync. Color printing takes longer than black-only printing.
4 Maintaining Your Printer It doesn’t take much effort to keep your Color StyleWriter 2400 printer in good working condition. You simply have to replace the ink cartridges (or their ink tanks) when they run out of ink and clean the printer or print head if you notice a problem. For other service, see the information about service and support that comes with your Color StyleWriter 2400. IMPORTANT Follow all the safety instructions given at the beginning of Chapter 1.
When to change ink tanks Look carefully at your printed documents to see if a color is missing or faded. Sometimes it’s obvious—such as when you run out of black ink. At other times you may notice that the colors seem wrong—such as when you’re printing a nature scene and you run out of yellow. The best way to verify that ink is running low is to print the test page. (For details, see “Checking the Print Nozzles” in Chapter 1.
4 Remove the new ink tank from its packaging. 5 Remove the plastic cap from the ink tank. Don’t let anything touch the openings. The ink may cause stains, and any contaminants may harm the print quality. 6 Slide the tank into the cartridge, and push it down so it snaps into place. IMPORTANT Make sure you put the color ink tank on the left and the black ink tank on the right. 7 Close the printer cover.
Replacing the ink cartridge The ink cartridge contains the print head, the device that takes the ink and sprays it on the paper. The Color StyleWriter 2400 printer comes with two ink cartridges: a four-color cartridge with replaceable ink tanks and a highperformance, black-only cartridge. The black-only cartridge lasts for about 900 typed pages—until it runs out of ink. The four-color cartridge lasts about twice as long, because you can replace its ink tanks.
How to replace the ink cartridge IMPORTANT Before replacing the cartridge, try printing the test page. (See “Printing the Test Page” in the section “Images Print Poorly” in Chapter 5.) 1 Turn on the printer. 2 Open the printer’s cover. Wait while the carrier moves to the center position. 3 Raise the bright blue lever on the carrier and remove the cartridge. Dispose of the cartridge. IMPORTANT Be careful not to touch the print head, or you may temporarily stain your fingers with ink.
6 Remove the bright orange cap from the cartridge’s print head. After you snap it off, dispose of the cap. 7 44 Chapter 4 Peel the orange tape off the print head.
8 Slide the cartridge into its place in the printer. 9 Lower the bright blue lever on the carrier to secure the cartridge in place. 10 Close the printer cover. Now you can open any document you want and print it as usual.
Storing the ink cartridge you aren’t using The Color StyleWriter 2400 comes with two ink cartridges, a black-only and a four-color cartridge. While they are sealed in their original packaging, the ink cartridges are protected. If you open both packages and switch ink cartridges for printing different documents, be sure to store the one you’re not using in the storage case supplied with your Color StyleWriter 2400. The storage case keeps the print head from drying out and prevents accidents with ink stains.
Cleaning the outside of the printer Before you clean the printer, turn it off and unplug the power cord. Then wipe the outside of the printer with a clean, soft cloth dampened with water. If necessary, you can use a mild soap or detergent. Be careful not to get any liquid in the power cord receptacle. WARNING Don’t use ammonia-based or alcohol-based cleaners on or around the printer—they may react with the plastic.
5 Troubleshooting This chapter provides solutions to some problems that you may encounter while using your Color StyleWriter 2400 printer. As long as you follow the maintenance instructions in Chapter 4, you’re not likely to have any problems with your Color StyleWriter 2400. The most common source of trouble is faulty software installation. To avoid these problems, follow the software installation instructions in Chapter 1.
Safety precautions To prevent damage to the Color StyleWriter 2400 printer and harm to yourself and other users, follow these safety tips. m Don’t touch anything inside the printer except as described in the instructions in this manual. Otherwise, you may damage delicate mechanical parts. m Don’t shake ink tanks or hold them with the ink opening pointing down. Ink can leak out and cause stains. m Don’t touch the ink opening on an ink tank. m Don’t oil the inside of the printer.
Removing items from your Fonts folder Items in your current Fonts folder can interfere with successful installation of the printer software. To correct the problem, follow these steps: 1 Open the Fonts folder (inside the System Folder) on your Macintosh. 2 Remove from the Fonts folder any file that has the same name as one of the fonts that comes with your Color StyleWriter 2400.
Using the Custom Installer You can install the printer software without installing the fonts that come with the printer. (The disadvantage is that you won’t be able to use these fonts if you don’t already have them.) 1 Insert the Color StyleWriter 2400 Installation disk into a floppy disk drive. If necessary, open the disk icon. 2 To start the Installer program, double-click its icon. 3 In the Welcome dialog box that appears, click Continue. 4 In the Installer dialog box, choose Custom Install.
6 When you see a message on your screen, follow the directions and insert the next disk. The Installer ejects disks and asks you to insert others. Keep following the instructions on the screen until the installation is complete. 7 When you see a message reporting that installation was successful, click Restart. The Installer restarts your Macintosh.
Text appears in the Geneva font or prints jagged When your Macintosh computer is low on memory, it may display and print certain fonts in the Geneva font. (Geneva looks like this.) Some text may also have jagged edges. One easy way to make more memory available is to quit open programs you aren’t using. For other suggestions on how to free up memory, see the documentation that came with your computer or with your latest system software upgrade.
Paper is jammed Occasionally a piece of paper may get jammed (stuck) inside the printer during the printing process. To clear a paper jam, follow these steps: 1 If necessary, open the printer to see where the jam is. 2 Gently pull the paper free. Paper or envelopes feed improperly If paper tears, gets skewed, or comes through the printer crumpled, it may not be entering the printer properly.
m Try to remove any torn or damaged pieces of paper from the printer. See the previous section, “Paper Is Jammed.” m Take the paper out of the sheet feeder and check it. Make sure none of the sheets is curled, bent, or dog-eared. Make sure the edges of the stack line up evenly. Make sure the left paper guide isn’t too snug or too loose. The stack should lie flat (not bowed). Make sure the paper doesn’t slide down into the printer. Load either envelopes or paper (not both) into the sheet feeder.
The lights indicate a problem Power button (I) Error light (‘) Power light Sometimes the lights on the printer signal a problem. m Both lights are off. To conserve energy, the printer turns itself off if it’s left idle for some time (usually about 5 minutes). If you suspect a problem, press the power button. If the lights remain off, check to make sure the power cord is plugged in properly and the outlet has power.
The Color StyleWriter 2400 won’t print a particular document If you attempt to print a document and no page is printed, try the following: m Check for messages on your Macintosh screen. (If necessary, open PrintMonitor, which is available in the Application menu at the top right corner of the screen.) m Turn the printer off, then on again. (This resets the printer.) m Repeat the printing process. Sometimes problems disappear when you try to print your document again. m Try printing from another program.
Messages appear on your computer screen Most messages that appear on your screen are self-explanatory. For example, they may tell you that the printer is out of paper or that the paper is jammed. Once you correct the problem, the message goes away. Here are some other problems that on-screen messages might report: The waste ink container in the printer is full. From time to time, the printer deposits some ink into a waste container.
The image is too light or too dark If printing looks fuzzy because it’s too light or too dark, try the following: m Check the nozzles in the print head. See “Checking the Print Nozzles” in Chapter 1 for instructions. If this doesn’t help, replace one or more ink tanks in the four-color ink cartridge, or replace the black-only cartridge. See “Replacing Ink Tanks in the Four-Color Ink Cartridge” and “Replacing the Ink Cartridge” in Chapter 4 for instructions.
Printing appears on only part of the paper Check the selections in the Page Setup dialog box. Check the nozzles in the print head. See “Checking the Print Nozzles” in Chapter 1 for instructions. If this doesn’t help, replace one or more ink tanks in the four-color ink cartridge, or replace the black-only cartridge. See “Replacing Ink Tanks in the Four-Color Ink Cartridge” and “Replacing the Ink Cartridge” in Chapter 4 for instructions.
Unwanted horizontal white lines or stripes appear Problems with print quality, especially horizontal white lines in your document, may mean a nozzle on the print head is clogged or your ink cartridge is running out of ink. There are two ways you can clear up the problem. m Cleaning the print head is the faster method. It forces a nozzle cleaning as part of a print job. In other words, you can tell the printer to clean the print head before it starts printing the next document.
Cleaning the print head To clean the print head, follow these steps: 1 When you are about to print a document, click Utilities in the Print dialog box. Click this button. The Utilities dialog box opens. Then click OK. First, click to place an X here. The Utilities dialog box closes, and the Print dialog box reappears. 2 In the Print dialog box, click Print. The printer cleans the print head before printing your document.
Printing the test page To print the test page and clean the print head, follow these steps: 1 Turn off the printer. 2 Make sure you’ve loaded U.S. letter-size or A4 paper into the printer. 3 Press and hold down the power button until the power light starts to blink. 4 Release the power button and wait for the test page to print. 5 Examine the nozzle test pattern for broken or missing horizontal lines. The nozzle test pattern appears near the bottom of the test page.
The image prints wavy or distorted Make sure that you are using recommended types of paper. Check the setting of the internal paper selector above the ink cartridge. If the problem persists, see the information about service and support that comes with the printer. Stains appear on printed pages Stains on the backs or tops of printed pages may mean that ink has spilled inside the printer. If so, the ink can transfer to the rollers and from there to the paper. Turn the printer off and unplug it.
Ink tanks and cartridges run out of ink too quickly To extend the life of your ink cartridges, try the following: m Select Draft print quality in the Print dialog box whenever you can. m Don’t clean the print head unless necessary. m Don’t print solid background colors unless necessary. m Don’t open the printer’s cover unnecessarily. (After you shut the cover, the printer cleans the print head, which uses up ink.) m Don’t unplug the printer or otherwise discontinue power frequently.
Appendix A Technical Information General specifications Marking engine m Thermal ink jet engine Resolution m 360 dots per inch (dpi) for text and graphics (180 dpi for draft quality) Engine speed m Printing speed depends on the images printed and on the Macintosh computer used. Connector cable m Apple System/Peripheral-8 cable Interface m High-speed serial (RS-422) m Optional LocalTalk Paper feed in pounds (lb.) and grams/meter2 (g/m2) m Sheet feeder holds up to 100 sheets of 20-lb.
Printing materials m Plain paper: Use 16-lb. (60-g/m2) to 24-lb. (90-g/m2) paper. m Accepts most letterhead and colored stock. m Accepts medium-weight sheets of labels. m Use #10 or Monarch envelopes. m Apple recommends back-print film, transparency film, coated paper, and glossy paper especially designed for the Color StyleWriter 2400 printer. See your Apple-authorized dealer or reseller. Paper sizes in millimeters (mm) and inches (") m U.S. letter: 215.9 mm x 279.4 mm (8.5" x 11") m U.S. legal: 215.
Operating environment Temperature m 15° to 30° C (59° to 86° F) Relative humidity m 10 percent to 80 percent, noncondensing Storage environment Temperature m 0° to 35° C (32° to 95° F) Humidity m 5 percent to 95 percent, noncondensing Input electrical requirements U.S./Japan m 120 volts AC, 60 hertz, 1.0 ampere (amp) Europe/Australia m 220 to 240 volts AC, 50 hertz, 0.5 amp Power consumption Operating m 45 watts maximum Printable surface m Maximum printable line: 206 millimeters (8.
Appendix B Using Fonts With the Color StyleWriter 2400 Printer A font is a collection of letters, numbers, and symbols in a distinctive typographic design. Your Macintosh computer and Color StyleWriter 2400 printer come with a variety of fonts that look great both on your monitor and on paper. Fonts come in such a variety of formats that problems can sometimes arise. This appendix provides the information you need to avoid such problems and to solve them if they come up.
Bitmapped fonts Bitmapped fonts consist of “pictures” of a typeface at specific sizes. For example, you might have bitmapped fonts at 10-, 12-, and 18-point sizes installed in your Macintosh computer. For best results you need a separate font file for each size of character you want to use. The icon of a bitmapped font (also called a fixed-size font or screen font) has the single letter A on it. The font’s point size appears at the end of its name.
PostScript fonts PostScript is a page-description language that defines the characters, symbols, and images that appear on each page of a document. A PostScript font comes as a pair of fonts: an outline font for the printer and a corresponding bitmapped font for displaying type on your screen. No bitmapped font, no menu entry: If your system doesn’t have the bitmapped font, the PostScript font name won’t appear in your font menu. Certain printers are designed specifically to work with PostScript fonts.
TrueType fonts A TrueType font is scalable, describing a typeface without rigidly specifying a size. So it looks good whatever size you choose. TrueType fonts provide sharp text at any size on screen or on paper. You can mix and match TrueType fonts from various font vendors. TrueType fonts store individual text characters as mathematical descriptions of lines and curves, rather than as groups of pixels (a bitmap).
QuickDraw GX imaging technology A QuickDraw GX font is a TrueType or PostScript font with an additional set of sophisticated features. These features include extremely accurate typographic elements such as ligatures and kerning, plus the ability to skew, rotate, and add perspective to text in extremely flexible ways. QuickDraw GX is more than a font format; it’s a sophisticated printing and display technology that supports complex graphics and advanced typography.
For example, if a document uses 12-point Times®, available in that size as a bitmapped font and as a TrueType font, the system uses the bitmapped font. If a document uses 4-point Times, the system scales the TrueType font to that size, because a bitmapped version isn’t available. Using only TrueType fonts produces a closer match between the appearance of type on the screen and on paper.
TrueType and PostScript fonts PostScript fonts were designed as fonts for PostScript printers. However, if you have Adobe Type Manager software installed, your computer can both display and print PostScript fonts. Use different names: To avoid confusing the printer software, be sure that you don’t install both TrueType and PostScript versions of the same font. For example, do not have a PostScript font file called Times and a TrueType font file called Times installed in your system at the same time.
Where fonts are stored All fonts for your Color StyleWriter 2400 printer reside in special places within the System Folder. To install fonts in System 7, you drag them to the System Folder. Your Macintosh will automatically put them where they belong. In system software version 7.0, bitmapped and TrueType fonts are installed in the System file, and PostScript fonts are installed in the Extensions folder. In system software versions 7.1 and 7.
Suitcases A font suitcase is a special folder for collections of fonts. Suitcases provide a convenient way to organize fonts in the same font family. For example, it’s a good idea to use a single suitcase (called Courier) for all fonts in the Courier font family—all Courier roman fonts as well as fonts with names like Courier Bold and Courier Oblique.
Combining suitcases: To merge all the fonts from one suitcase with another, drag one suitcase on top of the other. All the fonts from the dragged suitcase will go into the other, and the dragged suitcase will disappear. A suitcase can also contain fonts from different font families, although you should keep all fonts of the same family in the same suitcase. All the fonts will still appear in menus with their proper names. You treat a suitcase as you would a folder. To open a suitcase, you doubleclick it.
Styled fonts Most fonts that come with your Color StyleWriter 2400 printer have defined styles. For example, if you open the Bookman font suitcase, you see files for bold and italic versions of the font. But fonts such as Chicago, Geneva, Monaco, and New York do not come with defined styles. If you open the Chicago font (contained in a suitcase in the Fonts folder, which is inside your System Folder), you see only one file.
Common questions about fonts Here are some questions that often come up about fonts. What kind of fonts should I buy? Bitmapped fonts are best for screen display but don’t look as good when you print them. PostScript fonts look great on paper if you have a PostScript printer or Adobe Type Manager. TrueType fonts are the best all-purpose fonts to use for your Macintosh monitor and Color StyleWriter 2400 printer.
What does the term Apple classic fonts mean? The Apple classic fonts are the original ten bitmapped fonts that came with the first Macintosh in 1984. These fonts, which all have city names, include Athens, Cairo (a picture font), Chicago, Geneva, London, Los Angeles, Monaco, New York, San Francisco, and Venice. Several of the fonts (Athens, Cairo, London, and San Francisco) came in only one size—18 points. . Chicago, Geneva, Monaco, and New York are currently available in TrueType versions.
What is font substitution? Font Substitution, which isn’t available for your Color StyleWriter 2400 printer, is an option in the Page Setup dialog box for certain PostScript printers. When font substitution is turned on, these printers will use their built-in equivalents for three bitmapped fonts (Times for New York, Helvetica for Geneva, and Courier for Monaco). What’s a downloadable font? A downloadable font is a TrueType or PostScript font sent to an “intelligent” printer by your system software.
Appendix C Packing and Moving the Printer If you need to move your printer a long distance, follow these steps. 1 Turn off the printer and unplug it. 2 Remove any paper from the sheet feeder. 3 Remove the power cord and serial cable.
4 Open the cover and tape the carrier (with an ink cartridge installed) to the right side of the printer. Because you’ve unplugged the printer, the carrier stays in its “parked” position on the right. Use masking tape to tape the carrier to the side of the printer. 5 Close the cover. 6 Push the paper support and output tray back inside the printer. 7 Repack the printer in its original packing material. When the printer arrives at its new location, unpack it and set it up as described in Chapter 1.
Appendix D Working With ColorSync Providing consistent, pleasing color with desktop computers is a technical challenge. Achieving “What You See Is What You Get” (WYSIWYG) in color is more difficult than in black and white, because colored light on your monitor is very different from printed ink. Even the terms for colors depend on the device: m On monitors (and most scanners), color is identified as RGB, for red, green, and blue light.
About ColorSync To solve these problems, Apple designed ColorSync, a system extension that provides color-matching capabilities. Here’s what ColorSync does: m It defines colors independent of the device creating the colors. m It makes sure that colors on different devices match as closely as possible. ColorSync color matching is a central part of Macintosh computing, ensuring that applications, monitors, printers, scanners, and digital cameras use the same scheme for color matching.
Index A Adobe PostScript fonts icon 73 Adobe Type Manager (ATM) software 73, 77 A4 paper loading in sheet feeder 14 used for nozzle check 13 alerts, setting up 26 Apple classic fonts 83 Apple System/Peripheral-8 connector cable 4, 12, 67 AppleTalk network, sharing printer on 31 Application menu 30 ATM (Adobe Type Manager) software 73, 77 audio alert for printing 26 B bitmapped fonts icon 72 Macintosh search order 77 preinstalled and scaled 72 and TrueType fonts 76 used to display screen text 73 Bitstream
C cables, connecting 12 “carbonless carbon” paper 59 carrier illustration of 9 parked position 86 cartridges. See ink cartridges case for storing ink cartridges 4 Chicago 12 bitmapped font 82, 83 Chooser (Apple menu) 18 Chooser dialog box 31, 34 CIE XYZ color standard 88 classic fonts, Apple 83 cleaning ink spills in the printer 65 nozzles 15–16 print head 62–63 safety instructions 2 cleansers 47 CMM (color-matching method) 27–28, 88 CMYK color system 87 coated paper.
disconnecting the printer 6 disk icon 16 disks Color StyleWriter 2400 Installation 16 locking 16 provided 4 display fonts.
G generic PostScript font icon 73 Geneva 9 display font 82 glossy paper loading instructions 24 recommended use 36 graphics, fonts for 75 Grayscale color option 26 green power light 7, 8, 15 grounding plug 6 guide, paper 14, 22 H Halftoning Options 27, 38 hard disk, system requirements 5 horizontal orientation, setting up 25 I icons bitmapped font 72 Color SW 2400 18, 29 disk 16 missing 50 modem port 12 paper 14 PostScript fonts 73 printer port 12 images enlarging or reducing 25 reasons for printing poorl
J “jaggies” in bitmapped fonts 72 K kerning 75 Key Caps desk accessory 74 L labels loading instructions 24 specifications 68 landscape orientation 25 legal-size paper 14, 23, 68 letterhead paper 22, 68 levers blue 9, 11, 43, 45 external paper selector 14, 22 internal paper selector 13, 23, 60, 65 ligatures 75 light fonts 81 lights. See error light; power light lines broken or missing 16 horizontal 62 maximum printable 69 loading printing materials.
O oblique fonts 81 off-center printing 61 on/off (power) button 7, 15 operating environment 69 orange cap on print head 9 orientation 25 outlet, grounded AC 6 outline fonts 73–74 output tray 14, 23 P packing material, removing 4 packing a printer 85–86 pages printing problems 61 smudged 60 stains on 65 won’t print 58 page setup 25 paper feeds improperly 55–56 legal size 14 letterhead 22 loading in sheet feeder 13–14, 22–24 plain 35 recommended use 35–38 size specifications 68 types of 24 types to avoid 59
features 1 installing ink cartridge 8–11 installing software 16–17 internal paper selector 13, 23 opening front cover 8, 66 packing and moving 85–86 paper jam problems 55–56 passwords 33 plugging in 6 PostScript 73 print materials used 24 problems with lights 57 safety precautions 50 setting up in Chooser 18 sharing 31–33 slow 58 turning on and off 7 unpacking 4–5 unplugging 2–3 warranty 49 weight 68 printer cover 2, 8, 11, 66 printer log, setting up 32 printer name, changing for LocalTalk network 34 printe
R radio interference vi, 12 random-access memory (RAM). See memory Read Me file 27 reducing the size of an image 25 removing fonts 51–53 repair, warning 49 replacing an ink cartridge 43–45 requirements, system 5 resolution, specifications 67 RGB color system 87 rollers, cleaning 47, 65 roman fonts 81 rotated text 54 S safety instructions 2–3, 50 scalable fonts 74 scaling a page 25 scheduling a print job 30 screen fonts.
horizontal white lines 62 identically named fonts 51 images print poorly 59–60 improper paper feed 55–56 ink smears 60 installing without fonts 52–53 jagged Geneva fonts 54 Macintosh doesn’t recognize the printer 53 missing icon 50 off-center page 61 a paper jam 55 printer is slow 58–59 printing a partial page 61 running out of ink quickly 66 stains on printer pages 65 unsuccessful installation 50 TrueType fonts icon 74 previewing on screen 74 and QuickDraw GX image technology 75 scalable 74 where stored 78
The Apple Publishing System This Apple manual was written, edited, and produced on a desktop publishing system using Apple Macintosh computers and QuarkXPress. Technical illustrations were drawn in Adobe Illustrator; screen shots were created and modified with system software, ExposurePro, Aldus SuperPaint, and Adobe Photoshop. Proof pages were created on Apple LaserWriter printers and on QMS and Tektronix color printers. Final pages were output directly to separated film on a PostScript-driven imagesetter.