
User Manual


Chapter 5 Custom settings and output formats 12 0
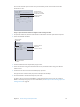
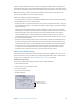
4 To open the Audio tab, click the Audio button.
5 Select the Audio Enabled checkbox.
This sets the MPEG-4 output to be an audio-only (.m4a) le. You can also specify the other
settings in the Audio tab as needed.
Stage 2: Congure the MPEG-4 output to include podcasting information
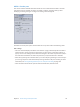
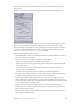
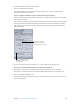
1 Select the “Enhanced Podcast (m4a le)” checkbox near the bottom of the MPEG-4 Encoder pane
of the Inspector window.
This checkbox is available only when the Video Enabled checkbox in the Video tab is deselected.
Selecting the “Enhanced Podcast (m4a le)” checkbox ensures that any annotations you add, as
well as any chapter and podcast markers with their artwork and URLs, are embedded with the
output media le.
Deselect this checkbox
to activate the “Enhanced
Podcast (m4a file)” checkbox.
Select this checkbox to include
podcasting information in the
output media file.
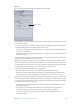
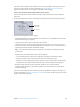
2 To save the setting so that you can apply it to a source media le’s target, click Save.
Stage 3: Open the Additional Information tab and enter annotations
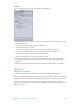
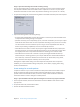
1 In the Batch window, click a non-target area of the job created by the source media le.
The Inspector window shows the A/V Attributes, Additional Information, and Job Action tabs.
2 Click the Additional Information tab.
The Additional Information tab is where you can add annotations, such as a title and an artist, to
the output media le.