
User Manual

Chapter 4 Assign settings and preview media 60
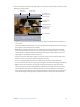
In and Out controls
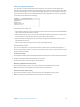
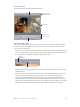
After you select the batch item, you can use the In and Out controls to see and adjust the In and
Out point timecode information.
Sets In point to current
playhead position.
In point timecode
Out point timecode
Sets Out point to current
playhead position.
•
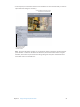
In and Out point timecode elds: The exact locations of the In and Out points are displayed
here using the standard timecode format of hh:mm:ss:. You can manually edit these elds by
selecting the eld and entering new values. If a new value is entered, the timeline’s In or Out
point moves to the specied point in the current batch item.
Note: If your source media le has a timecode track, the Start and End timecode values of the
clip appear in the In and Out point timecode elds. Otherwise, the timecode starts at 00:00:00:00.
•
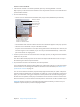
In and Out point buttons: You can use the Set In Point and Set Out Point buttons (next to the
timecode elds) to set In and Out points. (You can also set In and Out points by dragging; see
the “Timeline controls” section, below.)
•
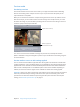
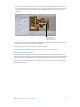
Source/output information: The clip’s frame size and frame rate are shown in the lower-left
corner of the Preview window. The clip’s duration (from the In point to the Out point) is shown
in the lower-right corner. With the Source View button active, the frame size and frame rate
represent the source media le. With the Settings View button active, the frame size and frame
rate represent the setting for this batch item.
Note: To see the total duration of the clip (without In and Out points), select the source le in
the Batch window and open the Inspector window (choose Window > Show Inspector).
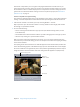
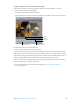
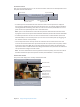
Preview area controls
The preview area displays the currently selected batch item.
Split-screen slider
Cropping boundary
Cropping handle for
the lower-right corner
Cropping dimensions
(also seen in Source
Inset fields in the
Geometry pane)