
User Manual

Chapter 4 Assign settings and preview media 63
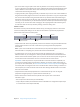
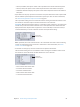
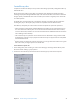
Choose items from the Marker pop-up menu to add, remove, show, hide, and edit markers and
poster frames.
•
Import Chapter List: Opens a le import dialog that allows you to import a le containing a list
of chapter marker times for the source media le. For more information, see Add compression
or podcast markers on page 49.
•
Add/Remove marker: The option you see changes depending on whether or not the playhead
is positioned on a marker.
•
If the playhead is not positioned on a marker: Choosing “Add marker” places a new marker in
the timeline at the playhead’s current position.
•
If the playhead is positioned on a marker: Choosing “Remove marker” deletes the current marker.
•
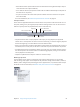
Edit: Available only when the playhead is positioned on a marker. Choosing Edit opens a
dialog that allows you to set the marker type and assign a URL and an image to it. For more
information, see Add compression or podcast markers on page 49.
•
Show Chapter/Podcast Markers: Controls whether chapter and podcast markers (those with
names) are shown in the timeline. A checkmark indicates they are shown.
•
Show Compression Markers: Controls whether compression markers (those without names) are
shown in the timeline. A checkmark indicates they are shown.
•
Show Edit/Cut Markers: Controls whether markers automatically placed at each edit point by
another application, such as Final Cut Pro, are shown in the timeline. A checkmark indicates
they are shown.
•
Set poster frame: Makes the current frame the poster frame, which is a still image that
represents a video or audio media le or a podcast chapter in applications such as iTunes and
the Finder. By default, the rst frame in a video le is the poster frame.
•
Clear poster frame: Deletes the poster frame marker.
•
Go to poster frame: Moves the playhead to the poster frame.