
2


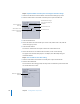


Table Of Contents
- Compressor User Manual
- Contents
- An Introduction to Compressor
- Getting Started Quickly
- The Basic Transcoding Workflow
- The Compressor Interface
- Importing Source Media Files
- Creating, Previewing, and Modifying Settings
- Creating Jobs and Submitting Batches
- Assigning Settings to Source Media Files
- Assigning Destinations to Source Media Files
- Submitting a Batch
- About the History Drawer
- Resubmitting a Batch
- Saving and Opening a Batch File
- Submitting a Final Cut Pro Project for Transcoding
- Resubmitting a Final Cut Pro Project
- Transcoding Different Clips From One Source Media File
- Creating Dolby Digital Professional Output Files
- Creating H.264 DVD Output Files
- Creating MPEG-1 Output Files
- Creating MPEG-2 Output Files
- Creating MPEG-4 Output Files
- Creating QuickTime Movie Output Files
- Creating QuickTime Export Component, AIFF, and TIFF Files
- Adding Filters to a Setting
- Adding Frame Controls, Geometry, and Actions to a Setting
- Using the Preview Window
- Creating and Changing Destinations
- Using Droplets
- Customer Support
- Command-Line Usage
- Index

126 Chapter 9 Creating MPEG-1 Output Files
Step 3: Configure the Audio settings
1 Click the Audio button in the MPEG-1 Encoder pane to open the Audio tab.
2 Select the Enabled box.
3 Choose 48 kHz from the “Sample rate” pop-up menu.
4 Select Stereo when using two-channel audio sources, or Mono when using one-
channel audio sources.
5 Choose the bit rate to use from the “Bit rate” pop-up menu.
The typical values used for DVD projects are 192 Kbps and 224 Kbps.
6 Select a different setting in the Setting tab of the Presets window.
This opens a dialog prompting you to save the current preset.
7 Select the Save button and click OK.
This saves the “MPEG-1 Audio for DVD” preset.
Creating a Group and Destination
To make it easy to use these two MPEG-1 presets with a source, you can create a preset
group using them. See “Creating Groups of Settings” on page 75 for more information.
Also, to make it easier to use the output files created by these presets in
DVD Studio Pro, create a destination that ensures the video and audio output files have
the same name, only with different file extensions. See “Creating Destinations for Use
With DVD Studio Pro” on page 232 for more information.
Select to enable the
Audio tab.
Choose the 48 kHz
sample rate.
Select either
Stereo or Mono.
Choose the bit rate.