
2


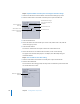


Table Of Contents
- Compressor User Manual
- Contents
- An Introduction to Compressor
- Getting Started Quickly
- The Basic Transcoding Workflow
- The Compressor Interface
- Importing Source Media Files
- Creating, Previewing, and Modifying Settings
- Creating Jobs and Submitting Batches
- Assigning Settings to Source Media Files
- Assigning Destinations to Source Media Files
- Submitting a Batch
- About the History Drawer
- Resubmitting a Batch
- Saving and Opening a Batch File
- Submitting a Final Cut Pro Project for Transcoding
- Resubmitting a Final Cut Pro Project
- Transcoding Different Clips From One Source Media File
- Creating Dolby Digital Professional Output Files
- Creating H.264 DVD Output Files
- Creating MPEG-1 Output Files
- Creating MPEG-2 Output Files
- Creating MPEG-4 Output Files
- Creating QuickTime Movie Output Files
- Creating QuickTime Export Component, AIFF, and TIFF Files
- Adding Filters to a Setting
- Adding Frame Controls, Geometry, and Actions to a Setting
- Using the Preview Window
- Creating and Changing Destinations
- Using Droplets
- Customer Support
- Command-Line Usage
- Index

Chapter 10 Creating MPEG-2 Output Files 129
HD to SD Downconversion
For those situations in which you are editing high definition (HD) sources in
Final Cut Pro and want to create a standard definition (SD) DVD from them, Compressor
provides high-quality downconversion. Compressor retains as much detail as possible
during scaling and correctly preserves progressive or interlaced formats when
encoding to MPEG-2 for DVD.
To see the source media resolution and frame rate:
1 Import the source media file into the Batch window.
2 Click the source’s name in the Batch window.
The source media file’s resolution and frame rate, along with its duration, appear in the
lower-left corner of the Preview window.
About the MPEG-2 Encoder Pane
This section contains detailed information about the various tabs within the MPEG-2
Encoder pane in the Inspector window. You make your MPEG-2 settings using these
tabs, by either modifying an existing setting or creating a new setting in the Settings
tab of the Presets window.