
2
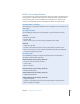


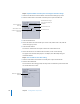


Table Of Contents
- Compressor User Manual
- Contents
- An Introduction to Compressor
- Getting Started Quickly
- The Basic Transcoding Workflow
- The Compressor Interface
- Importing Source Media Files
- Creating, Previewing, and Modifying Settings
- Creating Jobs and Submitting Batches
- Assigning Settings to Source Media Files
- Assigning Destinations to Source Media Files
- Submitting a Batch
- About the History Drawer
- Resubmitting a Batch
- Saving and Opening a Batch File
- Submitting a Final Cut Pro Project for Transcoding
- Resubmitting a Final Cut Pro Project
- Transcoding Different Clips From One Source Media File
- Creating Dolby Digital Professional Output Files
- Creating H.264 DVD Output Files
- Creating MPEG-1 Output Files
- Creating MPEG-2 Output Files
- Creating MPEG-4 Output Files
- Creating QuickTime Movie Output Files
- Creating QuickTime Export Component, AIFF, and TIFF Files
- Adding Filters to a Setting
- Adding Frame Controls, Geometry, and Actions to a Setting
- Using the Preview Window
- Creating and Changing Destinations
- Using Droplets
- Customer Support
- Command-Line Usage
- Index

130 Chapter 10 Creating MPEG-2 Output Files
The MPEG-2 pane opens with the default Video Format tab on top and contains the
following items:
 File Extension field: Displays the MPEG-2 file extension (m2v) automatically after the
MPEG-2 output format is selected from the File Format pop-up menu.
 Allow Job segmenting: This checkbox allows you to turn off job segmenting. It is only
relevant if you are using Compressor with distributed processing and with two pass
or multi pass encoding. (The Compressor 2 distributed processing feature is limited
to computers that have either Final Cut Studio or DVD Studio Pro 4 installed.) For
more information, see “Job Segmenting and Two Pass VBR” on page 136.
 Video Format, Quality, GOP, and Extras: These buttons open the Video Format, Quality,
GOP, and Extras tabs described next.
Video Format Tab
You use the Video Format tab to make settings related to video formats, frame rates,
aspect ratio, field dominance, and timecode. It contains the following controls:
 Video Format pop-up menu: Choose your output video file format as either NTSC
(default), PAL, 720p, 1080i (HDV res), 1080i (Std. res), Automatic (SD), or Automatic
(HD). When you choose a Video Format setting, the other settings in this tab will be
filled in with default values, or they will be grayed out, indicating that there are now
options for that setting. The NTSC and PAL items refer to standard definition settings
for the NTSC and PAL TV standards. Of the major-market DVD regions, NTSC is used
in North America and Japan, and PAL is used throughout Europe.
Generally, the output video format should match the source video format. For
interlaced video originating from traditional NTSC or PAL camcorders, choose NTSC
or PAL from this pop-up menu. If you are unsure of what your source media file’s
video format is, you can choose either Automatic (SD) for standard definition or
Automatic (HD) for high definition. This setting analyzes your source media clip’s
frame rate to determine the correct video format.