
2

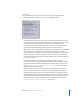


Table Of Contents
- Compressor User Manual
- Contents
- An Introduction to Compressor
- Getting Started Quickly
- The Basic Transcoding Workflow
- The Compressor Interface
- Importing Source Media Files
- Creating, Previewing, and Modifying Settings
- Creating Jobs and Submitting Batches
- Assigning Settings to Source Media Files
- Assigning Destinations to Source Media Files
- Submitting a Batch
- About the History Drawer
- Resubmitting a Batch
- Saving and Opening a Batch File
- Submitting a Final Cut Pro Project for Transcoding
- Resubmitting a Final Cut Pro Project
- Transcoding Different Clips From One Source Media File
- Creating Dolby Digital Professional Output Files
- Creating H.264 DVD Output Files
- Creating MPEG-1 Output Files
- Creating MPEG-2 Output Files
- Creating MPEG-4 Output Files
- Creating QuickTime Movie Output Files
- Creating QuickTime Export Component, AIFF, and TIFF Files
- Adding Filters to a Setting
- Adding Frame Controls, Geometry, and Actions to a Setting
- Using the Preview Window
- Creating and Changing Destinations
- Using Droplets
- Customer Support
- Command-Line Usage
- Index

150 Chapter 10 Creating MPEG-2 Output Files
4 Decide whether you want the GOP pattern to be open or closed and click the
appropriate button.
Note: For all HD MPEG-2 formats, the GOP structures are closed.
See “Understanding GOPs and Frame Types” on page 140, “Things to Consider When
Choosing a GOP Setting” on page 140, or “GOP Tab” on page 138 for more information
about GOPs.
Step 4: Choose Extras settings
You can control the inclusion or exclusion of specific MPEG-2 authoring information in
the Extras tab.
1 Click the Extras button in the MPEG-2 Encoder pane to open the Extras tab.
Working With MPEG-2 I-Frames
The Compressor Preview window offers additional MPEG-2 transcoding flexibility by
allowing you to manually insert I-frames into your output MPEG-2 file at any frame
location, regardless of your chosen GOP pattern and size. These are known as forced
I-frames, and may be useful for improving the quality of the MPEG-2 file in the vicinity
of the scene change. See “Understanding GOPs and Frame Types” on page 140 for
more information on I-frames.
In addition, adding I-frames to your clip allows you to create chapter markers that
DVD Studio Pro can understand and use. See “Adding Markers to a Clip” on
page 220 and “Adding DVD Studio Pro Chapter Markers to a Clip” on page 222
for more information.