
2


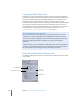


Table Of Contents
- Compressor User Manual
- Contents
- An Introduction to Compressor
- Getting Started Quickly
- The Basic Transcoding Workflow
- The Compressor Interface
- Importing Source Media Files
- Creating, Previewing, and Modifying Settings
- Creating Jobs and Submitting Batches
- Assigning Settings to Source Media Files
- Assigning Destinations to Source Media Files
- Submitting a Batch
- About the History Drawer
- Resubmitting a Batch
- Saving and Opening a Batch File
- Submitting a Final Cut Pro Project for Transcoding
- Resubmitting a Final Cut Pro Project
- Transcoding Different Clips From One Source Media File
- Creating Dolby Digital Professional Output Files
- Creating H.264 DVD Output Files
- Creating MPEG-1 Output Files
- Creating MPEG-2 Output Files
- Creating MPEG-4 Output Files
- Creating QuickTime Movie Output Files
- Creating QuickTime Export Component, AIFF, and TIFF Files
- Adding Filters to a Setting
- Adding Frame Controls, Geometry, and Actions to a Setting
- Using the Preview Window
- Creating and Changing Destinations
- Using Droplets
- Customer Support
- Command-Line Usage
- Index

Chapter 12 Creating QuickTime Movie Output Files 165
 File Extension field: Indicates the file extension for this output file format. The file
extension .mov represents QuickTime. It is recommended that you don’t alter this field.
 Allow Job segmenting: This checkbox allows you to turn off job segmenting. It is only
relevant if you are using Compressor with distributed processing and with two pass
or multi pass encoding. (The Compressor 2 distributed processing feature is limited
to computers that have either Final Cut Studio or DVD Studio Pro 4 installed.) For
more information, see “Encoder Pane” on page 43.
 Video Settings and Audio Settings: These buttons open the QuickTime Compression
Settings and Sound Settings dialogs. Use these dialogs to select suitable codecs and
change other video or audio compression settings. See “About the Sound Settings
Dialog” on page 169 and “About the Compression Settings Dialog” on page 167 for
more information on these dialogs.
 Enabled/Disabled: Use these pop-up menus to enable or disable Video and Audio
settings. Enabled means the video or audio track will be included in the output movie.
Disabled means the video or audio track will be excluded from the output movie.
 Streaming: Choose one of the following QuickTime streaming options from this pop-
up menu:
 None: If you choose this setting (the default), your output media file will not
stream over the Internet.
 Fast Start: This option allows your output media file to be viewed even before it is
fully downloaded from its server.
 Fast Start–Compressed Header: This setting achieves the same results as Fast Start
(allowing your output media file to be viewed before it is fully downloaded from
the server), but the output media files are smaller.
 Hinted Streaming: This setting allows hint tracks to be added to the output media
file so that it can be used with a QuickTime Streaming Server.
 Options button: This button remains dimmed unless Hinted Streaming is selected from
the Streaming pop-up menu. Clicking this button opens the QuickTime Hint Exporter
Settings dialog, which allows you to choose extra hinting settings for your stream.
 Summary table: Displays full details for this setting.