
2


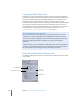


Table Of Contents
- Compressor User Manual
- Contents
- An Introduction to Compressor
- Getting Started Quickly
- The Basic Transcoding Workflow
- The Compressor Interface
- Importing Source Media Files
- Creating, Previewing, and Modifying Settings
- Creating Jobs and Submitting Batches
- Assigning Settings to Source Media Files
- Assigning Destinations to Source Media Files
- Submitting a Batch
- About the History Drawer
- Resubmitting a Batch
- Saving and Opening a Batch File
- Submitting a Final Cut Pro Project for Transcoding
- Resubmitting a Final Cut Pro Project
- Transcoding Different Clips From One Source Media File
- Creating Dolby Digital Professional Output Files
- Creating H.264 DVD Output Files
- Creating MPEG-1 Output Files
- Creating MPEG-2 Output Files
- Creating MPEG-4 Output Files
- Creating QuickTime Movie Output Files
- Creating QuickTime Export Component, AIFF, and TIFF Files
- Adding Filters to a Setting
- Adding Frame Controls, Geometry, and Actions to a Setting
- Using the Preview Window
- Creating and Changing Destinations
- Using Droplets
- Customer Support
- Command-Line Usage
- Index

Chapter 12 Creating QuickTime Movie Output Files 167
About the Compression Settings Dialog
You use the Compression Settings dialog to change your video codec settings for the
QuickTime output format. To open the Compression Settings dialog, click the Video
Settings button in the QuickTime Encoder pane.
If a particular setting can’t be changed, it remains dimmed. Some video codecs—such
as Sorenson Video 3 and Photo-JPEG—allow you to make additional settings. If this is
the case, the Options button becomes available. Click it to make additional settings.
The Compression Settings dialog contains the following items, depending on which
codec you choose in the Compression type pop-up menu:
 Compression type: Use this pop-up menu to choose the video codec you want to
add to your preset.
 Depth pop-up menu: You use the Depth pop-up menu to define the color setting. For
example, if a QuickTime movie were composed of millions or thousands of colors
and the playback computer only showed 256 colors, you would use this setting to
resolve this color depth discrepancy.
The contents of this pop-up menu change depending on the video codec selected in
the Compression type pop-up menu. For example, if you choose the PNG codec, you
can make a selection ranging from Grays to Millions of Colors+, while the Photo-JPEG
codec only allows you to choose between Color and Grayscale.
 Quality slider: Use this slider to make general setting changes to the overall image
quality of your processed file. Quality is a subjective setting that trades image quality
for bandwidth and gives the entire media file the same quality. Lower quality means
that the finished file requires less bandwidth and streams faster. Available settings
are Least, Low, Medium, High, and Best. You can also drag the slider between any of
these settings to obtain a more specific rate (displayed numerically).
Compression type
pop-up menu
Options button
Frames per second field
and pop-up menu