
2


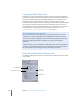

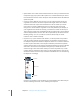


Table Of Contents
- Compressor User Manual
- Contents
- An Introduction to Compressor
- Getting Started Quickly
- The Basic Transcoding Workflow
- The Compressor Interface
- Importing Source Media Files
- Creating, Previewing, and Modifying Settings
- Creating Jobs and Submitting Batches
- Assigning Settings to Source Media Files
- Assigning Destinations to Source Media Files
- Submitting a Batch
- About the History Drawer
- Resubmitting a Batch
- Saving and Opening a Batch File
- Submitting a Final Cut Pro Project for Transcoding
- Resubmitting a Final Cut Pro Project
- Transcoding Different Clips From One Source Media File
- Creating Dolby Digital Professional Output Files
- Creating H.264 DVD Output Files
- Creating MPEG-1 Output Files
- Creating MPEG-2 Output Files
- Creating MPEG-4 Output Files
- Creating QuickTime Movie Output Files
- Creating QuickTime Export Component, AIFF, and TIFF Files
- Adding Filters to a Setting
- Adding Frame Controls, Geometry, and Actions to a Setting
- Using the Preview Window
- Creating and Changing Destinations
- Using Droplets
- Customer Support
- Command-Line Usage
- Index

168 Chapter 12 Creating QuickTime Movie Output Files
 Options button: This button remains dimmed unless the codec you selected from the
Compression type pop-up menu offers options. It is recommended that you contact
the manufacturers of these codecs directly for more information about the additional
options they offer.
 Frames per second: With this pop-up menu, you can reduce the frame rate of your
original file to reduce the size of the compressed file. Higher frame rates make for
smoother motion but require more bandwidth. You use the “Frames per second”
pop-up menu to choose a different frame rate, but for best results you should
change it to a number that the original file can be easily divided by. For example, if
your original file had a frame rate of 30 fps, you should use a frame rate of 10 fps or
15 fps. Choosing a frame rate of something like 24 fps would result in uneven motion
and even dropped frames, because 30 is not evenly divisible by 24. Choose from the
following settings: 8, 10, 12, 15, 23.98, 24, 25, 29.97, 30, 59.94, 60 fps, or choose
Custom to enter a number manually.
 Key frame every: If your selected codec allows it, use the “Key frame every” field to
enter the number of frames you want between your keyframes. Codecs based on
the temporal compression method use keyframes. These act as a reference frame for
the next sequence of frames, so that any data redundancy between the keyframe
and the ensuing frames can be removed. In between keyframes are the less detailed
delta frames. You need to insert keyframes throughout your media file because
content changes. Some video codecs allow you to insert a keyframe every certain
number of frames, while other video codecs use natural keyframes by scanning the
whole file to detect where the major similarities and differences occur and inserting
the keyframes accordingly.
If there’s a lot of motion in your media file, you need keyframes more often than you
do with something more static, such as a talking head sequence.
Keyframe
Delta frames
Keyframe