
2


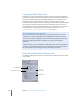


Table Of Contents
- Compressor User Manual
- Contents
- An Introduction to Compressor
- Getting Started Quickly
- The Basic Transcoding Workflow
- The Compressor Interface
- Importing Source Media Files
- Creating, Previewing, and Modifying Settings
- Creating Jobs and Submitting Batches
- Assigning Settings to Source Media Files
- Assigning Destinations to Source Media Files
- Submitting a Batch
- About the History Drawer
- Resubmitting a Batch
- Saving and Opening a Batch File
- Submitting a Final Cut Pro Project for Transcoding
- Resubmitting a Final Cut Pro Project
- Transcoding Different Clips From One Source Media File
- Creating Dolby Digital Professional Output Files
- Creating H.264 DVD Output Files
- Creating MPEG-1 Output Files
- Creating MPEG-2 Output Files
- Creating MPEG-4 Output Files
- Creating QuickTime Movie Output Files
- Creating QuickTime Export Component, AIFF, and TIFF Files
- Adding Filters to a Setting
- Adding Frame Controls, Geometry, and Actions to a Setting
- Using the Preview Window
- Creating and Changing Destinations
- Using Droplets
- Customer Support
- Command-Line Usage
- Index

Chapter 12 Creating QuickTime Movie Output Files 169
 Limit data rate to: Use this field to set the number of kilobytes per second
(KB/sec.) required to deliver your media file. This setting is useful if you have a
specific bit rate (such as a DSL connection) or amount of space (on a DVD or CD
ROM). You should choose a data rate that is appropriate for your delivery medium
and set it as high as possible within your data limitations. When you set a data rate,
you override other codec quality settings because the codec compresses the file as
much as it needs to based on its data rate limit.
Remember that the data rate is only for the video track of a media file. If your media
file also contains audio, you must allow some space for that too.
About the Sound Settings Dialog
You use the Sound Settings dialog to change your audio compression settings for
either the QuickTime or AIFF output format. To open this dialog, click the Audio
Settings button in the QuickTime Movie or AIFF Encoder pane.
If a particular audio setting cannot be changed, it remains dimmed. Some audio
codecs—such as Qualcomm PureVoice and QDesign Music 2—allow you to make
additional settings. If this is the case, the Options button becomes available. Click it to
make additional settings.
Format
pop-up menu
Rate field and
pop-up menu
Options button (dimmed)