
2

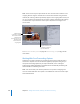


Table Of Contents
- Compressor User Manual
- Contents
- An Introduction to Compressor
- Getting Started Quickly
- The Basic Transcoding Workflow
- The Compressor Interface
- Importing Source Media Files
- Creating, Previewing, and Modifying Settings
- Creating Jobs and Submitting Batches
- Assigning Settings to Source Media Files
- Assigning Destinations to Source Media Files
- Submitting a Batch
- About the History Drawer
- Resubmitting a Batch
- Saving and Opening a Batch File
- Submitting a Final Cut Pro Project for Transcoding
- Resubmitting a Final Cut Pro Project
- Transcoding Different Clips From One Source Media File
- Creating Dolby Digital Professional Output Files
- Creating H.264 DVD Output Files
- Creating MPEG-1 Output Files
- Creating MPEG-2 Output Files
- Creating MPEG-4 Output Files
- Creating QuickTime Movie Output Files
- Creating QuickTime Export Component, AIFF, and TIFF Files
- Adding Filters to a Setting
- Adding Frame Controls, Geometry, and Actions to a Setting
- Using the Preview Window
- Creating and Changing Destinations
- Using Droplets
- Customer Support
- Command-Line Usage
- Index

210 Chapter 16 Using the Preview Window
You can also use the Preview window to enlarge the Preview screen size, manually add
I-frames (MPEG-1 and MPEG-2 only), and designate a portion of your media file for
transcoding using the In and Out markers.
About the Preview Window
The Preview window allows you to play batch items before submitting them for
transcoding, and allows you to compare versions of your clip to ensure that the quality
of the output media file is acceptable.
The Preview window contains the following items:
 Preview scale selection: Adjusts the Preview screen size. The three settings are 100%,
75%, and 50%, but you can also drag the Preview window handle to any size you like.
 Source/Output selection: Use these buttons to preview the selected batch item using
either the source’s aspect and size or the output’s aspect and size. The Source View
button also provides a cropping boundary that you can use to define one or more
edges to be cropped. The Output View button shows the cropped version of the
media scaled to its aspect and size setting.
 Source/Output information: The clip’s frame size and frame rate are shown in the
lower-left corner of the Preview window. The clip’s duration is shown in the lower-
right corner. With the Source View button selected, the frame size, frame rate, and
duration represent the source media clip. With the Output View button selected, the
frame size, frame rate, and duration represent the setting for this batch item, and the
duration is based on the In and Out points set in the Preview window.
In and out controls
Preview scale selection
Source/Setting selection
Preview screen area
Batch item
selection controls
Timeline controls
Marker pop-up menu
Transport controls