
2
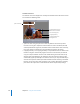


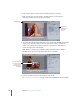
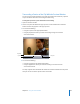

Table Of Contents
- Compressor User Manual
- Contents
- An Introduction to Compressor
- Getting Started Quickly
- The Basic Transcoding Workflow
- The Compressor Interface
- Importing Source Media Files
- Creating, Previewing, and Modifying Settings
- Creating Jobs and Submitting Batches
- Assigning Settings to Source Media Files
- Assigning Destinations to Source Media Files
- Submitting a Batch
- About the History Drawer
- Resubmitting a Batch
- Saving and Opening a Batch File
- Submitting a Final Cut Pro Project for Transcoding
- Resubmitting a Final Cut Pro Project
- Transcoding Different Clips From One Source Media File
- Creating Dolby Digital Professional Output Files
- Creating H.264 DVD Output Files
- Creating MPEG-1 Output Files
- Creating MPEG-2 Output Files
- Creating MPEG-4 Output Files
- Creating QuickTime Movie Output Files
- Creating QuickTime Export Component, AIFF, and TIFF Files
- Adding Filters to a Setting
- Adding Frame Controls, Geometry, and Actions to a Setting
- Using the Preview Window
- Creating and Changing Destinations
- Using Droplets
- Customer Support
- Command-Line Usage
- Index

Chapter 16 Using the Preview Window 211
Batch item selection control area
You can use the batch item selection area to choose specific items from the Batch
window to show in the Preview window.
 Batch item selection buttons: Use these buttons to click backward or forward through
the list of source media files and clips with settings available for previewing. As you
click through the list, the selected batch item appears in the batch item pop-up menu.
 Batch item pop-up menu: Choose the source media file you want to preview from this
pop-up menu, with or without its assigned settings.
In and Out controls
Once you have selected the batch item, the In and Out controls can be used to see and
adjust the In and Out point timecode information.
 In and Out timecode fields: The exact locations of the In and Out markers are
displayed here using the standard timecode format of hh:mm:ss:frame. You can
manually edit these fields by selecting the field and entering new values. If a new
value is entered, the timeline’s relevant In or Out point moves to the specified point
in the current batch item.
Note: If your source media file has a timecode track with a specific timecode, the
start and end timecode of the clip will appear in both the In and Out timecode fields.
For everything else, the timecode will start with 00:00:00:00.
 In and Out point buttons: Drag the In point (right-pointing arrow) or Out point (left-
pointing arrow) buttons in the timeline to set a new In or Out point. You can also use
the Set In and Set Out buttons (next to the timecode fields) to set In and Out points.
Batch Item
selection buttons
Batch Item
pop-up menu
Sets In point to current
playhead position
Sets Out point to current
playhead position
In point timecode
Out point timecode