
2
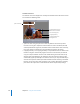


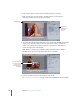
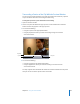

Table Of Contents
- Compressor User Manual
- Contents
- An Introduction to Compressor
- Getting Started Quickly
- The Basic Transcoding Workflow
- The Compressor Interface
- Importing Source Media Files
- Creating, Previewing, and Modifying Settings
- Creating Jobs and Submitting Batches
- Assigning Settings to Source Media Files
- Assigning Destinations to Source Media Files
- Submitting a Batch
- About the History Drawer
- Resubmitting a Batch
- Saving and Opening a Batch File
- Submitting a Final Cut Pro Project for Transcoding
- Resubmitting a Final Cut Pro Project
- Transcoding Different Clips From One Source Media File
- Creating Dolby Digital Professional Output Files
- Creating H.264 DVD Output Files
- Creating MPEG-1 Output Files
- Creating MPEG-2 Output Files
- Creating MPEG-4 Output Files
- Creating QuickTime Movie Output Files
- Creating QuickTime Export Component, AIFF, and TIFF Files
- Adding Filters to a Setting
- Adding Frame Controls, Geometry, and Actions to a Setting
- Using the Preview Window
- Creating and Changing Destinations
- Using Droplets
- Customer Support
- Command-Line Usage
- Index

212 Chapter 16 Using the Preview Window
Preview screen area
The Preview screen area displays the currently selected batch item. The Preview screen
also contains the following items:
 Split screen slider: Drag the split screen slider any distance across the top of the
Preview screen to get a comparison view between the source media file (left side)
and output media file (right side). In addition to the location of the slider at the top,
the screen division is indicated by a vertical white line bisecting the image.
 Cropping boundary: The cropping boundary is only available in Source view. Use the
handles to drag the red boundary edges and corners in the direction you want to
crop your output media file. Use the center handle to drag the entire frame in any
direction while still maintaining its dimensions. The new values (for left, top, right,
and bottom) appear dynamically in the Preview screen as you crop the frame. If you
also have the Inspector window open with the Batch selection showing in the Name
field, you can see the same values changing in the cropping fields of the Geometry
pane. Select the Output view to show the results of the crop boundary settings.
Cropping boundary
Cropping dimensions (also
seen in Source Inset fields
in the Geometry pane)
Cropping handle for the
lower-right corner
Split screen slider