
2
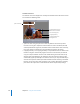


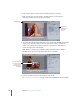
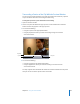

Table Of Contents
- Compressor User Manual
- Contents
- An Introduction to Compressor
- Getting Started Quickly
- The Basic Transcoding Workflow
- The Compressor Interface
- Importing Source Media Files
- Creating, Previewing, and Modifying Settings
- Creating Jobs and Submitting Batches
- Assigning Settings to Source Media Files
- Assigning Destinations to Source Media Files
- Submitting a Batch
- About the History Drawer
- Resubmitting a Batch
- Saving and Opening a Batch File
- Submitting a Final Cut Pro Project for Transcoding
- Resubmitting a Final Cut Pro Project
- Transcoding Different Clips From One Source Media File
- Creating Dolby Digital Professional Output Files
- Creating H.264 DVD Output Files
- Creating MPEG-1 Output Files
- Creating MPEG-2 Output Files
- Creating MPEG-4 Output Files
- Creating QuickTime Movie Output Files
- Creating QuickTime Export Component, AIFF, and TIFF Files
- Adding Filters to a Setting
- Adding Frame Controls, Geometry, and Actions to a Setting
- Using the Preview Window
- Creating and Changing Destinations
- Using Droplets
- Customer Support
- Command-Line Usage
- Index

214 Chapter 16 Using the Preview Window
Transport controls
These move the playhead backward or forward to the exact position of the next marker
or In and Out point, making it easy to navigate quickly between existing markers. You
can also use these buttons to quickly move the playhead to the start or end of the clip.
 Play/Pause button: Starts or stops playback of the clip. If you stop playback, the
playhead remains at its current position. To return to the start of the clip, you
need to drag the playhead back to the beginning or click the “move to previous
marker” control.
 Move to previous or next button: Moves the playhead to the previous or next marker,
or to the start or end of the clip if no more markers are present.
 Fast backward and fast forward buttons: Allow you to play your clip in either direction at
twice the normal speed. Hold down a button to continue scanning in either direction.
Marker pop-up menu
Use the Marker pop-up menu to manage the clip’s markers. While you can use markers
with all settings, they actually only affect the output file when the setting uses the
MPEG-1, MPEG-2, or H.264 for HD DVD output file formats. See “Adding Markers to a
Clip” on page 220 for more information.
 Add/Remove marker: Actual state depends on whether the playhead is positioned on
a marker or not.
 When not positioned on a marker, says “Add marker.” Choosing “Add marker” places
a new marker on the timeline at the playhead’s current position.
 When positioned on a marker, says “Remove marker.” Choosing “Remove marker”
deletes the current marker.
Move to
previous marker.
Play/pause
Fast backward
Move to
next marker.
Fast forward
Playback Loop button