
2
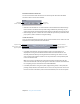
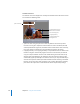


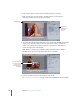
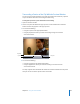

Table Of Contents
- Compressor User Manual
- Contents
- An Introduction to Compressor
- Getting Started Quickly
- The Basic Transcoding Workflow
- The Compressor Interface
- Importing Source Media Files
- Creating, Previewing, and Modifying Settings
- Creating Jobs and Submitting Batches
- Assigning Settings to Source Media Files
- Assigning Destinations to Source Media Files
- Submitting a Batch
- About the History Drawer
- Resubmitting a Batch
- Saving and Opening a Batch File
- Submitting a Final Cut Pro Project for Transcoding
- Resubmitting a Final Cut Pro Project
- Transcoding Different Clips From One Source Media File
- Creating Dolby Digital Professional Output Files
- Creating H.264 DVD Output Files
- Creating MPEG-1 Output Files
- Creating MPEG-2 Output Files
- Creating MPEG-4 Output Files
- Creating QuickTime Movie Output Files
- Creating QuickTime Export Component, AIFF, and TIFF Files
- Adding Filters to a Setting
- Adding Frame Controls, Geometry, and Actions to a Setting
- Using the Preview Window
- Creating and Changing Destinations
- Using Droplets
- Customer Support
- Command-Line Usage
- Index

Chapter 16 Using the Preview Window 215
 Edit: Only available when the playhead is positioned on a marker. Choosing Edit
opens a dialog for naming the marker. Naming a marker makes it a chapter marker
that can be used in DVD Studio Pro.
 Show chapter markers: Controls whether chapter markers (those with names) are
shown in the timeline. A checkmark indicates they are shown.
 Show compression markers: Controls whether compression markers (those without
names) are shown in the timeline. A checkmark indicates they are shown.
 Show edit/cut markers: Controls whether markers automatically placed at each edit
point by another application, such as Final Cut Pro, are shown in the timeline. A
checkmark indicates they are shown.
Previewing a Clip
You can preview either a source media file clip or a clip with a setting assigned to it.
Source media files have no settings assigned to them; in the Batch Item pop-up menu,
they appear with a format icon—such as QuickTime—next to their names. (Clips with
settings don’t have any format icons next to their names, just the setting name.) The
kind of clip you choose determines which options you see in the Preview window.
To preview a source media file:
1 Open the Preview window.
Note: You can open your file into the Preview window in one step, by double-clicking
the source media file in the Batch table of the Batch window.
2 Do one of the following:
 Choose a source media file from the Batch Item pop-up menu (identified by its
format icon).
 Click the Batch Item selection buttons until the source media file appears in the
pop-up menu
 Select the source media file in the Batch table of the Batch window.
Only the Source View button is active (and the Output View button is dimmed). This is
because you selected a regular source media file with no setting assigned, so you can
only see the unadulterated clip—without the split screen divider or cropping bars.
Batch Item
pop-up menu