
2
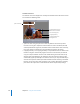


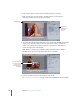

Table Of Contents
- Compressor User Manual
- Contents
- An Introduction to Compressor
- Getting Started Quickly
- The Basic Transcoding Workflow
- The Compressor Interface
- Importing Source Media Files
- Creating, Previewing, and Modifying Settings
- Creating Jobs and Submitting Batches
- Assigning Settings to Source Media Files
- Assigning Destinations to Source Media Files
- Submitting a Batch
- About the History Drawer
- Resubmitting a Batch
- Saving and Opening a Batch File
- Submitting a Final Cut Pro Project for Transcoding
- Resubmitting a Final Cut Pro Project
- Transcoding Different Clips From One Source Media File
- Creating Dolby Digital Professional Output Files
- Creating H.264 DVD Output Files
- Creating MPEG-1 Output Files
- Creating MPEG-2 Output Files
- Creating MPEG-4 Output Files
- Creating QuickTime Movie Output Files
- Creating QuickTime Export Component, AIFF, and TIFF Files
- Adding Filters to a Setting
- Adding Frame Controls, Geometry, and Actions to a Setting
- Using the Preview Window
- Creating and Changing Destinations
- Using Droplets
- Customer Support
- Command-Line Usage
- Index

216 Chapter 16 Using the Preview Window
3 Choose a Preview screen size from the Preview Scale pop-up menu, or drag the
Preview window handle to a size you like.
This does not affect the display frame size of the actual output media file. That can only
be set from the Geometry pane in the Inspector window.
4 Click the Play button to preview the selected source media file.
Source media files with markers already added, such as files from Final Cut Pro, will
show the markers in the timeline. You can manage the markers if needed. See “Adding
Markers to a Clip” on page 220 for more information.
To preview a clip with an assigned setting:
1 Open the Preview window.
Note: You can open the clip into the Preview window in one step, by double-clicking
the setting in the Batch table of the Batch window.
2 Do one of the following:
 Choose a setting from the Batch Item pop-up menu (clips with a setting have no
format icon next to their names).
 Click the Batch Item selection buttons until the clip with a setting appears in the
pop-up menu.
 Select the clip’s setting in the Batch table of the Batch window.
Both Source and Setting (Output) View buttons are active so you can switch between
these two views. Because you selected a clip with a setting, you can use the split screen
slider and cropping boundary in the Preview screen.
3 Click the Setting view button in the upper-right corner of the Preview window.
4 Choose a Preview screen size from the Preview Scale pop-up menu, or drag the
Preview window handle to a size you like.
This does not affect the display frame size of the actual output media file. That can only
be set from the Geometry pane in the Inspector window.
5 Drag the split screen slider left or right across the top of the screen to move the split
screen divider over more or less of the transcoded portion of the clip.