
2


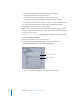

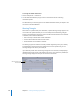
Table Of Contents
- Compressor User Manual
- Contents
- An Introduction to Compressor
- Getting Started Quickly
- The Basic Transcoding Workflow
- The Compressor Interface
- Importing Source Media Files
- Creating, Previewing, and Modifying Settings
- Creating Jobs and Submitting Batches
- Assigning Settings to Source Media Files
- Assigning Destinations to Source Media Files
- Submitting a Batch
- About the History Drawer
- Resubmitting a Batch
- Saving and Opening a Batch File
- Submitting a Final Cut Pro Project for Transcoding
- Resubmitting a Final Cut Pro Project
- Transcoding Different Clips From One Source Media File
- Creating Dolby Digital Professional Output Files
- Creating H.264 DVD Output Files
- Creating MPEG-1 Output Files
- Creating MPEG-2 Output Files
- Creating MPEG-4 Output Files
- Creating QuickTime Movie Output Files
- Creating QuickTime Export Component, AIFF, and TIFF Files
- Adding Filters to a Setting
- Adding Frame Controls, Geometry, and Actions to a Setting
- Using the Preview Window
- Creating and Changing Destinations
- Using Droplets
- Customer Support
- Command-Line Usage
- Index

17
223
17 Creating and Changing
Destinations
Compressor allows you to choose where to save your
transcoded files.
This chapter contains the following:
 About the Destinations Tab (p. 224)
 About the Destinations Inspector (p. 225)
 Creating a Destination (p. 226)
 Warning Triangles (p. 230)
 Deleting and Duplicating a Destination (p. 231)
 Creating Destinations for Use With DVD Studio Pro (p. 232)
Without a selected destination, the output file is saved to the same folder as the source
media file. This may be satisfactory for your needs, but if there are various remote
uploading servers, or if you just want a specific type of output file to end up in a
specific location, you must assign that destination.
If you have a volume open on your desktop, it is treated the same as a local destination
and allows you to save output media files directly, without the extra steps needed for
remote destinations, such as specifying the host name and entering the username and
password. When you use the remote option for your destination, you can save to any
folder under the User directory of that remote computer.
Once you have created all your necessary destinations, you won’t have to open the
Destinations tab of the Presets window again, because you can select all destinations
directly from the Batch window once they have been created.
Note: Make sure that your output files have access and appropriate privileges to any
remote destination you assign. An iDisk volume cannot be used as a destination. If
you want to save the output media file to a mounted iDisk volume, first save the file
to another destination, and then drag it to the mounted iDisk volume after it has
been transcoded.