
2


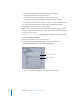

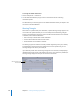
Table Of Contents
- Compressor User Manual
- Contents
- An Introduction to Compressor
- Getting Started Quickly
- The Basic Transcoding Workflow
- The Compressor Interface
- Importing Source Media Files
- Creating, Previewing, and Modifying Settings
- Creating Jobs and Submitting Batches
- Assigning Settings to Source Media Files
- Assigning Destinations to Source Media Files
- Submitting a Batch
- About the History Drawer
- Resubmitting a Batch
- Saving and Opening a Batch File
- Submitting a Final Cut Pro Project for Transcoding
- Resubmitting a Final Cut Pro Project
- Transcoding Different Clips From One Source Media File
- Creating Dolby Digital Professional Output Files
- Creating H.264 DVD Output Files
- Creating MPEG-1 Output Files
- Creating MPEG-2 Output Files
- Creating MPEG-4 Output Files
- Creating QuickTime Movie Output Files
- Creating QuickTime Export Component, AIFF, and TIFF Files
- Adding Filters to a Setting
- Adding Frame Controls, Geometry, and Actions to a Setting
- Using the Preview Window
- Creating and Changing Destinations
- Using Droplets
- Customer Support
- Command-Line Usage
- Index

226 Chapter 17 Creating and Changing Destinations
Creating a Destination
You use the Destinations tab in the Presets window with the Inspector window to
create and assign a destination and to add file identifiers to your output file. If you
want to save your output media files to a remote destination, you need to enter
information into the Remote dialog so that Compressor can successfully access the
remote server.
You can create the following destinations:
 Local: Any directory on your own computer
 Open Volume: Any shared volume open on your desktop
 Remote: A directory in the default location of an FTP server, if you have suitable
access privileges and permissions
Note: By default, the output media file destination is the same folder from which the
source media files originated. You can change the default destination to any other
Destination preset. Choose Compressor > Preferences and use the Default Destination
pop-menu to choose from the list of Destination presets.
To create a local or open volume destination:
1 Open the Destinations tab of the Presets window.
2 Click the Add ( + ) button and choose Local from the pop-up menu.
The Destination Selection dialog appears.
Choose Local from
the pop-up menu