
2


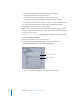

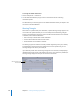
Table Of Contents
- Compressor User Manual
- Contents
- An Introduction to Compressor
- Getting Started Quickly
- The Basic Transcoding Workflow
- The Compressor Interface
- Importing Source Media Files
- Creating, Previewing, and Modifying Settings
- Creating Jobs and Submitting Batches
- Assigning Settings to Source Media Files
- Assigning Destinations to Source Media Files
- Submitting a Batch
- About the History Drawer
- Resubmitting a Batch
- Saving and Opening a Batch File
- Submitting a Final Cut Pro Project for Transcoding
- Resubmitting a Final Cut Pro Project
- Transcoding Different Clips From One Source Media File
- Creating Dolby Digital Professional Output Files
- Creating H.264 DVD Output Files
- Creating MPEG-1 Output Files
- Creating MPEG-2 Output Files
- Creating MPEG-4 Output Files
- Creating QuickTime Movie Output Files
- Creating QuickTime Export Component, AIFF, and TIFF Files
- Adding Filters to a Setting
- Adding Frame Controls, Geometry, and Actions to a Setting
- Using the Preview Window
- Creating and Changing Destinations
- Using Droplets
- Customer Support
- Command-Line Usage
- Index

228 Chapter 17 Creating and Changing Destinations
You can also manually edit this field by doing any of the following:
 Drag the file identifiers to rearrange their order.
 Click on either side of the file identifiers to type additional text.
 Use the Delete key on your keyboard to remove any of the file identifiers.
The Sample From Defined Template field in the Inspector window shows a sample of
the output filename with its chosen file identifiers. The default file identifier
combination is “Source Media Name–Setting Name.”
Note: Avoid customizing your filename templates with anything beginning with a
period ( . ). The resulting file will only be visible via the command line and not visible
using the Mac OS X Finder.
See “About the Destinations Tab” on page 224 for more details about these settings.
To create a remote destination:
1 Open the Destinations tab in the Presets window.
2 Click the Add ( + ) button and choose Remote from the pop-up menu.
The Remote dialog appears. It contains the following fields:
 Name: Use this field to modify the name of the destination preset.
Host Name is required.
File Path is required.