
2

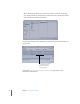


Table Of Contents
- Compressor User Manual
- Contents
- An Introduction to Compressor
- Getting Started Quickly
- The Basic Transcoding Workflow
- The Compressor Interface
- Importing Source Media Files
- Creating, Previewing, and Modifying Settings
- Creating Jobs and Submitting Batches
- Assigning Settings to Source Media Files
- Assigning Destinations to Source Media Files
- Submitting a Batch
- About the History Drawer
- Resubmitting a Batch
- Saving and Opening a Batch File
- Submitting a Final Cut Pro Project for Transcoding
- Resubmitting a Final Cut Pro Project
- Transcoding Different Clips From One Source Media File
- Creating Dolby Digital Professional Output Files
- Creating H.264 DVD Output Files
- Creating MPEG-1 Output Files
- Creating MPEG-2 Output Files
- Creating MPEG-4 Output Files
- Creating QuickTime Movie Output Files
- Creating QuickTime Export Component, AIFF, and TIFF Files
- Adding Filters to a Setting
- Adding Frame Controls, Geometry, and Actions to a Setting
- Using the Preview Window
- Creating and Changing Destinations
- Using Droplets
- Customer Support
- Command-Line Usage
- Index

Chapter 1 Getting Started Quickly 23
Step 3: Submit the batch
Once each media file has at least one setting and destination associated with it, it
becomes a job, and your batch is ready to be submitted. Click the Submit button to
submit your batch.
A progress bar appears, indicating that the batch is being submitted, and this batch
now disappears from the Batch table.
After submitting a batch, Batch Monitor automatically opens so you can monitor the
transcoding progress of your batch.
Note: If you haven’t recently submitted a batch, you can always open Batch Monitor by
double-clicking the Batch Monitor in the Utilities folder inside the Applications folder.
See Chapter 6, “Creating Jobs and Submitting Batches,” on page 77, for more
information on jobs and batches.