Compressor User Guide
KKApple Inc. Copyright © 2014 Apple Inc. All rights reserved. Your rights to the software are governed by the accompanying software license agreement. The owner or authorized user of a valid copy of Compressor software may reproduce this publication for the purpose of learning to use such software. No part of this publication may be reproduced or transmitted for commercial purposes, such as selling copies of this publication or for providing paid for support services.
Contents 5 5 Chapter 1: What’s new in Compressor? 6 6 7 8 Chapter 2: Compressor basics 11 11 12 16 17 18 Chapter 3: Simple transcoding 19 19 19 19 21 23 24 50 50 50 51 53 53 53 54 57 60 Chapter 4: Advanced adjustments 61 61 61 63 63 65 67 67 68 Chapter 5: Advanced tasks What’s new in Compressor 4.
69 69 69 70 71 72 74 74 75 77 78 79 80 83 84 84 85 86 Modify frame rate Frame rate options overview Retime video and audio Modify timing and frame rate About deinterlacing About reverse telecine Add video and audio effects Add and remove effects Video effects Audio effects Add metadata Set a poster frame Add markers Transcode time ranges Common transcoding workflows Example: Create a file with burned-in timecode Example: Convert NTSC or PAL footage to 24p HD Example: Create daily review copies of footage
What’s new in Compressor? 1 What’s new in Compressor 4.1? Compressor 4.1 introduces a new design and various new features, detailed below. New interface The interface in Compressor 4.
Compressor basics 2 What is Compressor? Compressor is an application that transcodes media files into a variety of formats. You can use Compressor to create files for many uses, including: •• Viewing on Apple devices such as Apple TV, iPad, iPhone, iPod, or iTunes using high-definition (HD) or standard-definition (SD) formats (including H.264) •• Publishing to video-sharing websites including Facebook, Vimeo, and YouTube using QuickTime •• Burning to DVD or Blu-ray disc using H.
Compressor workflow The basic process of transcoding files in Compressor is described below. Import your media into Compressor The first step in the transcoding process is to add one or more media source files to Compressor. You can add media files from your computer or a connected hard disk. Each media source file in Compressor is called a job. Each transcoding session, containing one or more jobs, is called a batch.
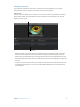
Interface overview The Compressor window has three views: Current, Active, and Completed. You can switch between these views by clicking a view button at the top of the window. Current view Current view is the default view in Compressor. Current view is where you prepare transcoding jobs and then submit your batch.
You can expand the Current view to display additional areas: Settings/Locations pane Inspector pane •• Settings and Locations pane: Click the Settings & Locations button at the top-left corner of the Compressor window to expand this area, and then click Settings or Locations to display the individual panes. The Settings pane provides quick access to all the built-in destinations and settings, as well as to any custom destinations or settings that you created.
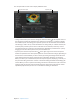
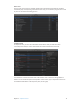
Active view In Active view, the Compressor window displays status information about batches (and their constituent jobs) currently being transcoded. In this view, you can monitor progress bars as well as pause or cancel the transcoding process. Completed view In Completed view, you can view information about batches and jobs that have been successfully transcoded, as well as information about items that failed to transcode. A list of batches is shown on the left side of the window.
3 Simple transcoding Simple transcoding overview When you add a source file to Compressor and apply output instructions (all done in Current view), you create a transcoding job. You can add more jobs to the batch, and then submit the batch for transcoding. Each job in a batch has has several parts: •• Source file: The media file that you want to transcode. •• Setting: The transcoding instructions that specify how the file will be processed.
Transcode files The easiest way to transcode media files in Compressor is to use or one or more built-in settings or to use a built-in destination (settings that are combined with a post-transcoding job action, such as uploading to Facebook or burning a Blu-ray disc). Set up the first transcoding job in a batch 1 Click the Add File button in the batch area. Batch area Add File button 2 In the file window that appears, select a media file and then click Add.
Add additional jobs to a batch If you want to, you can add additional source files to a batch. 1 Choose Add File from the Add pop-up menu under the batch area. You can also add a set of image sequence files or surround sound files. For more information, see Work with image sequence files on page 61 and Import and modify surround sound files on page 63. Add pop-up menu 2 In the file window that appears, select one or more media files, and then click Add. Shift-click to select consecutive files.
6 To view the properties of a setting, select an output row, and then open the inspector by clicking the Inspector button in the upper-right corner of the Compressor window. Depending on the setting you’re viewing, general, video, and audio properties are displayed in the inspector. For information about modifying these properties, see View and modify setting properties on page 19. Add and remove job outputs You can add additional transcoding instructions to a job by adding one or more output rows.
Transcode a batch After you’ve configured the jobs in your batch using the tasks above, you can transcode the batch. mm Click the Start Batch button in the lower-right corner of the batch area and, if necessary, follow the instructions to complete the transcoding process. The Compressor window switches to Active view, where you can monitor the transcoding process. View information about completed jobs In Completed view, you can see how a file was transcoded.
Built-in settings Use the built-in settings, grouped by category in the Settings pane, to convert any file from its source format to other commonly used formats.
Built-in destinations Destinations, available in the Settings pane, combine one or more settings and a post-encode job action, which automates tasks such as emailing, copying, and moving transcoded files. Built-in destination Contains Use to Add to iTunes Library Setting: Create an Apple device-compatible H.264 file, and then automatically add the file to your iTunes library. •• Apple Devices HD (Best Quality) Job action: •• Create Blu-ray Add to iTunes Library Settings: •• •• Dolby Digital H.
Built-in locations Use the following built-in locations, available in the Locations pane, to specify the save location of a transcoded file. Built-in location Use to Desktop Save the transcoded file on the user’s desktop. Movies Save the transcoded file in the user’s Movies folder. Source Save the transcoded file in the same location as the source media file. You can also create a custom location, either by duplicating an existing location or by creating a new location.
Advanced adjustments 4 Advanced adjustments overview For basic transcoding jobs, you can use the built-in settings and destinations that come with Compressor. However, if you have complex or custom transcoding specifications, you can make adjustments to the built-in settings and destinations in a number of ways: •• For a custom transcoding job that you will use only once, apply a built-in setting or destination and then modify its properties in the inspector.
View a setting’s general, video, and audio properties 1 Select a setting by doing one of the following: •• For a setting that has not been applied, click a built-in setting in the Settings pane. (If the Settings pane is hidden, click the Settings & Locations button in the upper-left corner of the Compressor window, and then click Settings at the top of the pane.) •• For a setting that has already been applied to a source file, select the output row of a job in the batch area.
3 To view general, video, or audio properties of the selected setting, click General, Video, or Audio at the top of the inspector pane. Every setting has a General inspector that displays basic properties, including setting name, description, output extension, and so on. Video settings have a Video inspector and, if the transcoding format encodes audio, an Audio inspector. Audio settings have an Audio inspector, but no Video inspector.
Create a custom setting from scratch You can also create a custom setting without duplicating a built-in setting. Because it’s easy to accidentally introduce transcoding errors, this method is recommended for advanced users only. 1 In the Settings pane (press Shift-Command-1 if it’s hidden), choose New Setting from the Add pop-up menu . 2 In the dialog that appears, choose a transcoding format from the pop-up menu, enter a name and description for the setting, and then click OK.
About formats and settings Compressor provides a variety of transcoding formats to create files playable on a variety of media platforms—from Apple devices to Blu-ray discs to websites, and so on. Each of the built-in settings in the Settings pane uses a specific transcoding format compatible with the following industry-standard platforms. You can see which format a setting is based on by looking at the summary information at the top of the inspector. Setting name The setting is based on this format.
Setting properties Common Audio Formats The built-in AIFF File, CAF File, and WAVE File settings use the Common Audio Formats transcoding format. This format encodes AIFF (Audio Interchange File Format), CAF (Apple Core Audio Format), or WAVE (Waveform Audio File Format) files. You can also create custom settings that use the Common Audio Formats transcoding format. The properties of built-in and custom settings that use this transcoding format are located in the General inspector and Audio inspector.
Audio effects For a list of available audio effects and instructions on how to add an audio effect to a setting, see Add and remove effects on page 74. Dolby Digital The built-in Dolby Digital settings (in the Create Blu-ray and Create DVD destinations, as well as the built-in AC-3 and EC-3 audio settings) use the Dolby Digital transcoding format. This format encodes Dolby Digital (AC-3) and Dolby Digital Plus (EC-3) audio files that contain multiple audio channels, including 5.1 surround sound.
Audio properties •• Channel layout: Use the pop-up menu to manually set the type of audio channel layout. For more information about audio channel layouts, including the surround sound channel layout, see About audio channels on page 65. •• Sample rate: Use this pop-up menu to set the number of times per second that music waveforms (samples) are captured digitally. The higher the sample rate, the higher the audio quality and the larger the file size.
•• Lo/Ro center, Lo/Ro surround, Lt/Rt center, Lt/Rt surround (for surround sound output): Use these pop-up menus to set the decibel level at which the surround and center channels are downmixed. Properties are enabled or disabled based on the channel layout you choose. •• DRC line mode: Use this pop-up menu to set the dynamic range compression processing mode. The default setting, Film Standard, is recommended for all use cases.
General properties •• Name: Displays the name of the setting. •• Description: Displays the description of the setting. •• Extension: Displays the extension of the output file (.m4v). •• Allow job segmenting: If you’ve set up distributed processing, select this checkbox to have Compressor process the output file using your shared computer group. For more information, see Transcode batches with multiple computers on page 98.
•• Frame sync: Select the Automatic checkbox to have Compressor calculate the key frame interval rate. Note: When Frame sync is turned on, the value in the seconds field is zero (.0). However, the actual value is determined during the encoding process. If the checkbox is not selected, you can drag the slider or enter a value in the text field to set the key frame interval (number of frames) at which you want key frames created in your output file.
•• Adaptive details: Select this checkbox to use advanced image analysis to distinguish between noise and edge areas during output. •• Anti-aliasing level: Sets the softness level in the output image. Double-click the value and then manually enter a new value or drag the slider to the right to increase softness. This property improves the quality of conversions when you’re scaling media up. For example, when transcoding SD video to HD, anti-aliasing smooths jagged edges that might appear in the image.
General properties •• Name: Displays the name of the setting. •• Description: Displays the description of the setting. •• Extension: Displays the extension of the output file (.264). •• Allow job segmenting: Job segmenting is not available for this setting. •• Default location: Select an item from the pop-up menu to set the default save location for transcoded files. •• Stream Usage: Use the pop-up menu to set whether the output file is transcoded for Blu-ray Disc or AVCHD.
Cropping and padding Customize the final cropping, sizing, and aspect ratio using the Cropping & Padding properties. Cropping removes video content from an image. Padding scales the image to a smaller size while retaining the output image’s frame size. For more information about these properties, see Modify frame size overview on page 67. •• Cropping: This pop-up menu sets the dimension of the output image.
Image Sequence The built-in OpenEXR Image Sequence and TIFF Image Sequence settings use the Image Sequence transcoding format. This format encodes a variety of image sequence file types used in motion graphics, including TIFF, OpenEXR, JPEG, PNG, and more. You can also create custom settings that use the Image Sequence transcoding format. The properties of built-in and custom settings that use this transcoding format are located in the General inspector and Video inspector.
Retiming This section contains one property: •• Set duration to: Sets the processing algorithm used to adjust the frame rate during transcoding. Select one of the following options: •• [Percentage] of source: Modifies the output clip’s speed by a percentage of the source clip’s speed. Enter a value in the percentage field or choose a preset value from the adjacent pop-up menu (with a downward arrow). •• [Total duration]: Sets the duration of the clip.
Cropping and padding Customize the final cropping, sizing, and aspect ratio using the Cropping & Padding properties. Cropping removes video content from an image. Padding scales the image to a smaller size while retaining the output image’s frame size. For more information about these properties, see Modify frame size overview on page 67. •• Cropping: This pop-up menu sets the dimension of the output image.
MP3 The built-in MP3 File and MP3 for Audio Podcasting settings use the MP3 transcoding format. This format encodes MP3 files, which are often used for digital audio players. You can also create custom settings that use the MP3 transcoding format. The properties of built-in and custom settings that use this transcoding format are located in the General inspector and Audio inspector. These properties are described below.
•• Joint stereo: Select the checkbox to have one channel carry the information that’s identical on both channels, and another channel carry unique information. At bit rates of 160 kbps and below, this setting can improve the sound quality of your converted audio. •• Smart encoding adjustments: Select the checkbox to have Compressor analyze the source file and the setting’s encoding properties to maximize the quality of the output file.
•• •• Format: Use the pop-up menu to set the stream type for the output file. There are three options: •• Program Stream: This stream type contains only one MPEG-2 content channel and its associated audio. Program streams require an error-free delivery method and are primarily used for storage or processing within a computer. •• Elementary Stream: This stream type contains only one MPEG-2 content channel and no audio. When you select this option, you should also set the “Stream usage” property.
Video properties •• Frame size: Use the pop-up menu to set the frame size (resolution) for the output file. •• Pixel aspect ratio: Use the pop-up menu to set the pixel aspect ratio (the ratio between the image frame width and height). You can also modify the aspect ratio of the output file using cropping and padding properties. For more information, see Modify frame size overview on page 67.
•• GOP structure: This property is available only when the “Frame rate” property is set manually (does not use Automatic). Note: Automatically determined properties, including the “Frame rate” property mentioned above, are assigned by Compressor based on your source media file. Therefore, "Automatic” properties are strongly recommended.
Quality The following properties determine how the video will be resized, retimed, and otherwise adjusted when transcoded. •• •• Resize filter: This pop-up menu sets the resizing method. There are three options: •• Fast (Nearest Pixel): Provides the fastest processing time. •• Better (Linear Filter): Provides a medium trade-off between processing time and output quality. •• Best (Statistical Prediction): Provides the highest output quality, but takes longer.
Setting summary Displays the setting name and transcoding format, as well as an estimated output file size. When you add a setting to a job or change the setting’s properties, this summary automatically updates. General properties •• Name: Displays the name of the setting. •• Description: Displays the description of the setting. •• Extension: Displays the extension of the output file (.mp4 or .m4a).
Video properties •• Frame size: Use the pop-up menu to set the frame size (resolution) for the output file. •• Pixel aspect ratio: Use the pop-up menu to set the pixel aspect ratio (the ratio between the image frame width and height). You can also modify the aspect ratio of the output file using cropping and padding properties. For more information, see Modify frame size overview on page 67.
Cropping and padding Customize the final cropping, sizing, and aspect ratio using the Cropping & Padding properties. Cropping removes video content from an image. Padding scales the image to a smaller size while retaining the output image’s frame size. For more information about these properties, see Modify frame size overview on page 67. •• Cropping: This pop-up menu sets the dimension of the output image.
Video effects For a list of available video effects and instructions on how to add a video effect to a setting, see Add and remove effects on page 74. Audio properties •• Channel layout: Use the pop-up menu to set the audio channel layout. •• Sample rate: Use this pop-up menu to set the number of times per second that music waveforms (samples) are captured digitally. The higher the sample rate, the higher the audio quality and the larger the file size.
Video properties The properties in this section are set based on the file format assigned to the setting. You can change the file format in the General pane of the inspector; for more information, see the "Settings” property in the “General properties” section, above. •• Frame size: For settings that use the QuickTime Export Component format, this property is set to Automatic. •• Pixel aspect ratio: For settings that use the QuickTime Export Component format, this property is set to Square.
General properties •• Name: Displays the name of the setting. •• Description: Displays the description of the setting. •• Extension: Displays the extension of the output file (.mov). •• Allow job segmenting: If you’ve set up distributed processing, select this checkbox to have Compressor process the output file using your shared computer group. For more information, see Transcode batches with multiple computers on page 98.
•• Field order: Use the pop-up menu to set the output scanning method (either the field dominance or a conversion to progressive scanning). There are four options: •• Same as Source: Maintains the same scanning method used by the source media file. •• Progressive: Scans complete frames (not frames divided into interlaced fields). •• Top First: Scans interlaced fields, giving dominance (field order) to the top field.
•• Adaptive details: Select this checkbox to use advanced image analysis to distinguish between noise and edge areas during output. •• Anti-aliasing level: Sets the softness level in the output image. Double-click the value and then manually enter a new value or drag the slider to the right to increase softness. This property improves the quality of conversions when you’re scaling media up. For example, when transcoding SD video to HD, anti-aliasing smooths jagged edges that might appear in the image.
Work with destinations View and modify destination properties A destination consists of one or more settings combined with an automated job action that is performed after transcoding. For example, if you apply the built-in Publish to Facebook destination to a source file, Compressor uses the setting to create a QuickTime movie file optimized for viewing on the web and then runs a job action that publishes the file to your Facebook account.
Create a custom destination by duplicating an existing destination You can also duplicate an existing destination and then modify its setting properties or job action properties. 1 In the Settings pane, select the destination that you want to duplicate and then choose Duplicate from the Action pop-up menu at the bottom of the pane. The new destination appears in the Custom section of the Settings pane and is selected by default. The Destination inspector is displayed in the inspector pane.
Create a custom location 1 Click the Add button at the bottom of the Locations pane. If the Locations pane is hidden, press Shift-Command-2. 2 In the window that appears, select a location on your computer or on a connected device, and then click Choose. The new location appears in the Custom area of Locations pane and is selected by default. The Location inspector is displayed in the inspector pane.
3 To modify the filename format, do any the following: •• Move existing tokens: Drag tokens to reorder them. Or click a token to select it, press Command-X to cut the token, click to select a new location in the field, and then press Command-V to paste the token in the new location. •• Add a token: Click a location in the field to specify where you want to place a new token, and then then choose a token from the pop-up menu.
Add metadata to a job mm You can add metadata to a standard, image sequence, or surround sound job in the form of job annotations and closed-caption files. For instructions, see Add metadata on page 78. Delete a job mm Click a job in the batch area to select it, and then press Delete. Job properties Standard media job properties The properties of a job containing a standard media file are described below. The job’s properties are displayed in the Job inspector.
Image sequence job properties The properties of a job containing an image sequence media file are described below. The job’s properties are displayed in the Job inspector. Note: To learn how to import a set of image sequence files, see Work with image sequence files on page 61. Job summary Displays the name, location, file information, and the duration of the source file. Timing Provides the timecode for the Start point, In point, and duration of the image sequence output file.
Surround sound job properties The properties of a job containing an image sequence media file are described below. The job’s properties are displayed in the Job inspector. Note: To learn how to import a set of surround sound files, see Import and modify surround sound files on page 63. Job summary Displays the name, location, video and audio encoding information, and the duration of the source file. Timing Provides the timecode for the Start point, In point, and duration of the source file.
Work with job actions Add and modify job actions A job action is an automated action performed on a media file after it’s transcoded—such as burning a DVD, uploading to Vimeo or YouTube, and so on. If a job contains a job action, a gear icon is shown in the top-right corner of the job. This job uses the Create DVD job action. You can add a job action to a job, as well as modify a job action’s properties, in the Job inspector.
Job action properties Compressor comes with a set of job actions that are used in destinations as well as in jobs. The job action assigned to a destination or job performs an automated action after transcoding— usually copying the transcoded file to a new location. For more information about adding or modifying a job action in a job, see View and modify job properties on page 53. For information about choosing a job action that’s part of a destination, see View and modify destination properties on page 50.
•• Disc template: This pop-up menu sets the menu template. •• Title: Type the disc name in the text field. •• When disc loads: This pop-up menu sets what happens when you play the disc: Show Menu or Play Movie. •• Use chapter marker text as subtitle: Select this checkbox to include chapter marker text as subtitles on the output disc. For more information about chapter markers, see Add markers on page 80. •• Background: Click the Add button to select a graphic for the disc’s background.
Web publishing job actions The Publish to CNN iReport, Publish to Facebook, Publish to Tudou, Publish to Vimeo, Publish to YouTube, and Publish to Youku job actions include the following properties: Different fields are displayed based on the selected video-sharing service. •• Category: Choose a category for the published file from the pop-up menu. •• Copyright: Choose an item from the pop-up menu to set copyright information associated with the file being published.
Advanced tasks 5 Advanced tasks overview You can customize your workflow by making specific adjustments to applied settings.
3 To view additional information about the job in the Job inspector, select the job in the batch area. The Job inspector appears on the right side of the Compressor window. (If the inspector pane is hidden, click the Inspector button in the upper-right corner of the Compressor window.) The Job Inspector displays information about the image sequence source file, including the location of the files, size and frame information, and the duration of the sequence.
Work with surround sound files Import and modify surround sound files There are two methods you can use to add audio files to a batch to create a surround sound job: •• Manually assign audio files to surround sound channels. •• Append audio filenames with channel identifier codes and have Compressor automatically map the filenames to the correct surround sound channels.
The Job inspector appears on the right side of the Compressor window. (If the inspector pane is hidden, click the Inspector button in the upper-right corner of the Compressor window.) Create a surround sound source file using channel identifier codes You can add channel identifier codes to the filenames of surround sound files in the Finder and then add the files in Compressor.
Modify a surround sound source file 1 In the batch area, select a job that contains a surround sound source file. 2 In the Surround Sound Properties area of the Job inspector, do either of the following: •• To assign a different file to a channel: Click the channel’s icon, select a different file, and click Open. •• To remove a file from a channel: Click the Remove button .
The channel codes describe the location of the channel: •• L: Left front channel •• R: Right front channel •• C: Center front channel •• Ls: Left surround channel •• Rs: Right surround channel •• Cs: Center surround channel •• LFE: Low-frequency effects channel (subwoofer, LFE) Note: It’s important to understand that Compressor cannot convert stereo audio files into 5.1 surround sound channels. If you want to output a 5.
Modify frame size Modify frame size overview Although many of the built-in settings in Compressor contain properties that set the frame size and aspect ratio of your output video file, you can customize the final frame dimensions using the cropping and padding properties in the Video inspector. Cropping removes video content from an image. If the output file has a different aspect ratio than the output frame size, black borders appear along the top and bottom or left and right sides of the transcoded file.
Crop or pad the video frame There are multiple ways you can customize the frame size of a source clip during transcoding. The cropping and padding controls allow you a great degree of flexibility and versatility. Remove part of the source image To remove part of the original source image, use the cropping controls in the Video inspector. Depending on the “Frame size” setting (in the Video Properties section of the Video inspector), cropping may or may not reveal black borders around the edges of your clips.
Force the source image to a different aspect ratio 1 Do one of the following: •• In the batch area, click an output row to select a setting that’s been applied to a job. With this method, the modifications you make will be used for outputting only that job. •• In the Settings pane, select a custom setting from the Custom group. (If the Settings pane is hidden, press Shift-Command-1.) With this method, the modifications you make will be saved to the custom setting for future use.
If the source media file contains audio, retiming modifies the audio speed as well, thereby keeping audio and video in sync. Compressor also automatically corrects the pitch so the audio does not sound artificially high or low. Important: If you modify retiming properties in a setting that uses the QuickTime Movie format and choose “Copy audio tracks from source” in the Audio inspector, the audio speed is not changed. Consequently, audio in the output file will not maintain sync with the video.
Note: Frame rate conversion can have a subtle or dramatic effect depending on how big a difference there is between the original and new frame rates, and also depending on the specific nature of the footage being converted. Footage with a lot of movement yields a much more visible change than footage with little movement in the frame.
About reverse telecine Telecine is the process of converting motion picture film to the NTSC video format used in broadcast television. The most common telecine approach to converting film’s standard 24 fps frame rate to NTSC video’s 29.97 fps frame rate is to perform a 3:2 pulldown (also known as a 2:3:2:3 pulldown). If you alternate recording two fields of one film frame and then three fields of the next, the 24 frames in 1 second of film end up filling the 30 frames in 1 second of video.
When using the reverse telecine feature in Compressor, consider these issues: •• Because of the unpredictable nature of the processing when reversing the telecine, segmented encoding does not work as efficiently as it does when reverse telecine is not being used. •• If you pause the transcoding process, the transcode must start from the beginning when you restart it. When film is telecined to NTSC video, it has a constant cadence. This means that the 3:2 pattern is consistent and uninterrupted.
Add video and audio effects Add and remove effects Compressor provides a variety of video and audio effects that you can use to improve the quality of the video and audio in the transcoded file. Video effects modify specific visual aspects of your source media, such as brightness and contrast, color, noise levels, and interlacing. Audio effects modify sound aspects in your source media, such as dynamic range, peaking, and equalizer effects.
Turn an effect off or on After adding an effect to a setting, you can turn its properties off or on. This can be useful when previewing an effect. mm Click the blue activation checkbox next to the effect properties. When the checkbox is blue, the effect is turned on. When the checkbox is black, the effect is turned off.
•• Noise Removal: Reduces random flecks of noise in the video file, including noise introduced by codecs. This effect allows you to blur areas of low contrast while leaving high-contrast edges sharp, creating results that are imperceptible to the human eye but that improve the final compression of the transcoded file. The effect’s properties include: •• Apply to: This pop-up menu sets the channels from which noise is filtered.
•• Watermark: Superimposes a still image or a movie file onto the video. This effect contains the following properties: •• Position: Choose a position for the watermark from the pop-up menu, such as Center, Lower Left, Lower Left–Title Safe, and so on. •• Scale by: Drag the slider to set the watermark image’s scaling between 1 (actual size) and 10 (10 times the actual size). (You can also double-click the value and type a new value.
•• •• •• Dynamic Range: Controls a clip’s audio levels by enhancing the quieter parts and lowering the louder parts. This is also referred to as audio level compression. The Dynamic Range effect contains the following properties: •• Soften above: Drag the slider to set the level at which audio is reduced (softened) to the level set by the “Master gain” control (described below). (You can also double-click the value and type a new value.
Associate a closed caption file with a source file Compressor can include a closed caption file (using the Scenarist closed caption format file) when encoding files with the following formats: •• QuickTime files: Compressor adds the closed caption file as a closed caption track to the QuickTime output file. You can view the closed captions using QuickTime Player (version 7.2 or later).
3 In the preview area, choose Set Poster Frame from the Marker pop-up menu . A poster frame marker appears in the timeline. Go to the poster frame mm In the preview area, choose Go to Poster Frame from the Marker pop-up menu Remove the poster frame mm In the preview area, choose Clear Poster Frame from the Marker pop-up menu . .
Markers can be output when using settings based on the following formats: •• H.264 for Apple Devices (For more information, see H.264 for Apple Devices on page 27.) •• MPEG-2 (For more information, see MPEG-2 on page 37.) •• MPEG-4, when configured for audio podcasting (For more information, see MPEG-4 on page 41.) •• QuickTime Movie (For more information, see QuickTime Movie on page 46.
4 Enter a web address in the URL field. When viewing the transcoded file, you can click the URL to open a web browser and view a website. 5 Select an image to be displayed at the marker point by choosing an option from the Image pop-up menu: •• Frame: Uses the frame on which the marker is placed as the display image. To use a different frame in the source file, enter a different timecode value in the viewer that appears at the bottom of the Marker inspector.
Remove markers 1 Select a job in the batch area and then select a marker in the preview area. You can also select markers by clicking the Next button preview area. or Previous button in the 2 Do one of the following: •• Remove all markers in the source file: Choose Remove All Markers from the Marker pop-up menu •• Remove one marker: Select a marker by clicking it or clicking the Next button or Previous button in the preview area. Then choose Remove Marker from the Marker pop-up menu (or press M).
3 Duplicate the job by doing the following: a Control-click the job you used in step 1, and then choose Edit > Copy from the shortcut menu. b Select an empty part of the batch area to deselect the job you just copied, then Control-click the batch area and choose Edit > Paste from the shortcut menu. The duplicate job is pasted into the batch area. 4 Designate a different portion of the source file to be transcoded by following the instructions in steps 1 and 2.
5 Click the Change button in the “QuickTime settings” property, and then make the following changes in the Standard Video Compression Settings window: a Choose H.264 from the Compression Type pop-up menu. b In the Motion section, set the Key Frames setting to Automatic. c In the Data Rate section, click “Restrict to” and enter 1000 kbits/sec in text field. Note: If you’re familiar with customizing compression settings, you can modify the setting’s properties in this window to your liking.
3 In the inspector pane, click Video to switch to the Video inspector. 4 In the Video Properties area, set the following values: •• Frame size: 1920 x 1080 •• Pixel aspect ratio: Square •• Frame rate: 23.976 •• Field order: Progressive 5 In the Cropping & Padding area, choose Preserve Source Aspect Ratio from the Padding pop-up menu.
3 Click Locations to open the Locations pane, and then click the Add button . 4 In the window that appears, select the folder where you want the video files to be saved, and then click Choose. Tip: To avoid unnecessary copying or duplicating of files, select the folder directly on the server where the videos can be accessed by the intended recipients as soon as transcoding is complete. The new location is added to the Custom section of the Locations pane.
Create dailies to be hosted on a third-party website Some productions may prefer to use a public video-sharing service like YouTube, Vimeo, or others to host their dailies. The built-in destinations in Compressor are designed to automatically upload to some of these sites. However, other sites require creating a custom destination. This example uses a popular Chinese video-sharing service called Youku. The steps are nearly identical for other video-sharing services.
Work smarter 6 Work smarter overview This chapter covers information and techniques that will help you work more efficiently in Compressor, including how to: •• Customize application preferences •• Use keyboard shortcuts •• Create and use droplets—standalone applications that let you transcode media files in the Finder, by dragging and dropping •• Use Compressor with Final Cut Pro X and Motion •• Use distributed processing to transcode files with a network of shared computers •• Enable one or
My Computer Use the controls in the My Computer pane to allow other computers to use your computer to process batches: •• Allow other computers to process batches on my computer: Click the switch to On to make your computer available to other computers for distributed processing. Switching this on automatically enables the “When sharing my computer” controls in the Advanced pane. For more information, see Advanced on page 91.
Advanced Use the controls in the Advanced pane to adjust additional distributed processing settings. These advanced controls are intended for network administrators and other users with networking experience. For more information about distributed processing, see Transcode batches with multiple computers on page 98. •• Enable additional Compressor instances: This property activates additional instances of the Compressor application, which can potentially speed transcoding.
Keyboard shortcuts Built-in keyboard shortcuts You can use keyboard shortcuts to quickly accomplish many tasks in Compressor. To use a keyboard shortcut, press all the keys in the shortcut at the same time. Shortcuts for common commands are listed in the table below.
Customize keyboard shortcuts View keyboard shortcuts in the Command Editor Compressor provides a wide variety of menu commands and keyboard shortcuts that let you control almost every aspect of your transcoding workflow. You can use the Command Editor to modify existing shortcuts, create new shortcuts, and save multiple sets of keyboard shortcuts that you can export for others to use. You can also import a set of shortcuts that someone else created.
As you type, commands that match the search term appear in Command List at the bottom of the Command Editor. Tip: To show the keys that correspond with the items in the Command List, click the Keyboard Highlight button to the left of the search field. Modify keyboard shortcuts in the Command Editor You can quickly and easily customize keyboard shortcuts in the Command Editor.
Import a command set 1 Choose Compressor > Commands > Import. 2 In the window that appears, navigate to the location where you’ve stored a command set file, select it, and click Open. If you’re already using a command set with the same name, a window appears and prompts you to rename the command set. The new command set is added to the Commands submenu of the Compressor menu and to the pop-up menu in the Command Editor.
Transcode files using a droplet 1 In the Finder, drag one or more media files onto the droplet. When you release the mouse button, the Droplet window opens. 2 In the Droplet window, do either or both of the following: •• Choose a new save location from the Location pop-up menu. •• Specify a computer or group of computers from the Process On pop-up menu. 3 Click Start Batch. The transcoded file appears in the location you specified.
Create additional instances of Compressor You can increase the processing power of a single computer, and thus reduce the time it takes to process batches, by enabling one or more additional instances of the Compressor application. Enabling additional instances of Compressor does not install multiple copies; instead, it creates additional services that can be accessed by Compressor. The number of available Compressor instances is determined by your computer’s cores and memory.
Transcode Final Cut Pro and Motion projects using Compressor If you have Final Cut Pro X 10.1 or later or Motion 5.1 or later installed on the same computer as Compressor 4.1 or later, you can send sequences or clips from Final Cut Pro or Motion directly to Compressor for transcoding. Transcode a Final Cut Pro or Motion project using Compressor Do one of the following: mm Send a project from Final Cut Pro to Compressor: Select the project and choose File > Send to Compressor.
Create a group of shared computers You can create a group of shared computers to use to transcode your batches. 1 Choose Compressor > Preferences (or press Command-Comma). 2 Select Shared Computers. 3 At the bottom of the list of shared computers (on the left), click the Add button . A new “Untitled” group is added to the list. 4 Double-click the “Untitled” group to select it, and type a new name for the group.
View the progress or history of a batch that was transcoded by a group of shared computers After submitting a batch to be transcoded by a group of shared computers, you can find information about the transcoding status. mm Open any of the following views: •• Active view: After you submit a batch, the Compressor window automatically switches to Active view to show the progress of the transcode. •• Completed view: Click the Completed button at the top of the Compressor window.
Manually configure SMB file sharing Important: If you’ve already set up your own file sharing system, you can skip this task and go to the next one. 1 In Mac OS X, choose Apple menu > System Preferences. 2 Click Sharing. 3 In the Sharing preferences pane, select the File Sharing checkbox on the left to turn on file sharing. You can confirm that SMB sharing is on by clicking the Options button and verifying that the “Share files and folders using SMB” checkbox is selected.
Compressor [-resetBackgroundProcessing [cancelJobs]] [-sharing ] [[-requiresPassword ] | [-noPassword]] [-instances ] [-networkInterface ] [-portRange ] These three arguments are the minimum required to submit a batch: Compressor ‑jobpath ‑settingpath ‑locationpath Command options This table shows the most used command options for submitting jobs: Submission command option Description -computergroup Specifies the name
What this command does: •• Identifies where Compressor is located •• Assigns the batch name “My First Batch” (The quotation marks are used because of the spaces.) •• Finds the file “MySource.mov” for the job at ~/Movies •• Uses the “Apple Devices HD (Custom)” setting at ~/Library/Application\ Support/Compressor/ Settings (The “\” character is used to retain the space in “Application Support.”) •• Writes the output file, “MyOutput.
Glossary AAC (Advanced Audio Coding) Also called MPEG-4 Audio. A standard way of compressing and encoding digital audio. AAC-encoded files rival the quality of audio CDs and generally sound as good as or better than MP3 files encoded at the same or even a higher bit rate. AC-3 (Audio Codec 3, Advanced Codec 3, Acoustic Coder 3) A Dolby Digital compressed audio format often used for encoding surround sound. AIFF (Audio Interchange File Format) A cross-platform audio file format developed by Apple.
•• Apple ProRes 422 HQ: A higher-data-rate version of Apple ProRes 422 that preserves visual quality at the same high level as Apple ProRes 4444, but for 4:2:2 image sources. With widespread adoption across the video post-production industry, Apple ProRes 422 HQ offers visually lossless preservation of the highest-quality professional HD video that a singlelink HD-SDI signal can carry.
Destination In Compressor, a group of one or more transcode settings plus a post-transcoding action. If you use a destination to transcode a file, one or more new files are created to the setting’s specifications, and then an action is automatically performed on the transcoded file. For example, the Facebook destination outputs the source file using the HD 720p QuickTime setting, creating a file optimized for viewing on the web and on mobile devices such as iPad and iPhone.
Markers In Compressor, markers flag a specific location in a source file with editing notes or other descriptive information. Compressor can create the following types of markers: •• Chapter markers: These orange markers allow easy access to index points throughout a DVD, QuickTime movie, or video podcast. QuickTime Player can interpret any text track containing time stamps as a chapter track. Chapter markers can also have artwork and a URL assigned to them that appear when a podcast is played.
Setting In Compressor, a group of properties that are used to transcode a source media file. Each setting contains the following properties (which you can modify in the Inspector pane): •• A transcoding format that converts your source media file. Choose one of the following formats based on the intended playback method: AIFF, Dolby Digital Professional, DV Stream, H.