Compressor User Guide
Contents Compressor User Guide What’s new 4 What’s new in Compressor 4.5.3 4 What’s new in Compressor 4.5 5 What’s new in Compressor 4.4.7 5 What’s new in Compressor 4.4.5 6 What’s new in Compressor 4.4.4 6 What’s new in Compressor 4.4.2 7 What’s new in Compressor 4.4.1 7 What’s new in Compressor 4.
Compressor User Guide Advanced tasks 94 Import an image sequence in Compressor 94 Work with surround sound files 96 Work with 360-degree video 100 Work with captions 104 Create iTunes Store packages 114 Create IMF packages 126 Modify frame size 130 Modify playback speed 135 View and modify audio tracks in Compressor 139 Add video and audio effects 140 Work with metadata annotations in Compressor 145 Add descriptive audio tracks in Compressor 147 Set a poster frame in Compressor 1
What’s new What’s new in Compressor 4.5.3 Compressor 4.5.3 introduces new features and enhancements, detailed below. System requirements The recommended system requirement for Compressor 4.5.3 is macOS 11 Big Sur. The minimum system requirement is macOS 10.15.6. For more information, go to the Final Cut Pro Tech Specs webpage, then click Compressor at the top of the page. Vertical and square video Compressor can transcode video to and from all aspect ratios. See Modify a frame size in Compressor.
What’s new in Compressor 4.5 Compressor 4.5 introduces new features and enhancements, detailed below. System requirements The recommended system requirement for Compressor 4.5 is macOS Big Sur. The minimum system requirement is macOS 10.15.6. For more information, go to Final Cut Pro tech specs, then click Compressor at the top of the page. Apple silicon Compressor now runs natively on Apple silicon and Intel-based Mac computers.
What’s new in Compressor 4.4.5 Compressor 4.4.5 introduces the following new features: Metal-based processing engine Compressor 4.4.5 includes a new processing engine that improves playback and accelerates rendering, compositing, and exporting. Optimized for Mac Pro Compressor 4.4.5 is optimized for Mac Pro, using up to 28 CPU cores, multiple GPUs, and an Afterburner card. Afterburner enhances decode performance for ProRes files. HDR in preview window Optimized for Pro Display XDR Compressor 4.4.
What’s new in Compressor 4.4.2 Compressor 4.4.2 introduces the following new features: 64-bit architecture Compressor is now a 64-bit application, which supports larger frame sizes and takes advantage of all system memory. Closed-caption enhancements Compressor now supports SRT subtitles. See Intro to supporting captions in Compressor.
High-dynamic-range video • Deliver high-dynamic-range (HDR) video in HDR10 and hybrid log-gamma (HLG) formats. See Intro to wide color gamut and HDR in Compressor. • Create HDR packages for submission to the iTunes Store in Dolby Vision and HDR10 formats. See Submit HDR content to the iTunes Store in Compressor. HEVC encoding Encode with the new HEVC format (High-Efficiency Video Coding, also known as H.265) for high-quality video with smaller file sizes.
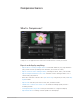
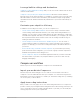
Compressor basics What is Compressor? Compressor is an application that transcodes media files into a variety of formats. Export and display anything Compressor User Guide • Export video for viewing on Apple devices in standard-definition (SD), high-definition (HD), and 4K formats (including H.264 and HEVC, also known as H.265). • Export content for video-sharing websites, including Facebook, Vimeo, and YouTube.
Leverage built-in settings and destinations Compressor comes with built-in settings that you can use to transcode files into the most common media formats. Compressor also provides preconfigured destinations that transcode files and then perform actions on the transcoded files.
Compressor also provides a number of preconfigured destinations, which combine settings and a post-transcoding action, such as burning a Blu-ray disc. Choose an output location Designate a location on your computer or on a connected storage device where you want to save the transcoded media file. You can choose any of several preconfigured locations, including your computer desktop, your Movies folder, or the source folder of the original media. You can also choose a custom location.
• Preview area: A viewer with playback controls that shows how your media file will look and sound after transcoding. In this area you can also add metadata and markers to be included in the transcoded file. • Batch area: A list under the preview area that displays the transcoding batches you add to Compressor. A batch is one or more transcoding jobs. A job is a source file to which you apply transcoding instructions.
Active view In Active view, the Compressor window displays status information about batches (and their constituent jobs) currently being transcoded. In this view, you can monitor progress bars as well as pause or cancel the transcoding process. Completed view In Completed view in Compressor, you can view information about batches and jobs that have been successfully transcoded, as well as information about items that failed to transcode. A list of batches is shown on the left side of the window.
Errors & Warnings window The Errors & Warnings window in Compressor lists any errors or warnings that may prevent a batch from being properly processed. If you see an alert icon ( or ) in the batch area, there are one or more problems with the batch. Click the alert icon (or press Command-E) to open the Errors & Warnings window. In the Errors & Warnings window, click an alert message to highlight the affected job in the batch area.
Simple transcoding Intro to simple transcoding in Compressor When you add a source file to Compressor and apply output instructions (all done in Current view), you create a transcoding job. You can submit a single job for transcoding, or add more source files (and output instructions), then submit a batch of jobs for transcoding. Each job in a Compressor batch has several parts: Compressor User Guide • Source file: The media file that you want to transcode.
In the example below, two jobs make up the batch: The first Compressor job uses the built-in Create DVD destination to output a Dolby Digital audio file and an MPEG-2 video file. Because a CEA-608 closed-caption file has been added to the job, synchronized dialog captions are embedded in the MPEG-2 output file. The transcoded files are saved to the source folder (the folder where the source media is stored), and after the files are transcoded, they’re burned to a DVD (using the Create DVD job action).
3. In the settings window that appears, do the following: a. Select one or more transcode settings or destinations from the list. Tip: Shift-click to select consecutive settings; Command-click to select nonconsecutive settings. The settings and destinations are grouped by category. For example, the Apple Devices setting group contains multiple settings for 4K, HD, and SD output formats.
You can also add a set of image sequence files or surround sound files. See Import an image sequence in Compressor and Create a surround sound job in Compressor. 2. To add transcode settings to a job, click Add on the right side of the Setting/Location/ Filename row in the batch area. 3. To continue chaining jobs, repeat step 1 above. Add additional jobs to a batch Optionally, you can add additional source files (and transcode instructions) to a batch. 1.
4. In the settings window that appears, select one or more settings or destinations, choose a save location from the pop-up menu, then click OK. The output instructions that you specified appear in the job. If you chose multiple settings or a destination with multiple outputs, each output appears in a separate row. If you chose a destination, its job action appears in the upper-right corner of the job area. 5.
The Compressor window switches to Active view, where you can monitor the transcoding process. View information about completed jobs In Completed view, you can see how a file was transcoded. 1. In Compressor, click the Completed button at the top of the Compressor window. 2. Select a batch, job, or transcoded file and, if necessary, click the Inspector button .
Preview jobs in Compressor Before you process a job, you can preview what your transcoded files will look like. The preview area has a number of tools to help you visualize how your final output will appear. Note: Property adjustments made in the video pane of the inspector to retiming, color space, and interlacing are not displayed in the preview area. Change how the timecode is displayed You can change how the timecode is displayed in the preview area. 1.
• Click the Zoom pop-up menu (in the upper-right corner of the preview area), then choose a zoom level. • Press Shift-Z to resize the preview area to fit the current available window space. Tip: To increase the available preview area space, resize the Compressor window, or drag the divider bar between the preview area and the batch area down. View different areas of a zoomed-in preview area When the preview area is zoomed to a level greater than 100%, you can’t view the entire image at once.
Built-in destination Contains Use to Create Blu-ray Settings: Create an H.264 elementary stream and a Dolby Digital audio file, then automatically burn the files to a Blu-ray disc. • Dolby Digital • H.
Built-in setting group Contains Use to Audio Formats • AAC Create audio files in the most commonly used formats. • AC3 • AIFF • Apple Lossless • CAF • EC3 • FLAC • MP3 • WAVE Motion Graphics • Animated Image (Large) • Animated Image (Small) Create files for use with motion graphics applications.
You can also customize a built-in setting in Compressor or create your own custom setting from scratch. For example, you can create a custom setting either to convert progressive video to interlaced video or to convert 29.97-fps video to 23.98 fps video. Before you create a custom setting, view the related built-in settings to see if any of those meet your needs. If one does, or if it comes close, duplicate that setting, then modify any properties that you need to change.
Advanced adjustments Intro to advanced adjustments in Compressor For basic transcoding jobs, you can use the built-in settings and destinations that come with Compressor. However, if you have complex or custom transcoding specifications, you can make adjustments to the built-in settings and destinations in a number of ways: • For a custom transcoding job that you will use only once, apply a built-in setting or destination and then modify its properties in the inspector.
View a setting’s general, video, and audio properties 1. In Compressor, select a setting by doing one of the following: • For a setting that has not been applied, click a built-in setting in the Settings pane. (If the Settings pane is hidden, click the Settings & Locations button in the upperleft corner of the Compressor window, then click Settings at the top of the pane.) • For a setting that has already been applied to a source file, select the output row of a job in the batch area. 2.
Modify an applied setting’s properties After you apply a setting to a source file, you can modify its properties in the inspector. 1. In Compressor, select the output row of a job in the batch area. The properties of the selected setting are displayed in the inspector. If the inspector is not visible, click the Inspector button in the upper-right corner of the Compressor window. 2. To view general, video, or audio properties, click General, Video, or Audio in the inspector. 3.
Create a custom setting by duplicating an existing setting To save a modified setting for future use, you must create a custom setting. The easiest way to do this is to duplicate a built-in setting and then modify its properties in the inspector. 1. In the Settings pane in Compressor (press Shift-Command-1 if it’s hidden), select the setting you want to duplicate. To reveal individual settings in a setting category, click the disclosure triangle next to the category name. 2.
3. Drag custom settings from the Custom area of the Settings pane into your new group. You can add only custom settings to a custom group. If you want to add a built-in setting to the group, you must duplicate the setting (as described in Create a custom setting by duplicating an existing setting above), then add the duplicated setting to your group. Save and share custom settings You can save a custom setting as a file and share it with colleagues or move it from one system to another.
Platform or use Use video settings based on these Use audio settings based on these formats formats Apple TV, iPad, iP hone, iPod touch, the Apple Music app, and the Apple TV app Apple Devices settings in Compressor • AAC (see MPEG-4 settings in Compressor) Web delivery, including Facebook, YouTube, and Vimeo QuickTime Movie settings in Compressor QuickTime Movie settings in Compressor Blu-ray discs H.
The properties of Apple Devices settings are located in the General, Video, and Audio inspectors (described below). Setting summary Displays the setting name and transcoding format, as well as an estimated output file size. When you add a setting to a job or change the setting’s properties, Compressor automatically updates this summary. General properties • Name: Displays the name of the setting. • Description: Displays the description of the setting.
Metadata Specifies how metadata is embedded in the transcode. See Work with metadata annotations in Compressor. • Use Job Annotations: Includes the metadata from the Job Annotations listed in the Job Inspector. This is the default setting. • Pass through source file metadata: Passes the existing metadata from the source file to the transcode. Ignores Job Annotations listed in the Job Inspector. • Remove all metadata and annotations: Passes no metadata to the source file.
• Encoder type: Use this pop-up menu to set the type of encoder. This pop-up menu is enabled when Codec is set to HEVC. Choose from two options: • Faster (standard quality): Encodes the output file using a faster codec, with standard quality. • Slower (higher quality): Encodes the output file using a slower codec, with higher quality. Important: Not all options are available on all hardware. • Profile: Use this pop-up menu to set the quality of compression used in the output file.
• 360° metadata: Use this pop-up menu to choose the type of 360° metadata, if any, included in the output file: • Automatic: Compressor chooses the metadata format based on the properties in the Job inspector and the transcode setting you applied. The format chosen is listed to the right of the pop-up menu. • None: No 360° metadata is attached to your output file. • Spherical Video V1: The 360° metadata format most commonly used by sharing sites, including YouTube and Vimeo.
• • Lanczos 2: Adjacent pixel values are averaged using a truncated sinc function. This option is slower than Gaussian but provides sharper results. • Lanczos 3: Similar to Lanczos 2 but averages more pixel values. This option is slower than Lanczos 2 but may produce better results. • Bicubic: Adjacent pixel values are averaged using a bicubic function. The processing time and output are most similar to Lanczos 2 and Lanczos 3.
• Bit rate: Use this pop-up menu to set the bit rate to use for the encoded audio. • Bit rate strategy: Use this pop-up menu to select the strategy used to encode the audio. There are four options: • • Constant bit rate: Uses the value set in “Bit rate” to determine the bit rate for the encoded audio. • Average bit rate: Uses the value set in “Bit rate” to determine the target average bit rate for the encoded audio. This option provides a more consistent bit rate than variable bit rate.
• Default location: Choose an item from the pop-up menu to set the default save location for transcoded files. • File type: Choose a file type from the pop-up menu (AIFF, CAF, FLAC, or WAVE). Retiming Sets the processing algorithm used to adjust the frame rate during transcoding. Select one of the following options: • Set to percent of source using: Modifies the output clip’s speed by a percentage of the source clip’s speed.
• Compression: Use this pop-up menu to manually set the amount of compression the FLAC encoder uses to encode the audio signal. This setting is only available for FLAC file types. Audio effects For a list of available audio effects and instructions on how to add an audio effect to a setting, see Add and remove effects in Compressor.
• So source frames play at [frame rate] fps: Nondestructively changes the playback speed of the clip without discarding frames or creating new frames. This property has no effect unless the “Frame rate” value in the Video inspector is different from the source file’s frame rate.
• • Surround EX Mode: When using a 5.1 (L R C LFE Ls Rs), 5.0 (L R C Ls Rs), 4.1 (L R LFE Ls Rs), or 4.0 (L R Ls Rs) layout, this property tells the playback device whether the audio has been encoded in Dolby Digital Surround EX. Choose an option from the popup menu: • Not Indicated: Does not send the playback device information about whether the bitstream was encoded in Dolby Digital Surround EX. • Not Encoded: Tells the playback device that the bitstream was not encoded in Dolby Digital Surround EX.
H.264 for Blu-ray setting in Compressor The built-in H.264 for Blu-ray setting in Compressor (in the Create Blu-ray destination) uses the H.264 for Blu-ray transcoding format. This format encodes H.264 elementary stream files for Blu-ray and AVCHD DVD authoring. Note: You can also create custom settings that use the H.264 for Blu-ray transcoding format. However, the built-in H.
• So source frames play at [frame rate] fps: Nondestructively changes the playback speed of the clip without discarding frames or creating new frames. This property has no effect unless the “Frame rate” value in the Video inspector is different from the source file’s frame rate.
• Cropping: This pop-up menu sets the dimension of the output image. The custom option allows you to enter your own image dimensions in the fields; other options use predetermined sizes. The Letterbox Area of Source option detects image edges and automatically enters crop values to match them. This is useful if you want to crop out the letterbox area (the black bars above and below a widescreen image) of a source media file.
• Anti-aliasing level: Sets the softness level in the output image. Double-click the value and then manually enter a new value or drag the slider to the right to increase softness. This property improves the quality of conversions when you’re scaling media up. For example, when transcoding SD video to HD, anti-aliasing smooths jagged edges that might appear in the image. • Details level: Sets the amount of detail in the output image.
• Default location: Choose an item from the pop-up menu to set the default save location for transcoded files.
Retiming Sets the processing algorithm used to adjust the frame rate during transcoding. Select one of the following options: • Set to percent of source using: Modifies the output clip’s speed by a percentage of the source clip’s speed. Enter a value in the percentage field or choose a preset value from the adjacent pop-up menu (with a down arrow). • Set to: Sets the duration of the clip. Enter a timecode duration in the field or click the arrows to increase or decrease the time.
• Color space: Use this pop-up menu to convert the source media to a new color space, including wide color gamut. Choose Automatic to allow Compressor to choose the best color space based on the selected preset. You can also choose a manual setting to override the default. For more information about wide color gamut, see Intro to wide color gamut and HDR in Compressor. • RAW to log: Use this pop-up menu to select how ProRes RAW conversion is done.
• • Gaussian: Adjacent pixel values are averaged using a gaussian distribution of weights. This provides a medium trade-off between processing time and output quality. • Lanczos 2: Adjacent pixel values are averaged using a truncated sinc function. This option is slower than Gaussian but provides sharper results. • Lanczos 3: Similar to Lanczos 2 but averages more pixel values. This option is slower than Lanczos 2 but may produce better results.
MP3 settings in Compressor The built-in MP3 File and MP3 for Audio Podcasting settings in Compressor use the MP3 transcoding format. This format encodes MP3 files, which are often used for digital audio players. You can also create custom settings that use the MP3 transcoding format. Note: You can also create custom settings that use the MP3 transcoding format.
• Sample rate: Use this pop-up menu to set the number of times per second that music waveforms (samples) are captured digitally. The higher the sample rate, the higher the audio quality and the larger the file size. • Data rate: Use the slider to set the number of kilobits per second (kbps) required to deliver your audio file. Using a higher rate will produce a higher-quality audio file.
General properties • Name: Displays the name of the setting. • Description: Displays the description of the setting. • Extension: Displays the extension of the output file. • Allow job segmenting: If you’ve set up distributed processing, select this checkbox to have Compressor process the output file using your shared computer group. See Transcode batches with multiple computers using Compressor.
Retiming Sets the processing algorithm used to adjust the frame rate during transcoding. Select one of the following options: • Set to percent of source using: Modifies the output clip’s speed by a percentage of the source clip’s speed. Enter a value in the percentage field or choose a preset value from the adjacent pop-up menu (with a down arrow). • Set to: Sets the duration of the clip. Enter a timecode duration in the field or click the arrows to increase or decrease the time.
Compressor User Guide • Top First: The video is interlaced and displayed as two separate interleaved fields. The field containing the top line (even lines) is sampled at an earlier instant in time than the field containing the bottom line (odd lines). This field order is commonly used for high-definition video and standard-definition PAL video. • Bottom First: The video is interlaced and displayed as two separate interleaved fields.
• • Motion estimation: This pop-up menu sets the amount of motion processing that will be performed on the file. There are three options: • Good: The fastest processing setting. Use this setting when there is relatively low motion between frames. In general, use Good with the one-pass encoding modes. • Better: Provides very good results even in the presence of complex interlaced motion. In general, use Better with Single Pass VBR (Best) and Two Pass VBR (Best). • Best: The slowest processing setting.
Cropping and padding Customize the final cropping, sizing, and aspect ratio using the Cropping & Padding properties in Compressor. Cropping removes video content from an image. Padding scales the image to a smaller size while retaining the output image’s frame size. For more information about these properties, see Intro to modifying frame size in Compressor. • Cropping: This pop-up menu sets the dimension of the output image.
• Best (Motion Compensated): Uses optical flow to interpolate using areas of movement between neighboring frames to produce high-quality output. • Reverse Telecine: Removes the extra fields added during the telecine process to convert the film’s 24 fps to NTSC’s 29.97 fps. Choosing this item disables all the other Quality controls. See Use reverse telecine in Compressor. • Adaptive details: Select this checkbox to use advanced image analysis to distinguish between noise and edge areas during output.
Setting summary Displays the setting name and transcoding format used by Compressor, as well as an estimated output file size. When you add a setting to a job or change the setting’s properties, this summary is automatically updated. General properties • Name: Displays the name of the setting. • Description: Displays the description of the setting. • Extension: Displays the extension of the output file (.mp4 or .m4a).
Captions This area contains a single property, the “Embed closed captions” checkbox. Select the checkbox if you’ve added CEA-608 closed captions to a job and you want Compressor to insert the captions into the output video file. See Intro to supporting captions in Compressor. Metadata Specifies how metadata is embedded in the transcode. See Work with metadata annotations in Compressor. • Use Job Annotations: Includes the metadata from the Job Annotations listed in the Job Inspector.
• Top First: The video is interlaced and displayed as two separate interleaved fields. The field containing the top line (even lines) is sampled at an earlier instant in time than the field containing the bottom line (odd lines). This field order is commonly used for high-definition video and standard-definition PAL video. • Bottom First: The video is interlaced and displayed as two separate interleaved fields.
• Entropy mode: When Codec is set to H.264, use this pop-up menu to set the entropy mode to CABAC (which provides higher-quality output) or CAVLC (which is faster and more compatible for playback on older devices). • Key frame interval: Enter a value in the text field to set the key frame interval (number of frames) at which you want key frames created in your output file.
• Padding: This pop-up menu sets the scaling of the output image while retaining the output image’s frame size. The custom option allows you to enter your own scaling dimensions in the fields; other options use predetermined dimensions. Quality The following properties determine how Compressor resizes, retimes, and otherwise adjusts the video when transcoded: • • Compressor User Guide Resize filter: This pop-up menu sets the resizing method.
• Details level: Sets the amount of detail in the output image. Double-click the value and then manually enter a new value or drag the slider to set the value. This sharpening control lets you add detail back to an image being enlarged. Unlike other sharpening operations, the “Details level” property distinguishes between noise and feature details, and generally doesn’t increase unwanted grain.
MXF settings in Compressor The MXF settings in Compressor appear in the Custom area of the Settings pane after you install Pro Video Formats for Final Cut Pro, Motion, and Compressor. MXF (Material eXchange Format) is a metadata “wrapper” or “container” that (like QuickTime) holds video or audio media. The metadata describes the enclosed media’s attributes, including compression type, frame rate, frame size, creation date, and custom data created by a camera operator, assistant, or archivist.
• So source frames play at [frame rate] fps: Nondestructively changes the playback speed of the clip without discarding frames or creating new frames. This property has no effect unless the “Frame rate” value in the Video inspector is different from the source file’s frame rate.
Cropping and padding Customize the final cropping, sizing, and aspect ratio using the Cropping & Padding properties in Compressor. Cropping removes video content from an image. Padding scales the image to a smaller size while retaining the output image’s frame size. For more information about these properties, see Intro to modifying frame size in Compressor. • Cropping: Use this pop-up menu to set the dimension of the output image.
• Best (Motion Compensated): Uses optical flow to interpolate using areas of movement between neighboring frames to produce high-quality output. • Reverse Telecine: Removes the extra fields added during the telecine process to convert the film’s 24 fps to NTSC’s 29.97 fps. Choosing this item disables all the other Quality controls. See Use reverse telecine in Compressor. • Adaptive details: Select this checkbox to use advanced image analysis to distinguish between noise and edge areas during output.
QuickTime Export Components setting in Compressor In Compressor, QuickTime Export Components is a custom setting that you can manually add to the Settings pane and then apply to jobs in the batch area. Use this transcoding format to output files in codecs playable on third-party devices and operating systems, such as mobile phones. You can transcode files for 3G, AVI, and Apple iPod, or transcode using third-party plug-ins that you’ve installed on your system.
• Camera LUT: Use this pop-up menu to select the camera lookup table (LUT) applied to the source. Select a custom LUT to transform your video from one color space to another. This setting is enabled if the source is ProRes RAW and if “RAW to log” is set to a value other than None. This setting is also enabled if “Camera log” in video properties in the Job inspector is set to a value other than None.
General properties • Name: Displays the name of the setting. • Description: Displays the description of the setting. • Extension: Displays the extension of the output file (.mov). • Allow job segmenting: If you’ve set up distributed processing, select this checkbox to have Compressor process the output file using your shared computer group. See Transcode batches with multiple computers using Compressor.
• Remove all metadata and annotations: Passes no metadata to the source file. • Include metadata from the source file that cannot be displayed as a job annotation: Available when Use Job Annotations is selected. Includes the metadata from the Job Annotations listed in the Job Inspector and passes the existing metadata from the source file to the transcode. Video properties • Enable video pass-through: Select this checkbox to copy the source video unmodified to the destination file.
• Color space: Use this pop-up menu to convert the source media to a new color space. Choose Automatic to allow Compressor to choose the best color space based on the selected preset. Choose “Same as Source” to use the color space of the source file. You can also choose a manual setting to override the default. See Transcode a video file to a different color space. • RAW to log: Use this pop-up menu to select how ProRes RAW conversion is done.
When QuickTime settings are set to HEVC, the Profile pop-up menu sets the color depth of the output file (the number of bits used to represent color in each color channel—red, green, and blue). There are two options: • 8-Bit Color: Provides a good balance between picture quality and file size. (This option is available only on recent Mac computers that support hardware encoding of HEVC.) • 10-Bit Color: Provides better picture quality but with larger file sizes.
• Include Dolby Vision 8.4 metadata: Select this checkbox to have Compressor include Dolby Vision 8.4 metadata in the output file. Dolby Vision 8.4 is a format designed to optimize HDR content for Apple devices. If this checkbox is selected, “Color space” is set to Rec. 2020 HLG, Codec is set to HEVC, and Profile is set to 10-Bit Color. • Frame Reordering: Select this checkbox to potentially provide a better-quality output file by allowing Compressor to reorder video frames during transcoding.
• • Gaussian: Adjacent pixel values are averaged using a gaussian distribution of weights. This provides a medium trade-off between processing time and output quality. • Lanczos 2: Adjacent pixel values are averaged using a truncated sinc function. This option is slower than Gaussian but provides sharper results. • Lanczos 3: Similar to Lanczos 2 but averages more pixel values. This option is slower than Lanczos 2 but may produce better results.
Audio properties • Enable audio pass-through: Select this checkbox to copy the source audio unmodified to the destination file. When this checkbox is selected, all the other settings in the Audio Properties area are disabled. • Channel layout: Use the pop-up menu to set the audio channel layout. See Audio channel layouts in Compressor. • Sample rate: Use this pop-up menu to set the number of times per second that music waveforms (samples) are captured digitally.
Work with destinations View destination properties in Compressor A destination in Compressor consists of one or more settings combined with an automated job action that’s performed after transcoding. For example, if you apply the built-in Add to TV Home Videos destination to a source file, Compressor uses the setting to create a QuickTime movie file and then runs a job action that copies the file to your Home Videos library on Apple TV.
3. Fill in the job action properties in the Action area. For example, if you choose the Add to Apple TV Home Videos job action, you can enter a title for the movie. Because you’re modifying a custom destination, the properties that you provide for the job action will be saved for future use. You can also modify the properties of the setting that the destination uses. See View and modify a setting’s properties in Compressor.
2. If necessary, click the Inspector button to reveal the Location inspector. The selected location’s properties are displayed in the Location inspector. Create a custom location 1. In Compressor, click the Add button at the bottom of the Locations pane. If the Locations pane is hidden, press Shift-Command-2. 2. In the window that appears, select a location on your computer or on a connected device, then click Choose.
2. If necessary, click the Inspector button to reveal the Location inspector. The “Filename format” field in the Location inspector displays naming tokens that determine the output filename. 3. To modify the filename format, do any the following: • Move existing tokens: Drag tokens to reorder them. Or click a token to select it, press Command-X to cut the token, click to select a new location in the field, then press Command-V to paste the token in the new location.
Work with jobs Intro to jobs in Compressor When you add a source file to Compressor and apply settings or destinations, you create a transcoding job. Jobs are displayed in the batch area of the Compressor window. When you select a job in the batch area, its properties are shown in the Job inspector.
Job summary Displays the source file’s name, location, video and audio encoding information, and duration. If the source is a standard-dynamic-range video file, an SDR badge appears in the upper-right corner of the summary area; if the source is a high-dynamic-range video file, an HDR badge appears in the upper-right corner. For more information about HDR and SDR files, see Intro to wide color gamut and HDR in Compressor.
• • Bottom First: The field containing the bottom line (odd lines) is sampled at an earlier instant in time than the field containing the top line (even lines). Bottom-first field order is commonly used for standard-definition NTSC video. Color space: Use this pop-up menu to choose a color space to apply to the source clip in the job. This property defines how Compressor interprets the color data in the source clip; it doesn’t convert the clip you output to another color space.
• MaxCLL: Displays the value, in nits, of the brightest pixel in the video file (Maximum Content Light Level). • MaxFALL: Displays the value, in nits, of the maximum average light level for any single frame in the video file (Maximum Frame Average Light Level). For more information about working in HDR color space, see Change video color space in Compressor. (HDR transcoding in Compressor requires macOS 10.13 or later.
• Layout and Padding: When “Projection mode” is set to Cubic, these fields become available, allowing you to adjust the six faces of the unfolded cube. Most of the time, there’s no need to change these values. The integer value in the Layout field specifies the order of the six unfolded cube faces (the default value of 0 specifies the face order used in the Spherical Video V2 metadata standard: right, left, up, down, front, back).
Job summary Displays the name, location, file information, and duration of the source file. Timing Provides the timecode for the Start point, In point, and duration of the image sequence output file. Image sequence properties The following properties are available in the Image Sequence Properties area of the Job inspector: • Frame Rate: Choose a frame rate for the image sequence file from the pop-up menu, or type a custom value in the text field.
Image sequence files Displays the image sequence files, in order. Job annotation The Job Annotation area of the Job inspector in Compressor contains the Field pop-up menu, which lets you include annotation metadata in your output file. See Work with metadata annotations in Compressor. Action The following properties are available in the Action area of the Job inspector: • When done: Use this pop-up menu to assign an automated job action to be performed after transcoding.
Surround sound properties Displays the names of the files assigned to surround sound channels. You can modify these file assignments using the following controls in the Surround Sound Properties area: • Remove button: Click a Remove button to remove a file assigned to a channel. • Channel icon: Click the channel icon (a speaker icon or subwoofer icon) to assign a different file to a channel. • Add Video: Click the Add Video button to assign a video file to the surround sound source audio file.
Work with job actions Add and modify job actions using Compressor A job action is an automated action performed on a media file after it’s transcoded, usually for the purpose of sending your video out into the world. For example, Compressor can automatically upload the finished file to a video-sharing site like Vimeo. Or Compressor can add the finished file to an email message and send it to a recipient of your choosing, including yourself. Job actions usually need to be configured to work properly.
2. Select the job in the batch area, then, if necessary, click the Inspector button reveal the inspector pane. to 3. Modify the properties relevant to the alert message. When the icon disappears or when the alert message disappears from the Errors & Warnings window, the issue is fixed. Remove a job action 1. Select the job in the Compressor batch area. 2. If necessary, click the Inspector button to reveal the inspector pane. 3.
• Build type: The create DVD job action builds a VIDEO_TS folder; the Create Blu-Ray job action builds a BDMV folder. These folders contain files correctly formatted for the type of disc selected. You can set how you want to save that data by choosing an option from the “Build type” pop-up menu: • Disc: Available when Output device is set to a compatible device, burns the folder to a disc.
Prepare for HTTP Live Streaming The Prepare for HTTP Live Streaming job action processes the transcoded files using the instructions you provide via the properties below and then uploads the processed files to the server you specify. To learn more about HTTP Live Streaming, see the HTTP Live Streaming Overview and other related documents, available in the Mac Developer Library. • Destination for Live Stream assets: Click the Choose button to assign a save location for the live streaming assets.
Work with batches in Compressor A batch contains one or more jobs to be submitted to Compressor for transcoding. When you select a batch, its properties are shown in the Batch inspector. View batch properties • In Compressor, click the source file names at the top of the batch area. If necessary, click the Inspector button to reveal the inspector pane. The batch properties are displayed in the Batch inspector: • Name: Identifies the batch in Active and Completed views.
Advanced tasks Import an image sequence in Compressor You can import a sequence of still images into Compressor as an image sequence source file. Each image in the image sequence represents a single video frame. Import a set of image sequence files 1. In Compressor, do one of the following: • At the bottom of the batch area, click the Add pop-up menu , choose Add Image Sequence, select a folder of image sequence files, then click Add.
The Job inspector displays information about the image sequence source file, including the location of the files, the size and frame information, and the duration of the sequence. Further down in the Job inspector is a list of the individual image files that make up the sequence. 4. If necessary, you can specify field order, frame rate, and color space for the source file, or click the Choose button to add an audio file to the image sequence source file.
Work with surround sound files Create a surround sound job in Compressor There are two methods you can use in Compressor to add audio files to a batch to create a surround sound job: • Manually assign audio files to surround sound channels. • Append audio filenames with channel identifier codes and have Compressor automatically map the filenames to the correct surround sound channels.
4. When you’re done setting up the surround sound group, click Add. A new surround sound source media file appears in a job in the batch area. 5. To view additional information about the surround sound source file in the Job inspector, select the job in the batch area. The Job inspector appears on the right side of the Compressor window. (If the inspector pane is hidden, click the Inspector button in the upper-right corner of the Compressor window.
• -Rs: Right surround channel • -S: Center surround channel • -LFE: Low-frequency effects channel (subwoofer, LFE) For example, if the audio file for your left front channel is named “final audio_left.aiff,” name the file “final audio_left-L.aiff.” Note: Compressor will recognize source files with or without a file extension (.aiff or .wav, for example). 2. Drag all of the renamed source audio files (not the folder of files) to the batch area in Compressor.
The illustration below shows the available audio channel layouts. The channel codes describe the location of the channel: • L: Left front channel • R: Right front channel • C: Center front channel • Ls: Left surround channel • Rs: Right surround channel • Cs: Center surround channel • LFE: Low-frequency effects channel (subwoofer, LFE) Note: It’s important to understand that Compressor can’t convert stereo audio files into 5.1 surround sound channels. If you want to output a 5.
After you import a surround sound source file, you can transcode that file into any of the channel layouts above. Compressor analyzes audio files during import to determine the source file’s channels. When you apply a transcode setting to the source file, Compressor automatically adjusts the channel layout of the setting to provide logical results.
• In a rectangular window: This viewing method is used on a smart phone, tablet, or computer. The viewer scrolls the window to see different parts of the scene. • On a standard display: This viewing method, with the audience unable to control viewing angles, is similar to watching conventional video, with the added benefit of giving the filmmaker more options for angle choices during editing.
2. In the Job inspector, review the properties shown in the 360° Metadata area. If the 360° Metadata area is collapsed, move the pointer to the right of the heading, then click Show. 3. If necessary, add or modify metadata properties in the 360° Metadata area. Note: If you modify properties in the 360° Metadata area, the image in the Compressor preview area stays the same. The preview area displays the 360° source file’s video with its native properties.
• Cubic: A less common form of spatial mapping, this option represents the spherical data as an unfolded cube with six faces. • Pixel bounds: When “Projection mode” is set to Equirectangular, this property becomes available, allowing you to modify the boundaries of the equirectangular frame. Most of the time, there’s no need to change these values.
• Spherical Video V1: The 360° metadata format most commonly used by sharing sites, including YouTube and Vimeo. • Spherical Video V2: A less common but more up-to-date 360° metadata format used by YouTube and Vimeo. 3. Click Start Batch to export your file and its 360° metadata. If you applied a YouTube or Vimeo destination to the source file, the metadata will be parsed by the sharing website so that your 360° video displays correctly. 360º image © 2015 Jaunt, Inc.
• SRT (SubRip Text) subtitles: SRT subtitles can be used to deliver foreign-language translations or a transcript of dialog, narration, or audio descriptions to people who are deaf or hard of hearing. SRT subtitles, which use the .srt filename extension, offer more limited formatting options than CEA-608 captions.
For information about formatting and modifying captions in Compressor, see Edit caption properties in Compressor and Adjust caption timing in Compressor. Add a source video file with embedded CEA-608 captions If a source video file already contains embedded CEA-608 closed captions, importing the video into Compressor automatically adds the caption data to the job. 1. In Compressor, click the Add pop-up menu Add File. under the batch area, then choose 2.
View captions in the preview area You can preview the appearance and timing of captions in Compressor in the preview area. And you can navigate from caption to caption in the Closed Captions inspector or Subtitles inspector. 1. In the Compressor batch area, select the captions filename (in the row under the Captions heading). 2. In the preview area, click the Captions button , then choose On. Captions will now be visible in the preview area. 3.
Edit caption properties in Compressor You can edit caption content, placement, formatting, and timing in the Closed Captions inspector (for jobs that contain CEA-608 closed captions) or Subtitles inspector (for jobs that contain iTT subtitles or SRT subtitles). Because CEA-608, iTT, and SRT captions have different specs, each Compressor inspector contains slightly different controls. Specify the caption language properties Before transcoding, you need to specify the language and country of the captions.
• Paint-On: The caption appears letter by letter from left to right, beginning at at the caption’s timecode start point. If multiple captions overlap in time, they’re stacked vertically onscreen, with each new caption "painting on” beneath the previous caption. • Roll-Up: The caption appears letter by letter from left to right (like Paint-On). Additionally, if multiple captions overlap in time, newly appearing captions push older captions up line by line.
3. To modify the position of the caption in the video frame, click a Text Placement arrow (under the Caption Text field). The caption is repositioned in the video frame. WARNING: CEA-608 captions that overlap spatially and temporally may create position and timing errors. Modify text color and style The formatting controls in the Closed Captions inspector or Subtitles inspector let you change the color and font style of caption text.
Add a new caption You can also add new captions to an existing captions file. 1. In the Compressor preview area, drag the playhead want to insert a new caption. 2. Click the “Add a caption” button Subtitles inspector. to a point in your video where you near the bottom of the Closed Captions inspector or 3. Enter caption text in the window that appears, then click OK. The new caption with a default duration of two seconds appears in the preview window at the timecode start point.
2. To modify the caption’s start point or end point, do any of the following: • Adjust the start point or end point in single-frame increments: Click the down arrow or up arrow on either side of the Caption Start or Caption End field. • Change the start point or end point in larger increments: Position the pointer over the hours, minutes, seconds, or frames area of timecode in the Caption Start or Caption End field, then drag left or right.
Modify the timing of multiple captions at the same time 1. In the Captions list or Subtitles list in Compressor (at the bottom of the Closed Captions inspector or Subtitles inspector), select multiple captions. Tip: Shift-click or Command-click to select multiple captions. If the selected captions have different timecode values, the Caption Start, Caption End, and Caption Duration fields in the inspector display dashes. 2.
Export captions in Compressor After you import captions into a job (optionally editing text properties and adjusting timing), you’re ready to export the video and captions. In a standard Compressor batch, the transcode setting and captions format you choose determines how Compressor outputs the job: • When you use a standard transcode setting (Apple Devices or MPEG Files, for example) to combine a video with CEA-608 closed captions, Compressor can embed the captions directly into the output video file.
For more details about the entire creation and submission process, including information for customers with direct submission privileges, see the iTunes Store Package Quick Start Guide. iTunes Store package required fields To submit a package to the iTunes Store using Compressor, you must have a valid short name and vendor ID. The short name is provided by the iTunes Store to approved content providers. The vendor ID is a unique identifier for your movie supplied by the iTunes Store.
Create an iTunes Store package 1. In Compressor, choose File > New iTunes Store Package. An iTunes Store package job appears in the batch area. (The batch area can contain only one iTunes Store package job at a time.) 2. To add the primary video of your submission, do one of the following: • Drag a video file from the Finder onto the Feature row. • Click Set on the right side of the Feature row and select a video file from the dialog that appears, then click Open.
Configure an iTunes Store package After you create an iTunes Store package and add media, you need to add identifying production data in the inspector. 1. In the Compressor batch area, click the top bar of the iTunes Store Package item. The iTunes Store Package inspector appears. (If the inspector is not visible, click the Inspector button in the upper-right corner of the Compressor window.) 2. In the iTunes Store Package inspector, enter a name for the project in the Name field.
2. In the Subtitles inspector, choose options from the Language pop-up menu, the Country pop-up menu, and the Purpose pop-up menu. Tip: You must choose a language before you can choose a country. There are three available options in the Purpose pop-up menu: • Translation (Full): Outputs a full translation of all words spoken in the film using the language of the intended territory. During playback, viewers can turn these subtitles on or off (unlike burned-in subtitles).
4. Click the Add Marker button (or press M). The inspector is updated to show the Marker inspector. 5. In the Marker inspector, enter a name for the marker. 6. Click the Image pop-up menu, then choose Frame or File to assign a preview image associated with the chapter marker. Important: Chapter markers must have an image associated with them (and not a black frame) to be compliant with iTunes Store submission requirements. 7. Repeat steps 2–5 to add additional chapter markers as required.
6. At the bottom of the batch area, click the Start Batch button. The existing package is updated to include the new or changed elements from the new batch. Note: You can’t remove elements from a package after it has been created. If you want to remove an element from an existing package, you must create a new package from scratch.
Designate the feature video as textless If your Feature video doesn’t contain any titles, it should be marked as Textless. This setting is selected by default. 1. In the Compressor batch area, select the Feature row item. 2. In the Job inspector, scroll down to Feature Video Properties, then select Textless (if it’s not already selected). Submit HDR content to the iTunes Store in Compressor You can use Compressor to prepare HDR (high dynamic range) content packages for submission to the iTunes Store.
3. To add the HDR feature video to the package, do one of the following: • Drag an HDR video file from the Finder onto the Feature row. • Click Set on the right side of the Feature row, select an HDR video file, then click Open. An output row containing the selected video file (and an HDR badge) is added to the job. Separate summaries for both the SDR and HDR source files appear in the Job inspector.
4. In the Job inspector, review the SDR Video Properties and HDR Video Properties areas to ensure that Compressor has correctly detected the native color space of each file. If a source file has metadata identifying its native color space, Compressor adds an asterisk next to the option shown in the SDR or HDR “Color space” pop-up menu.
6. Set the HDR format: • HDR10: By default, iTunes Store packages transcode HDR video to the HDR10 format, so no further modifications are required. • Dolby Vision: Open the Job inspector, then in the Dolby Vision Metadata area, click Choose, navigate to an XML file formatted using the Dolby Vision metadata specifications, and click Open. When you attach a Dolby Vision metadata file, Compressor transcodes your iTunes Store package to a format compatible with both HDR10 and Dolby Vision.
4. Set the HDR format: • HDR10: By default, iTunes Store packages transcode HDR video to the HDR10 format, so no further modifications are required. • Dolby Vision: Open the Job inspector, then in the Dolby Vision Metadata area, click Choose, navigate to an XML file formatted using the Dolby Vision metadata specifications, and click Open. When you attach a Dolby Vision metadata file, Compressor transcodes your iTunes Store package to a format compatible with both HDR10 and Dolby Vision.
5. Select the “Use iTunes to create SDR delivery from HDR source and Dolby Vision metadata” checkbox. 6. In the Video inspector, click Choose in the “QuickTime settings” area, then choose either Apple ProRes 4444 or Apple ProRes 4444 XQ from the pop-up menu. HDR package submissions to the iTunes Store must use the Apple ProRes 4444 or Apple ProRes 4444 XQ codec. If you choose a different codec, your package submission may fail. 7.
IMF package required fields A valid IMF package must include valid values for package name and content title, an audio language must be selected, and Multichannel Audio Description fields are required. You must also select a location for the output. These and additional fields can be found in the IMF Package inspector. If you don’t know the correct information, you can enter placeholder text.
2. To add the video to your package, do one of the following: • Drag a video file from the Finder onto the Video row. • Click Set on the right side of the Video row and select a video file from the dialog that appears, then click Open. An output row containing the selected video file is added to the job. Note: You can’t remove video elements from a package after it has been created. If you want to remove a video element from an existing package, you must create a new package from scratch. 3.
Build an IMF package After your package is properly loaded and configured, you can build the package. • In the Compressor batch area, click the Start Batch button. Compressor transcodes all the files, combining them into a single package file (saved in the location specified in the IMF Package inspector). Prepare an IMF package containing HDR content You can use Compressor to prepare IMF packages that include HDR (high dynamic range) video.
4. If you want to modify the color space of the video for the IMF package, open the Video inspector and choose new options from the following pop-up menu: • HDR color space: Choose either Rec. 2020 PQ, Rec. 2020 HLG or P3 D65 PQ. Either option is compatible with both Dolby Vision and HDR10. 5. Complete your IMF package by configuring package settings and then building the package.
Cropping removes video content from an image. If the output file has a different aspect ratio than the output frame size, black borders appear along the top and bottom or left and right sides of the transcoded file. If the cropped image matches the output frame size, the image will still be cropped, but no black borders will be seen. Padding doesn’t remove any of the source image. Instead, padding adds black to the image to fit it into a different-size frame.
Crop the source image To remove part of the original source image, use the cropping controls in the Video inspector. Depending on the “Frame size” setting (in the Video Properties section of the Video inspector), cropping may or may not reveal black borders around the edges of your clips. 1. In Compressor, do one of the following: • In the batch area, click an output row to select a setting that’s been applied to a job.
Pad the source image 1. In Compressor, do one of the following: • In the batch area, click an output row to select a setting that’s been applied to a job. With this method, the modifications you make will be used for outputting only that job. • In the Settings pane, select a custom setting from the Custom group. (If the Settings pane is hidden, press Shift-Command-1.) With this method, the modifications you make will be saved to the custom setting for future use. 2.
Conform video to a frame size When you set a frame size in the Video inspector, the frame fills until it reaches the lowest bound of the frame size you specified. For example, if you set a source video that's a 720 x 1280 vertical frame to transcode to a horizontal frame that’s 1280 x 720 (with no additional cropping or padding), the result is a video that’s 480 x 720. To create a video with an exact frame size, constrain the frame size and crop or pad the video. 1.
Modify playback speed Retiming options in Compressor There are two ways to use Compressor to modify the rate at which a transcoded file plays back. You can apply speed effects to slow down or speed up playback, or you can change the frame rate of the transcoded file (which may or may not have an effect on playback speed). If you do change the frame rate of the output file, there are special options for working with interlaced footage, including deinterlacing and reverse telecine.
Choose a new duration for a transcoded file 1. In Compressor, do one of the following: • In the batch area, click an output row to select a setting in a job. With this method, the modifications you make will be used for outputting only that job. • In the Settings pane, select a custom setting from the Custom group. (If the Settings pane is hidden, press Shift-Command-1.) With this method, the modifications you make will be saved to the custom setting for future use. 2.
3. Click the “Field order” pop-up menu, then choose a progressive or interlaced frame rate. If the current setting doesn’t allow field order modification, this control remains dimmed. If you want to convert a file with an interlaced format into a progressive format, see Use deinterlacing in Compressor. Note: The properties in the Retiming section of the General inspector are always affected by the “Frame rate” property, as well as the “Retiming quality” property in the Video inspector.
Use reverse telecine in Compressor Telecine is the process of converting motion picture film to the NTSC video format used in broadcast television. The most common telecine approach to converting film’s standard 24 fps frame rate to NTSC video’s 29.97 fps frame rate is to perform a 3:2 pulldown (also known as a 2:3:2:3 pulldown). If you alternate recording two fields of one film frame and then three fields of the next, the 24 frames in 1 second of film end up filling the 30 frames in 1 second of video.
When film is telecined to NTSC video, it has a constant cadence. This means that the 3:2 pattern is consistent and uninterrupted. It’s relatively easy to remove the telecine from a constant-cadence clip because you need only determine the pattern once. If you take these telecined clips and edit them as NTSC video, the result is a final video file that has a broken cadence with an inconsistent 3:2 pattern.
Change the format of a source audio track 1. In the Compressor batch area, click the job containing the source file you want to modify. 2. In the Audio Tracks section of the Job inspector, click the pop-up menu corresponding to the audio track you want to modify, then choose a configuration style. Depending on how many channels are in the audio track, different options appear in the pop-up menu. For example, a track with two channels can be configured as Stereo, Dual mono, 1.1, and so on.
Add a video or audio effect 1. In Compressor, do one of the following: • In the batch area, click an output row to select a setting that is part of a job. • In the Settings pane, select a custom setting from the Custom area. (If the Settings pane is hidden, press Shift-Command-1.) 2. In the Video inspector or Audio inspector, click the Add Video Effect pop-up menu or the Add Audio Effect pop-up menu, then choose an option.
• Color Correct Highlights, Color Correct Midtowns, Color Correct Shadows: Corrects white balance inaccuracies and creates color effects on the bright, midtone, or dark areas of the video. Drag the sliders to set red, green, and blue values between –100 and 100. • Fade In/Out: Adds a dissolve and a matte color at the beginning and end of the clip.
• • • Compressor User Guide Text Overlay: Superimposes text onto the image. The Text Overlay effect contains the following properties: • Position: Choose a position for the text overlay from the pop-up menu, such as Center, Lower Left, Lower Left–Title Safe, and so on. • Alpha: Drag the slider to set the text opacity between 0 (completely transparent) and 1 (completely opaque). • Overlay text: Type text in this field. • Text color: Click the color well to set the text color.
Audio effects in Compressor The Add Audio Effect pop-up menu in the Audio inspector contains the following effects: Note: Audio effects are not available in some settings when the “Copy audio tracks from source” checkbox is selected in the Audio inspector. • Apple: AUGraphicEQ: Configures a wide variety of frequencies throughout the audible frequency range.
• • Fade In/Out: Adds an audio fade-in effect at the beginning of the clip and a fade-out at the end of the clip. The Fade In/Fade Out filter contains the following properties: • Fade in duration: Enter a value in the text field or move the slider to set the length of the fade in seconds. • Fade out duration: Enter a value in the text field or move the slider to set the length of the fade out in seconds. • Fade in gain: Drag the slider to set the value between –100.0 (silence) and 0.
2. In the Job Annotations area of the Job inspector, click the Fields pop-up menu, choose Import, select a QuickTime movie or XML property list file that contains annotations, then click Open. Metadata values in the QuickTime movie or XML file that correspond to the metadata categories in Compressor are added to the fields below the pop-up menu, overwriting any existing metadata values. Compressor recognizes the following metadata categories in QuickTime movie files and XML property list files: com.apple.
• Remove all metadata and annotations: Passes no metadata to the source file. • Include metadata from the source file that cannot be displayed as a job annotation: Available when Use Job Annotations is selected. Includes the metadata from the Job Annotations listed in the Job Inspector and passes the existing metadata from the source file to the transcode. 3. Click Start Batch to export your file.
Set a poster frame in Compressor The poster frame is a still image that represents a video or audio media file or a podcast chapter. Note: When viewing the output file in Apple TV Home Videos, if no poster frame is set, Apple TV Home Videos automatically uses the frame 10 seconds from the movie’s first frame as the poster frame. Set the poster frame for a job 1. In the Compressor batch area, select the job that contains the source file that you want to set a poster frame in.
• Podcast markers: Like chapter markers, podcast markers can have artwork and a URL assigned to them. Podcast markers are usually used to provide a slideshow (with URLs) for users to view when playing audio podcasts. However, podcast marker names do not appear in the slideshow, and users can’t navigate to a podcast marker in the transcoded file. Podcast markers appear purple in the Compressor preview area. Markers can be output when using settings based on the following formats: • H.
Change the default marker type When you add a new marker, it’s automatically set as a chapter marker. You can change this default so new markers are always added as one of the other types of markers. • Click the “Modify marker settings” pop-up menu in the Compressor preview area and choose an item in the Default Marker submenu. Specify properties for chapter and podcast markers You can specify the properties of a chapter or podcast marker in the Marker inspector.
The file containing the list of timecode points must follow these rules: • The list of timecode values must be a plain text file. For best results, create the list with TextEdit and save the files using the .chp or .txt extension. • Each marker must be on a new line that starts with a timecode value in the format 00:00:00:00. • After the timecode value, you can include a name for the marker. You can use a space or tab character to separate the timecode value from the marker name.
Transcode time ranges in Compressor You can limit transcoding to specific time ranges in a media file by setting In and Out points. Transcode a portion of a source file 1. In the Compressor batch area, select the job that contains the source file that you want to transcode. 2. In the preview area, do one of the following to mark In and Out points: • Drag the In point to where you want the transcoding to begin, then drag the Out point to where you want the transcoding to end.
3. Duplicate the job by doing the following: a. Control-click the job you used in step 1, then choose Edit > Copy from the shortcut menu. b. Select an empty part of the batch area to deselect the job you just copied, then Control-click the batch area and choose Edit > Paste from the shortcut menu. The duplicate job is pasted into the batch area. 4. Designate a different portion of the source file to be transcoded by following the instructions in steps 1 and 2.
Work smarter Compressor preferences Intro to Compressor preferences You can modify Compressor preference settings to customize your workflow. Open Compressor preferences • Choose Compressor > Preferences (or press Command-Comma), then click a button at the top of the window to open a pane. There are four panes in the preferences window: • Use the General pane to set basic application preferences. • Use the My Computer pane to allow other computers to use your computer to process batches.
• • After starting a new batch: This section of the General pane has two controls: • Clear batch in the Current tab: Select this checkbox to automatically remove batch information from the Current view after a batch is transcoded. • Switch to the Active tab: Select this checkbox to have Compressor switch to Active view when a batch is transcoding. Reset all dialog warnings: Some warnings contain a checkbox for suppressing future instances of the same error.
Shared Computers preferences in Compressor Use the controls in the Shared Computers pane in Compressor to create groups of shared computers for distributed processing. See Transcode batches with multiple computers using Compressor. Advanced preferences in Compressor Use Advanced preferences in Compressor to adjust additional settings for distributed processing. These advanced settings are intended for network administrators and other users with networking experience.
Note: If your system doesn’t have enough memory or processor cores, this option is dimmed and not available. • Use GPU to process Final Cut Pro content sent to Compressor: This checkbox instructs Compressor to use the computer’s graphics processing engine to display or transcode a Final Cut Pro project sent to Compressor for processing. If you’re running both Compressor and Final Cut Pro at the same time, enabling this setting may degrade Final Cut Pro performance.
Action Shortcut Play the video L Set the In point I Set the Out point O Add a marker M Add a caption Option-C Go to the previous marker or In/Out point Control-Semicolon (;) Go to the next marker or In/Out point Control-Apostrophe (’) Start transcoding the batch Command-B Compressor window keyboard shortcuts Action Shortcut Show the Current view Command-1 Show the Active view Command-2 Show the Completed view Command-3 Show or hide the inspector pane Command-4 Show or hide the Se
Customize keyboard shortcuts View keyboard shortcuts in the Compressor Command Editor Compressor provides a wide variety of menu commands and keyboard shortcuts that let you control almost every aspect of your transcoding workflow. You can use the Command Editor to modify existing shortcuts, create new shortcuts, and save multiple sets of keyboard shortcuts that you can export for others to use. You can also import a set of shortcuts that someone else created.
• View commands associated with a specific key: Click a key on the virtual keyboard. The commands mapped to that key appear (along with the necessary modifier keys, if any—Control, Option, Shift, and Command) in the Key Detail list in the lower-right corner of the Command Editor. When you hold down any modifier buttons on the keyboard, the key colors update in the Command Editor. Key colors correspond with command classifications; for example, playback commands, such as Play/Pause (Space bar), are purple.
Export and import command sets in Compressor You can export a command set to create a backup or to share the set with another user. Exported command sets are saved in a file that can be imported back into Compressor at a later time. You can also import a command set. Export a command set 1. Choose Compressor > Commands > Customize. The Command Editor appears. 2. Click the pop-up menu in the top-left corner of the Command Editor, then choose a command set to export.
Empty batch When you first launch Compressor, or when you have no items in the batch area, the Touch Bar shows the Add Item button: Item Name Description Add Item Opens controls in the Touch Bar for adding media files to your batch. See Add item. Add item After you tap the Add Item button, the following buttons appear in the Touch Bar: Item Name Description Close Returns you to the previous Touch Bar screen. Add File Opens a dialog to select a file to add as a new job.
Item Name Description Add Marker Adds a default marker at the current playhead position. (If a marker is already present at the current frame, that marker is deleted.) Touch and hold to display controls for adding a marker different from the default type. See Add nondefault markers. Preview Navigation Available when the batch contains media, opens preview controls in the Touch Bar. See Preview navigation.
Item Name Description Close Returns you to the previous Touch Bar screen. Preview Navigation bar Displays a timeline for the selected media. Poster frames, markers, and the current playhead position are indicated with icons. Add Poster Frame Adds a poster frame at the current playhead position. See Set a poster frame in Compressor. Add Marker Adds a default marker at the current playhead position. (If a marker is already present at the current frame, that marker is deleted.
New setting When you tap the New Setting button, the following controls appear in the Touch Bar: Item Name Description Close Returns you to the previous Touch Bar screen. Add Setting Opens a dialog to add a new custom setting to the Settings pane. Add Destination Opens a dialog to add a new custom destination to the Settings pane. Add Group Opens a dialog to add a new folder in the Settings pane. See Apply transcoding instructions.
iTMS files options When you tap the Add iTMS Files button, the following controls appear in the Touch Bar: Item Name Description Close Returns you to the previous Touch Bar screen. Add Feature Opens a dialog to select a video file to use as the feature in your package. Add Subtitles Opens a dialog to select an .itt file for your package. Add Closed Caption Opens a dialog to select a closedcaption file for your package.
Completed view When you select an item in Completed view in Compressor, the following controls appear in the Touch Bar: Item Name Description Reuse Adds the currently selected item (in Completed view) to the batch area as a new, unprocessed batch. Show in Finder Displays a Finder window with all exported files highlighted. See Transcode files in Compressor.
High dynamic range (HDR) Additionally, some newer imaging devices can display extra levels of brightness in each color component (red, green, and blue) in a way that more closely reproduces how the human eye perceives contrast. These high-dynamic-range (HDR) displays have a much larger luminance range and typically process video at 10 bits per color component rather than at 8 bits.
However, transcoding a wide-gamut video to a standard-gamut color space may result in a more faded-looking, drab image (because the wide-gamut colors will be discarded). And transcoding a 10-bit video to 8-bit color will result in reduced resolution and potential banding in areas of the image with color gradients.
1. After you add a source file to a batch and assign a transcode setting in Compressor, open the Video inspector. If you assigned a transcode setting that allows you to modify the output file’s color space, a “Color space” pop-up menu appears in the Video inspector. (This pop-up menu is different from the “Color space” pop-up menu in the Job inspector, described in the previous task.) 2. To change the color space of the output file, click the “Color space” pop-up menu and choose a different option.
Create and use droplets in Compressor You can save one or more settings or a destination as a standalone application called a droplet. Using the droplet, you can easily transcode files by dragging them to the droplet icon in the Finder. Create a droplet 1. In the Settings pane in Compressor, select one or more settings, setting groups, or a destination that you want to save as a droplet. Note: You can Shift-click or Command-click to add multiple settings or setting groups.
Create additional instances of Compressor You can increase the processing power of a single computer, and thus reduce the time it takes to process batches, by enabling one or more additional instances of the Compressor application. Enabling additional instances of Compressor doesn’t install multiple copies; instead, it creates additional services that can be accessed by Compressor. The number of available Compressor instances is determined by your computer’s cores and memory.
Transcode a Final Cut Pro or Motion project using Compressor Do one of the following: • Send a project from Final Cut Pro to Compressor: Select the project and choose File > Send to Compressor. Note: You can configure Compressor to use the GPU of your computer to process Final Cut Pro content sent to Compressor in the Advanced preferences in Compressor pane of Compressor preferences. • Send a project from Motion to Compressor: Open the project and choose Share > Send to Compressor.
1. Choose Compressor > Preferences (or press Command-Comma). 2. Select My Computer. 3. If necessary, turn on “Allow other computers to process batches on my computer.” 4. To control access to your computer, select the Require Password checkbox and enter a password in the text field. The password is required by other computers to use your computer for transcoding. 5. To add Compressor to your list of login items, do the following: a. In the macOS Finder, choose Apple menu > System Preferences. b.
Configure SMB for use with automatic file sharing To use the automatic file sharing features of Compressor, SMB file sharing must be turned on, guests must be allowed access to shared folders, and a helper tool must be installed. 1. In the macOS Finder, choose Apple menu > System Preferences. 2. Click Sharing. 3. In the Sharing preferences pane, select the File Sharing checkbox on the left to turn on file sharing.
Manually configure file sharing using Compressor Compressor automatically manages the file sharing required for distributed processing. However, if you want to use your own file sharing system (such as a dedicated file server, Xsan, or NAS), you can turn off automatic file sharing, then manually configure file sharing and manually mount the shared volumes.
Use the command line to submit Compressor jobs Intro to shell commands in Compressor If you’re accustomed to doing your work from Terminal shells, you can run the Compressor application from the command line using the Compressor command. There are a number of command-line options for submitting jobs. In the command-line descriptions in this section, angle brackets < > indicate a mandatory argument in a command, and brackets [ ] indicate an optional argument.
Submission command option Description ‑settingpath Specifies the location of the settings for the job. ‑locationpath Specifies the destination file URL for the job. ‑relabelaudiotracks ] Relabels audio channel layouts. Unless -locationpath is specified, the relabeled audio tracks overwrite the ones in the original source file. All other parameters are ignored.
Compressor command code examples The following are examples of code used for submitting common Compressor commands. Important: If you’re using an image sequence as a source file, you must use a URL for the path in -jobpath. Submit a job The following command submits a Compressor job. Important: The command below must be executed on one line. /Applications/Compressor.app/Contents/MacOS/Compressor -batchname "My First Batch" -jobpath ~/Movies/ MySource.mov -settingpath ~/Library/Application\ Support/Compre
• • Uses the “Apple Devices HD (Custom)” setting at ~/Library/Application\ Support/ Compressor/Settings (The “\” character is used in this case to retain the space in “Application Support.”) Writes the output file, named “MyOutput.m4v,” to the ~/Movies folder Configure a shared computer The following command configures a computer to allow other computers to process Compressor batches on it. Important: The command below must be executed on one line. /Applications/Compressor.
Glossary AAC (Advanced Audio Coding) Also called MPEG-4 Audio. A standard way of compressing and encoding digital audio. AAC-encoded files rival the quality of audio CDs and generally sound as good as or better than MP3 files encoded at the same or even a higher bit rate. AC-3 (Audio Codec 3, Advanced Codec 3, Acoustic Coder 3) A Dolby Digital compressed audio format often used for encoding surround sound. AIFF (Audio Interchange File Format) A cross-platform audio file format developed by Apple.
• Apple ProRes 4444: An extremely high-quality version of Apple ProRes for 4:4:4:4 image sources (including alpha channels). This codec features full-resolution, mastering-quality 4:4:4:4 RGBA color and visual fidelity that is perceptually indistinguishable from the original material. Apple ProRes 4444 is a high-quality solution for storing and exchanging motion graphics and composites, with excellent multigeneration performance and a mathematically lossless alpha channel up to 16 bits.
batch In Compressor, one or more jobs to be processed. All jobs contained within the batch (shown in the batch area of the Compressor window) are submitted collectively when you begin the transcoding process. There are two types of batches in Compressor: standard batches, used for most transcoding jobs, and iTunes Store packages, a special workflow for submitting content to the iTunes Store. bit rate The number of bits per second in the transmission of a digital video or audio signal.
display aspect ratio The ratio between an image’s width and height. For example, standard-definition (SD) video typically has an aspect ratio of 4:3. High-definition (HD) video typically has an aspect ratio of 16:9. If SD video is played on an HD display, the image is either stretched, or is appended with black borders on left and right sides (pillarboxing). If HD video is played on an SD display, the image will be squeezed or black borders will appear at the top and bottom (letterboxing).
HLG (hybrid log-gamma) A mathematical HDR transfer function that converts image signal values in a video file to scene-relative light levels. HLG, which was developed by the BBC and the NHK (Japan Broadcasting Corporation), requires no metadata and is also compatible with SDR displays. In Compressor, HLG is used with the Rec. 2020 color space to create video files in the hybrid log-gamma HDR standard.
lower third A television industry term for a graphic placed in the lower area of the screen, usually to convey details about subjects or products. A common use of lower thirds is to identify individuals on the screen with their names and job titles. marker A marker flags a specific timing location in a source file. You can append a marker with editing notes or other descriptive information. Additionally, when you output the source file to an H.
PQ (perceptual quantizer) A mathematical transfer function that converts image signal values in a video file to absolute light levels on an HDR-capable display. Designed to approximate the sensitivity of human eyes, PQ allows for better levels of contrast at all light levels. In Compressor, PQ is used with the Rec. 2020 and P3 D65 wide-gamut color spaces to create video files in the industry-standard HDR formats, HDR10 and Dolby Vision.
source media file In Compressor, the original media file to be converted to a new file format. One source file is required for each job. SRT (SubRip Text subtitles) An industry-standard format for delivering onscreen text synchronized to the audio or video of a video program. SRT subtitles can be used to deliver foreign-language translations or a transcript of dialog, narration, or audio descriptions to people who are deaf or hard of hearing. SRT subtitles, which use the .
Apple Inc. © 2021 Apple Inc. All rights reserved. Use of the “keyboard” Apple logo (Shift-Option-K) for commercial purposes without the prior written consent of Apple may constitute trademark infringement and unfair competition in violation of federal and state laws. Apple, the Apple logo, Apple Music, Apple TV, Final Cut, Final Cut Pro, Finder, iMac, iPad, iPadOS, iPad Pro, iPhone, iPod, iPod touch, iTunes, Mac, MacBook Pro, Motion, QuickTime, Retina, tvOS, and Xsan are trademarks of Apple Inc.