
4.5


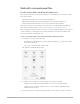
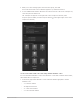

Table Of Contents
- Contents
- What’s new
- Compressor basics
- Simple transcoding
- Advanced adjustments
- Intro to advanced adjustments in Compressor
- Work with settings
- View and modify a setting’s properties in Compressor
- Create custom settings in Compressor
- Formats and settings in Compressor
- Properties of settings
- Apple Devices settings in Compressor
- Common Audio Formats settings in Compressor
- Dolby Digital settings in Compressor
- H.264 for Blu-ray setting in Compressor
- Image Sequence settings in Compressor
- MP3 settings in Compressor
- MPEG-2 setting in Compressor
- MPEG-4 settings in Compressor
- MXF settings in Compressor
- QuickTime Export Components setting in Compressor
- QuickTime Movie settings in Compressor
- Work with destinations
- Work with locations in Compressor
- Work with jobs
- Work with batches in Compressor
- Advanced tasks
- Import an image sequence in Compressor
- Work with surround sound files
- Work with 360-degree video
- Work with captions
- Create iTunes Store packages
- Create IMF packages
- Modify frame size
- Modify playback speed
- View and modify audio tracks in Compressor
- Add video and audio effects
- Work with metadata annotations in Compressor
- Add descriptive audio tracks in Compressor
- Set a poster frame in Compressor
- Add markers using Compressor
- Transcode time ranges in Compressor
- Modify starting timecode in Compressor
- Work smarter
- Compressor preferences
- Keyboard shortcuts
- Wide color gamut and HDR
- Create and use droplets in Compressor
- Create additional instances of Compressor
- Transcode Final Cut Pro and Motion projects in Compressor
- Use distributed processing
- Glossary

100Compressor User Guide
After you import a surround sound source file, you can transcode that file into any of the
channel layouts above.
Compressor analyzes audio files during import to determine the source file’s channels.
When you apply a transcode setting to the source file, Compressor automatically adjusts
the channel layout of the setting to provide logical results. For many settings, you can
choose Automatic from the “Channel layout” pop-up menu (in the Audio inspector) to
have Compressor determine the logical channel layout based on the source file.
Compressor also maps channels intelligently during output. For example:
• If you assign a mono channel layout to a stereo source file: The output file will be
automatically downmixed.
• If you assign a surround channel layout to a stereo source file: The output file will have
only left and right channels—mapped to the left front (L) and right front (R) channels of
the source file—while the other channels are unassigned.
• If you assign a left front or left rear surround channel to a stereo source file:
Compressor maps the source file to the left channel (and ignores the right channel).
Work with 360-degree video
Intro to Compressor 360° video
Compressor offers tools that let you prepare existing 360° video content (such as content
edited in Final Cut Pro) for export and distribution to sharing sites like YouTube and Vimeo.
360° video (sometimes called spherical video) is footage captured by special cameras that
point lenses in all directions to create a panoramic sphere of video. A viewer can watch
360° video in any of several ways:
• Through a virtual-reality (VR) headset: This hardware device displays video on a face-
mounted screen that’s updated dynamically to show different parts of a scene as the
viewer turns their head. Some VR headsets can also display stereoscopic (3D) 360°
video, enhancing the immersive experience.