
4.5


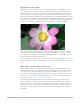

Table Of Contents
- Contents
- What’s new
- Compressor basics
- Simple transcoding
- Advanced adjustments
- Intro to advanced adjustments in Compressor
- Work with settings
- View and modify a setting’s properties in Compressor
- Create custom settings in Compressor
- Formats and settings in Compressor
- Properties of settings
- Apple Devices settings in Compressor
- Common Audio Formats settings in Compressor
- Dolby Digital settings in Compressor
- H.264 for Blu-ray setting in Compressor
- Image Sequence settings in Compressor
- MP3 settings in Compressor
- MPEG-2 setting in Compressor
- MPEG-4 settings in Compressor
- MXF settings in Compressor
- QuickTime Export Components setting in Compressor
- QuickTime Movie settings in Compressor
- Work with destinations
- Work with locations in Compressor
- Work with jobs
- Work with batches in Compressor
- Advanced tasks
- Import an image sequence in Compressor
- Work with surround sound files
- Work with 360-degree video
- Work with captions
- Create iTunes Store packages
- Create IMF packages
- Modify frame size
- Modify playback speed
- View and modify audio tracks in Compressor
- Add video and audio effects
- Work with metadata annotations in Compressor
- Add descriptive audio tracks in Compressor
- Set a poster frame in Compressor
- Add markers using Compressor
- Transcode time ranges in Compressor
- Modify starting timecode in Compressor
- Work smarter
- Compressor preferences
- Keyboard shortcuts
- Wide color gamut and HDR
- Create and use droplets in Compressor
- Create additional instances of Compressor
- Transcode Final Cut Pro and Motion projects in Compressor
- Use distributed processing
- Glossary

168Compressor User Guide
High dynamic range (HDR)
Additionally, some newer imaging devices can display extra levels of brightness in each
color component (red, green, and blue) in a way that more closely reproduces how the
human eye perceives contrast. These high-dynamic-range (HDR) displays have a much
larger luminance range and typically process video at 10 bits per color component rather
than at 8 bits. The larger luminance range and additional color data let HDR displays render
more discrete steps from the minimum to maximum brightness value in each color, creating
more realistic color transitions and revealing more detail in both shadows and highlights.
Compressor lets you view HDR video in the preview window on a supported display.
Devices that combine wide-gamut color with 10-bit HDR capability can produce vibrant
hues with nuanced shading, lending more realism and immediacy to an image, revealing
more detail, and reducing artifacts like gradient “banding” (often seen in images of the sky
as it transitions from lighter to darker areas.)
Several streaming content providers offer wide-color HDR video, including the iTunes Store,
Netflix, and Amazon Video. The Ultra HD Blu-ray disc format also supports wide-color HDR
video.
Wide-gamut color and HDR in Compressor
When you add a video file to Compressor for transcoding, the app identifies the source
video’s native color space (and displays an SDR or HDR badge in the Job inspector). After
you apply a transcode setting to the source file, you can modify that color space in the
file you output. Depending on the transcode setting you apply, Compressor offers several
common color space options—from standard gamut, to wide gamut, to wide-gamut HDR.
For details, see Change video color space in Compressor.
Transcoding a standard-gamut video to a wide-gamut color space won’t improve the
video’s appearance; the output video will look identical to the original because the wide-
gamut color space is a superset of the standard-gamut color space, and the colors won’t
be changed. Likewise, transcoding an 8-bit video to 10-bit HDR won’t change the video’s
appearance because Compressor can’t create additional resolution that wasn’t there to
begin with.