
4.5


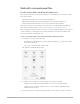
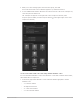
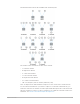

Table Of Contents
- Contents
- What’s new
- Compressor basics
- Simple transcoding
- Advanced adjustments
- Intro to advanced adjustments in Compressor
- Work with settings
- View and modify a setting’s properties in Compressor
- Create custom settings in Compressor
- Formats and settings in Compressor
- Properties of settings
- Apple Devices settings in Compressor
- Common Audio Formats settings in Compressor
- Dolby Digital settings in Compressor
- H.264 for Blu-ray setting in Compressor
- Image Sequence settings in Compressor
- MP3 settings in Compressor
- MPEG-2 setting in Compressor
- MPEG-4 settings in Compressor
- MXF settings in Compressor
- QuickTime Export Components setting in Compressor
- QuickTime Movie settings in Compressor
- Work with destinations
- Work with locations in Compressor
- Work with jobs
- Work with batches in Compressor
- Advanced tasks
- Import an image sequence in Compressor
- Work with surround sound files
- Work with 360-degree video
- Work with captions
- Create iTunes Store packages
- Create IMF packages
- Modify frame size
- Modify playback speed
- View and modify audio tracks in Compressor
- Add video and audio effects
- Work with metadata annotations in Compressor
- Add descriptive audio tracks in Compressor
- Set a poster frame in Compressor
- Add markers using Compressor
- Transcode time ranges in Compressor
- Modify starting timecode in Compressor
- Work smarter
- Compressor preferences
- Keyboard shortcuts
- Wide color gamut and HDR
- Create and use droplets in Compressor
- Create additional instances of Compressor
- Transcode Final Cut Pro and Motion projects in Compressor
- Use distributed processing
- Glossary

98Compressor User Guide
• -Rs: Right surround channel
• -S: Center surround channel
• -LFE: Low-frequency effects channel (subwoofer, LFE)
For example, if the audio file for your left front channel is named “final audio_left.aiff,”
name the file “final audio_left-L.aiff.”
Note: Compressor will recognize source files with or without a file extension (.aiff
or .wav, for example).
2. Drag all of the renamed source audio files (not the folder of files) to the batch area
in Compressor.
A new job appears in the batch area, and the Job inspector displays the audio channels
that have been assigned based on their channel codes. (If the Job inspector is not
visible, make sure the job is selected in batch area and the Inspector button
is
highlighted. If you need to reassign a channel, you can do so by clicking the channel’s
icon in the Job inspector.
You can optionally include a video file in the surround sound source file by clicking the
Add Video button in the Job inspector, selecting a video file, and clicking Open.
Modify a surround sound source file
1. In the Compressor batch area, select a job that contains a surround sound source file.
2. In the Surround Sound Properties area of the Job inspector, do either of the following:
• Assign a different file to a channel: Click the channel’s icon, select a different file,
then click Open.
• Remove a file from a channel: Click the Remove button
.
Audio channel layouts in Compressor
Most of the audio settings in Compressor provide mono and stereo (left and right) channel
configuration; some provide additional channel output options, including surround (5.1)
channel configuration. Several of Compressor’s settings offer multiple audio channel
configurations:
• QuickTime Movie settings: QuickTime Movie settings include additional audio channel
layouts, including 3.0, 4.0, and 5.1.
• Dolby Digital audio settings: Dolby Digital (AC-3) settings include even more audio
channel layouts, including 3.0, 3.1, 4.0, 4.1, and 5.1.