Projector Management Application Version 7.20 Instruction Guide Hitachi Maxell, Ltd.
Contents 1 2 3 4 INTRODUCTION .................................................................................................................................... 4 1.1 OUTLINE ............................................................................................................................................ 4 1.2 SYSTEM .............................................................................................................................................. 4 INSTALLATION ...............
4.2 OTHERS ........................................................................................................................................... 38 5 STATUS ................................................................................................................................................. 39 6 OUTPUT LOG ....................................................................................................................................... 40 7 CREATE LOG REPORT .....................
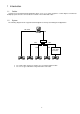
1 Introduction 1.1 Outline Using the Projector Management Application allows you to use a single computer to control diagnose and monitor multiple projectors that are connected to the network or via an RS-232C cable. 1.2 System The following diagram shows a typical network diagram for the Projector Management Application. RS-232C LAN HUB LAN LAN LAN LAN Ethernet / RS-232C Converter RS-232C Use a UTP cable category 5 or higher for a Local Area Network cable.
2 Installation 2.1 System Requirements The following are the minimum system requirements of hardware and software to use the Projector Management Application. (1) Operating System Windows 2000 Professional Windows XP Home Edition / Professional Windows Vista Home Basic / Home Premium / Business / Ultimate / Enterprise Windows 7 Starter / Home Basic / Home Premium / Professional / Ultimate / Enterprise Windows 8 / Windows 8 Pro / Windows 8 Enterprise Windows 8.1 / Windows 8.1 Pro / Windows 8.
2.2 Projector Management Application Installation The following describes the installation process for the Projector Management Application: (1) Double click the file “InstForPJMan_v7.20.exe”. (2) Select the language (English, Japanese or Chinese [Simplified]) during the installation process. And then click [OK]. (3) Click [Next] (4) Read “License Agreement” and select “I accept the term of the license agreement” and click [Next] if you agree the license agreement.
(6) Confirm the install folder and program folder again, and then click [Next]. (7) Click [Finish] to complete the Projector Management Application setup wizard.
3 Operating Instructions 3.1 Create login accounts The Projector Management Application requires a login name and password to launch the software. The Projector User Administration Tool helps you to create new user accounts. 3.1.1 How to launch Double Click “PJUsrEdit.exe” that is located on same folder that you installed Projector Management Application. It automatically launches the Projector User Administration Tool, if no user accounts are created yet.
3.1.4 Creating new user account Select [Edit] [Add New User] or rights click on the user list and select [Add New User]. The following dialog window appears. User Description User Rights Select All UnSel All --- Define user name, up to 20 characters --- Add comments, up to 50 characters --- Define accessibility. It defines the accessibility for the application software by each user account. The user can use allocation only marked application software. --- Select all application software.
3.2 Start Application Select Windows [Start] [Program] [Projector Tools] [Projector Management Application]. The login window will then appear. Enter the username and password that was created by “Projector User Administration Tool”. After logged in, the following window will appear. 3.3 Quit Application Select [File] - [Exit] to quit It is also possible to quit this software by clicking [x] on the top right corner of the window. When the confirmation dialogue appears, select [Yes] to finish.
3.4 Main Screen (1) Menu Menus and Functions in the Main Screen are shown below.
(2) Toolbar The functions of these icons correspond with the menus as follows: Icon Menu [Edit]-[Add Group] [Edit]-[Add Projector] [Edit]-[Delete] [Edit]-[Edit] [Edit]-[Cut] [Edit]-[Copy] [Edit]-[Paste] [View]-[Refresh] [Control]-[Power ON] [Control]-[Power OFF] [Schedule]-[Start] [Schedule]-[Stop] [Help]-[About Projector Management Application] 12
(3) Status Group PJMan provides two pre-defined projector views, and the flexible views that are based on the search queries. (a) All Projectors View Shows the list of all projectors that are defined in the PJMan software. (b) Error / Warning View Shows the list of projectors that are ONLY in Error or Warning state. (c) Find Result View Shows the multiple lists of projectors based on the given search queries (described in a later section).
(d) Projectors Group View Shows the list of groups and projectors in the selected group. Group Name Contains Comment --- Displays the group name. --- Displays the number of projectors and groups in the group. --- Displays the comment. Projector Name Model Connection --- Displays the projector name. --- Displays the model name. --- Displays the connection information. (IP address and MAC address / COM port) --- Displays the MAC address. --- Displays the power status (ON / STANDBY).
(e) Individual Projector View Shows the status of selected projector. Projector Name Model Comment --- Displays the projector name. --- Displays the model name. --- Displays the comment. Projector Name Model Connection --- Displays the projector name. --- Displays the model name. --- Displays the connection information. (IP address and MAC address / COM port) --- Displays the MAC address. --- Displays the power status (ON / STANDBY). --- Displays the input source. --- Displays the error status.
(4) Schedule View (a) For a group of projectors Current Date & Time Group Path Group Path Current Time Date Time Control --- Shows the full path name of selected group. Displays the current date and time. --- Displays the activation date. --- Displays the activation time. --- Displays the execute command.
(b) For an individual projector Current Date & Time Projector Path Group Path Current Time Date Time Control --- Shows the full path name of selected projector Displays the current date and time. --- Displays the activation date. --- Displays the activation time. --- Displays the execute command.
3.5 Add a group of projectors You can define a group of projectors into the tree view. Select [Edit] [Add Group] to add a group. Group Name Comment ----- Enter a group name up to 256 characters. Enter a comment up to 256 characters. Note: The maximum depth of sub groups is five levels. 3.6 Add an individual projector You can define an individual projector into the tree view. Select [Edit] [Add Projector] to add a projector.
[Discovery] Status Check Lamp Alarm Time Filter Alarm Time --- User can search for the projector (CPX2, CPX4, CP-DW10N, CP-A100, CP-AW100N, CP-X205, CP-X206, CP-S245, CP-X255, CP-X256, CP-X265, CP-X268A, CP-X305, CP-X306, CP-X308, CP-X417, CP-X467, CP-X505, CP-X605, CP-X608, CP-X615, CP-WX625, CP-SX635, CP-X705, CP-X807, CP-X809, CP-X2010N, CP-X2011N, CP-X2510N, CP-X2511N, CP-X3010N, CP-X3011N, CP-WX3011N, CP-X4011N, CP-X10000, CP-WX11000, CP-SX12000, ED-A100, ED-A110, ED-AW100N, ED-AW110N, ED-D10N, ED-D
The discovery feature allows you to search projectors on the network automatically. The discovery works when you are selecting a group or root. Select [Edit] [Discovery] from the menu. The discovery window is shown below. Click start button to begin the discovery process. For searching certain IP address range, please specify the IP address range to enter Start and End address, and then check the checkbox ”Specify an address range and search” and click the [Start] button.
3.7 Delete a group or individual projector You can delete a group of projectors or an individual projector. Click a group or projector in the tree view, select [Edit] [Delete]. You can also delete a group or projector by clicking the delete icon on the toolbar. When the confirmation dialogue appears, select [OK] to delete. 3.8 Change a group or individual projector settings You can change a group or individual projectors settings. Click a group on the tree view, select [Edit] [Edit].
3.11 Applying alarm / reminder settings to projectors in a group You can set alarm / reminder settings to multiple projectors in a group at the same time. Select the group that you want to set the alarm / reminder for and then select [Edit] [Alarm Time Setting] from the menu. The Alarm Time Settings dialogue will appear. Check the checkbox and enter the hours that the alarm / reminder will be activated.
3.14 Control the projector Select [Control] [Projector Control] to control the projector. The controllable functions will be depending upon what group or projector is selected. (a) In case of All Projectors selected Power Input Source Whisper Blank Mute Freeze Display Image Messenger ----------------- Turn on / off power for a group of projectors. Change input source. Change Whisper / Eco mode. Change blank on / off. Change sound mute status. Change freeze status.
(c) In case of Search Result item selected Power Input Source Whisper Blank Mute Freeze Display Image Messenger ----------------- Turn on / off power for a group of projectors. Change input source. Change Whisper / Eco mode. Change blank on / off. Change sound mute status. Change freeze status. Select My Image (e-SHOT) to display / OFF. Select Messenger to display / OFF.
(e) In case of an individual projector is selected Projector Information Projector Name --- Displays the projector name. Model --- Displays the model name. Comment --- Displays the comment. Power Input Source Aspect Whisper/Eco Mode Mirror/Installation Blank Mute Freeze Display Image Messenger Brightness Contrast Sharpness Color Tint Auto Adjust Lamp Time Reset Filter Time Reset Advanced Control --- Turn on / off power for a group of projectors. --- Change input source. Change aspect ratio.
3.15 Turn on the power Select [Control] [Power ON] to turn on the power. You can also turn on the power by clicking the power on icon on the toolbar. If you select a group of projectors, all projectors in the group are powered on. 3.16 Turn off the power Select [Control] [Power OFF] to turn off the power. You can also turn off the power by clicking the power off icon on the toolbar. If you select a group of projectors, all projectors in the group are powered off. 3.
3.19 Schedule Events In order to schedule events, select [Schedule] [Edit] from the menu. The Edit Schedule dialogue will appear. Group selected Projector selected Group Information Group Name --- Displays the group name. Contains --- Displays the number of projectors and groups in the group. Comment --- Displays the comment. Projector Information Projector Name --- Displays the projector name. Model --- Displays the model name. Comment --- Displays the comment.
3.20 Activate monitoring scheduled events Select [Schedule] [Start]. You can also activate monitoring events by clicking the schedule start icon on the toolbar. You cannot add, delete or edit an event during while the event monitoring process is active. Please see the chapter 5 for the details. 3.21 Stop monitoring scheduled events Select [Schedule] [Stop]. You can also stop the monitoring events by clicking [schedule stop] icon on the toolbar. Please see the chapter 5 for the details. 3.
3.23 Mail Setting A notification mail will be sent when any error or selected condition occurs. Select [Option] [Mail Settings] to open the mail settings dialogue. (1) Mail Settings Mail Settings dialog is as follows.
(3) Mail Text Settings Mail Text Settings dialogue is as follows.
3.24 My Image (e-SHOT) transfer You can send a My Image (e-SHOT) file to a projector that supports My Image (e-SHOT) feature.
JPEG file CP-X2011N / CP-X2511N / CP-X3011N / CP-WX3011N / CP-X4011N / ED-X45N / CP-X4021N / CP-X5021N / CP-WX4021N / CP-A220N / CP-A221N / CP-A222WN / CP-A300N / CP-A301N / CP-A302WN / ED-A220N / CP-AW250N / CP-AW251N / CP-AW252WN / iPJ-AW250N / BZ-1 / CP-AW2519N / CP-X2514WN / CP-X3014WN / CP-X4014WN / CP-WX3014WN / CP-X2021WN / CP-X2521WN / CP-X3021WN / CPX10WN / CPX11WN / CPWX12WN / CP-X8150 / CP-X8160 / CP-WX8240 / CP-WX8255 / CP-SX8350 / CP-WU8440 / CP-WU8450 / CP-X2015WN / CP-X2525WN / CP-X3015WN / C
3.25 User-defined Model 3.25.1 Add an User-defined Model You can create your own projector definition and add it as User-defined model. In order to add new User-defined model, click [Add Model…] button on the Add Projector window. Once you have added a User-defined model, the new model is added in the standard model list.
(2) Communication Settings RS-232C bits/s Data bits Parity Stop bit Flow Control Network --------------- COM port parameter setting (if RS232C uses) Baud rate Data bit Parity bit Stop bit Flow control Select network protocol (TCP or UDP) (3) Command Definitions 1 Name Command --- Enter the name of command, up to 32 ASCII characters. --- Define the command up to 32 ASCII characters. The allowed characters are depending on the command type selection (binary or Text) on the General Setting TAB.
(4) Command Definitions 2 Name Command ----- Enter the name of command, up to 32 ASCII characters. Define the command up to 32 ASCII characters. The allowed characters are depending on the command type selection (binary or Text) on the General Setting TAB. 3.25.2 Edit User-defined Model In order to edit User-defined model, select [Option] [Edit User-defined Model]. The following window will appear. (1) Edit Choose a User-defined Model form the list, and then click [Edit…] button.
3.25.3 Control User-defined Model (1) Power On Select [Control] [Power ON] to turn on the power. You can also turn on the power by clicking the power on icon on the toolbar. If you select a group of projectors, all projectors in the group are powered on. (2) Power Off Select [Control] [Power OFF] to turn off the power. You can also turn off the power by clicking the power off icon on the toolbar. If you select a group of projectors, all projectors in the group are powered off. (3) Command No.
3.27 Setup PJMessage to Projector For projectors that support Messenge function, PJMan allows you to setup PJMessenger message from PJMessenger file (pjm file), that is exported from another application software - Projector Messenger Tool (PJMessenger). Select projector(s) from the tree view, then go [Option] [Send Messenger data]. The following dialog will be displayed. It will populate only the projectors that supports PJMessenger function.
4 Mail Feature 4.1 Mail Format The Projector Management Application sends an e-mail by following format. Time : YYYY / MM / DD hh:nn:ss Projector Name : xxxxxx Connection: xxxxxx Message: xxxxxxxxxxxxxxxxxx (Typed in text on Message Setting screen) (Sample 1) Time: 2003 / 11 / 11 23:12:22 Projector Name: Projector1 Connection: 192.168.1.10 (00-00-87-16-8E-90) Message: Fan Error!!! (Sample 2) Time: 2003/11/12 20:00:17 Projector Name: Projector2 Connection: COM1 Message: Lamp Error!!! 4.
5 Status The projector status is classified with colored label. Status Normal Display (Black text with white background) Warning (Black text on yellow background) Error (White text on brown background) Disconnect (White text on red background) All of projectors are normal (Black text on white background) At least one projector is in the warning state and the rest of projectors are either warning or normal state.
6 Output Log In order to enable logging status data, please enable log setting through [File] [Log]. It does not record log data when it is unchecked. Output folder : (PJman installed folder)\Log\ Filename : TCP / IP network --- (IP address)_(Port No.).log (ex: 192.168.1.10_23.log) Serial (RS232C) --- COMM_(Port No.).log (ex: COMM_1.
7 Create Log Report In order to create Log Report, choose a projector or group that you want to create Report from the tree view. Ands then, select [File] [Log Report]. The following dialogue appears. Period --- The reporting period. Start : Start Date End : End Date Output folder --- Output folder The Log Report will create in the output folder when OK button is pressed. The folder contains individual Log Report of each projector separately.
8 Create Status Report You can create the status report as HTML format. The report shows a current snapshot of projector status in a particular group, searched group or groups. In order to show the status report, select the group or projector. And then go to [File] [Output Report] from the menu. The status report will be shown in the web browser. The status report will be given by group as shown below.